Everything on model trains, model railroads, model railways, locomotives, model train layouts, scenery, wiring, DCC and more. Enjoy the world's best hobby... model railroading!

model scale railroad houses to construct ho scale n scale oo gauge

Tunnel Construction Made Quick And Easy

Geof has very kindly agreed to share this idea for tunnel construction with readers:
Picture #1: This is a shot of the materials you’ll need for this project. The stapler OR the glue can be used to attach the liner to the layout table. I prefer the stapler myself but if the tunnel is already in place, you may have to use the glue instead.

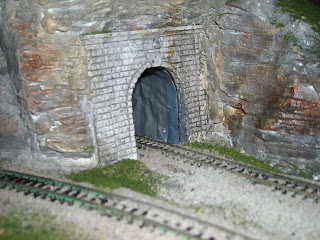
I have come up with a quick and easy method of construction that yields a great visual result for any scale with less effort. The technique I am going to describe is best when used on tunnels currently under construction although it can be used on existing tunnels but it is a little difficult to install.
To start, go to your local grocery or household discount store and purchase some heavy duty disposable cookie trays or sheet pans (aluminum foil in the roll form is too flimsy). A sheet pan that is 12″ x 18″ should yield about six linings in HO scale, 8 or more in N Scale and at least two in O gauge.
Next, get the INSIDE measurement of the portal and its sides. I use a flexible measuring tape for doing this. A single track N scale portal arch is about five inches, other scales or portal types would be longer. Whatever this measurement is add at LEAST another inch. This extra amount will act as ‘feet’ to mount the lining.
Using using a pair of utility scissors, cut the foil into strips as wide as the measurement you got from the step above. The lining length (or depth) is up to you. Seven inches is a good length for N scale. If the portal is on a high location on your layout where people can look down it, you may want to extend this for better effect.
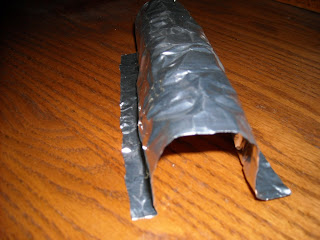
Next, gently crumple the foil to give the illusion of blasted rock. The tighter you crumple it, the more creases will form so, again, it is up to you how much of this you want. Avoid crumpling the foil too much because it may be difficult to straighten it out for the next step.
Once you are happy with the crumple effect, flatten the foil out and then curl it into an arch that roughly matches the shape of the portal. Next, fold the outside edges of the lining (about 1/2 inch worth) outward to make ‘feet’ that run the length of the lining on both sides. When looked at from the front, it should look like the Greek letter omega ( like this -> Ω ). These feet are used to attach the foil lining to the layout’s surface so it won’t shift about.

Next, using a spray paint that is similar in color to you layout’s mountain (although it doesn’t have to be exact), spray the inside of the lining with a few coats of paint (I use gray primer).

Once the paint is dry, place the lining in position behind the portal itself, making sure it is pressing up against the inside back face of the portal. Run a few trains though, particularly those with long engines or passenger cars to make sure that there is enough clearance and nothing hits. Once you are satisfied with the positioning, either staple or glue the lining feet to your table top. Run a train through once again just to be sure the lining didn’t shift.

This method also works for curved track coming out of tunnels but installation is a bit different. Once you have the lining arch and feet formed, cut the arch in half the long way, that is along the lining roof. You should now have two pieces that look almost like the letter ” J “. Using the scissors, make 1/2” cuts along the lining feet every inch or so. This will allow you to bend the lining to roughly match the radius of the curve.

The more slits or cuts you make will make the lining easier to bend. You may have to use this slit method along the top edge of the lining as well to prevent buckling. Don’t be too concerned with how the top of the lining looks since in most cases it will be out of sight anyway.
I hope this tip, albeit a long one, comes in handy for some of you out there.
>>> On behalf of readers, thanks Geof for your contribution.
If others would like to send in their clever ideas or tips for publication please use the form at http://www.model-railroad-resources.com/my-layout.html
You can also comment on Geof’s idea by using the green Comments link below this posting. After clicking the link you need to register (if you haven’t yet done so). It is quick and easy (takes about 2 minutes), and then you can participate in future model train discussions.

One Response to Tunnel Construction Made Quick And Easy

Leave a Reply

Your email address will not be published. Required fields are marked *

Add a photo or image related to your comment (JPEG only)

Reader Poll

Which scale of model trains do you operate or prefer?

View Results

Loading ... Loading ...

SUBMIT YOUR QUESTION

Download Your Free Catalog

Use Tiny Railroad Micro Controllers

N Scale Track Plans

Watch Video

Model Train DCC HELP

Model Train Help Ebook

NEW TO MODEL TRAINS?

FREE Tour Inside Club

Take a FREE tour inside the club.

Scenery Techniques Explained

Scenery & Layout Ideas

Model Railroading Blog Archive