Everything on model trains, model railroads, model railways, locomotives, model train layouts, scenery, wiring, DCC and more. Enjoy the world's best hobby... model railroading!
Model Railroad Bridge Installation, Bridge Abutments, Pier Foundations
 Tom has a question for readers:
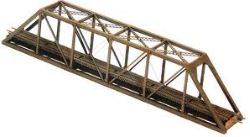
“I need help on installation of N scale bridges. I specifically require help on preparing the roadbed, bridge abutments, and pier foundation. I recently completed a Pratt Truss Bridge kit, and two deck bridges. Can someone advise please?”
To guide Tom, please add your comment here on this posting.
2 Responses to Model Railroad Bridge Installation, Bridge Abutments, Pier Foundations
Leave a Reply


Tom, I’m unfamiliar with Pratt, but I too work in N-Scale, using Kato track. Judging by your photo, the Pratt is single-track, which can be a lot easier than a double-track bridge if switches are involved.
You would have to go by the track leading up to and after you cross the bridge (see Robert Anderson’s tip about track gauge). The track across the bridge should be on the same level as the ground track, so for the piers you might have to do some measuring to get it right. The piers should support the bridge on either side without buckling the track on entering or exiting the bridge.
The height of the cutout that the bridge crosses, whether it be water or another train, should be in accordance with the bridge piers. For water, I usually leave about a half inch (at least) of shore line for N-Scale, so the water doesn’t seem like it’s overflowing its banks. If passing over other trains, put the lowest part of the bridge about 2-1/2 inches or even three inches above the tops of the lower train so an “accident” don’t occur. Make all of these measurements on the track rail height.
I hope this post helps. Remember to test-fit everything before nailing or gluing it down.
John
A lot of wisdom John!!!! Thanks!!!!