
Everything on model trains, model railroads, model railways, locomotives, model train layouts, scenery, wiring, DCC and more. Enjoy the world's best hobby... model railroading!
Art is trying to locate a trolly/train to complement a Hawthorn Village scene – HO or smaller. Here is his question:
Am looking for 1 (or more ) car trolley. H/O track ends at 15″, for a U turn. Hawthorne Ceramic Holiday villages appear to be HO scale or slightly smaller. My layout is on a credenza 14″ wide so it needs to negotiate a 14″ U-Turn at the end if a credenza. . could extend with a ply wood base but prefer not to do so. Any suggestions from your readers will be appreciated.
To help Art simply click on the green comments link to add you feedback on this posting.
A few weeks ago Tim sent in some info about the model train layout he is building with the help of his wife, uncle and nephew. He has now sent in some more details he would like to share with others in the hobby. He aslo gives some tips based on his experiences working on the RR project:
A combination of things then slowed my progress. My nephew came over two weekends after finishing the construction of the table and we began laying track on the table. I own several Accurail 89 ‘ foot car carriers so I wanted curves that could accommodate them.
Some days later, I took my wife out to dinner and after wards we headed to Lowes. I immediately searched for a dry wall saw and bought one along with several other tools.

Lessons learned and equipment being used:
I am principally modeling the Missouri Pacific though I have engines from the Southern Railway, Rock Island, and Illinois Central. I am attempting to model from the early seventies to the early nineteen eighties. I am loosely basing my layout on the old CE&I line bought out by Missouri Pacific in 1967. I initially wanted to have a small town with a single farm and a grain elevator for the industry, but I quickly learned that I didn’t have enough room on my 4X8 table.
I immediately simplified it to a couple farms and the grain elevator. In order to add some variety, I placed a river to the west end of the table and a highway overpass to cross a road over the mainline and servicing siding for the grain elevator.
The Highway Overpass
As part of my rr layout, I am building a highway overpass to cross a country highway over the main line and the spur lines at the elevator. The kit that I am using is a Rix Modern Overpass kit. It comes in 50′ foot road sections (measure 7 inches long) and the piers.
I started by painting the pieces; however, this turned out to be a bad idea. I primed them with gray primer spray paint and I then painted them with concrete gray. This creates a couple major problems. First, it makes it difficult to glue the pieces together.
Each foundation consists of holes where piers go. The holes helps hold the tubes in place plus they permit you to adjust the height of the bridge. Painted even with just the primer causes the holes to be almost too small for inserting them. You will most likely tear up the tubes or the pieces that you are inserting them into.
Once I got my first hill up, I realized that my pier was too high (full height is 6 inches). I tried cutting it down, but that caused the plastic to tear. I then had to start over.
Recommendation
Measure the height of the area to be crossed to determine the height for your piers prior to building them (if you need taller piers the company recommends that you use Plastruct tubing).
I also recommend measuring the distance you intend to cross so you can glue the appropriate number of road sections together. This permits you to line up your “I” beams and glue it more securely. Use a strong glue like a gap glue for assembling them due to the weight.
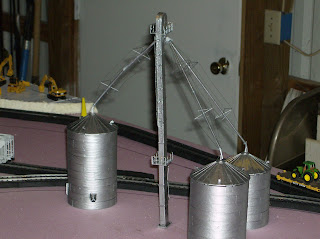
The Grain Elevator
This is also a Rix kit. As stated earlier, I found gluing this together to be difficult. Just before Thanksgiving, I traveled to a new hobby store in Marion, IL called “Chuck’s Depot.” The owner suggested that I use a glue made by Faller called “Expert: Plastic cement” for working with the Rix products. This glue worked adequately to build the conveyor leg shown below.
You must buy the conveyor leg and its bins separately. Technically, it comes with plenty of parts between the grain bin and the leg, but if you make some mistakes or lose some parts you’ll come up short quickly.
Rix’s produces an expansion kit and another that provides extra parts for the bins; however, they don’t yet provide any for the conveyor leg. It requires two auger pipes to connect the leg to a 44′ foot grain bin. Each tube provided is 5 inches long so I cut one inch from each pipe to make them eight inches. I found the Faller’s glue not strong enough for the auger pipes. I recommend a gap glue for those. I put the augers on last and this created all kinds of problems.
In building a second conveyor leg, I glued the parts that hold the pipes in place to the “head” prior to assembling anything else. It allows you to hold pressure to insure adequate bonding without damaging the details on the leg.
I am also planning to use Evergreen styrene tubes for the augers instead of the tubes provided (more on that in a later article). Use a strong glue due to the weight of holding the pipes up (I used Gap glue). I also used Gap glue to glue the platforms together. Don’t wait for the platforms to dry before assembling to the leg. They must be flexible enough to wrap around the leg. I used the gap glue to glue the cage that goes around the ladder. You may use any glue for putting the sections of the leg up. For support wires, I used regular thread, I found the support wires provided with the kit too flimsy. I tried 15 pound test fishing line. This has too much torque and it wants to pull away from the glue and bends the augers.
To submit details of your layout for publication go to http://www.model-railroad-resources.com/my-layout.html
Tom would like to hear the opinions of others in the hobby regarding loco motors:
“As a new model railroader I am looking at various locos. What puzzles me is there are different types of motors used. Can anyone shed some light on this question?”
To add your feedback click on the green comment link below.
Alan has a question and would like to hear readers views:
“Can someone please guide me re installing Digital into 0 Gauge three-rail locos? I have British prototype steam locos from ACE and Basset Lowke and am in set up mode, so it is opportune for me to go either way, and Digital clearly offers a whole new operational world, if it can be done?”
To add your feedback click on the green comments link below.
Matt wants to hear from others in the hobby regarding their manufacturer preferences, opinions and stockist suggestions for buying train supplies:
“I used to have a HO set in Germany, but have not used it since I moved to Canada 20 years ago. Now with having a 6 year old son and a rather large basement I am absolutely looking forward getting into it again. I brought my set with me and I plan to set it up agin here as part of the ‘new’ big set, with the old one being the Europe section and the new being the Noth America section.
My question for the blog readers is -I would like to have their advice on what brand (for engines and tracks) to go with, as I live in a small town in BC and have no access to a store to compare and get advice. Also, can anyone recommend a store where I can buy all my supplies including buildings, landscape items, vehicles, trains etc. My first choise in Germany would be Marklin, with Fleischman being second, but here I have no clue what is available and what is good or not.Also, can different manufacturers be compatible among each other? Thanks to everyone who helps in advance.”
To add some feedback click on the green comment link below.
Doug wants to hear reader recommendations on building a layout his Grandchildren can enjoy:
“Perhaps someone can advise me on the following. I am looking atbuilding the Transbay Interwoven ( Atlas 7X7 step#13) but I cannot findanywhere a plan showing scenery or finished layout to give me finalperspective.
This is my first attempt at building, we had one as kids and now I wantto do this with my Grandchildren, or is there a better layout your readers can recommend that will give two trains agood run and rise through mountains and over rivers etc. Thank you so much for offering this service.”
About the Transbay Interwoven Layout:
Features one train passing over another. The Transbay Interwoven does this by using elevated track provided by the Atlas pier Set. A minimum table size of 6′ x 10′ is needed to construct the Transbay Interwoven with track around 79 feet.
To add some feedback click on the green comment link below.
Jerry has a quick question that has been covered previously on the blog:
“My engine runs fine on a short track but when hook it all together about 50 ft. it wont run. Can readers tell me, is my transformer too small?”
To add your feedback click the green comments link blow.
Colin has a question for Australian model railroaders about 4008 and 4242 locos used by Pacific National:
Your readers may not be able to answer my question about local railroad locos and rolling stock under Queensland Railways logos here in Australia, but here goes anyhow. I would like to find the big locos being used by Pacific National for freight services here in Australia at the moment, 4008, 4242 etc, even if I have to paint the decals myself. Does anyone have any ideas where I could buy these locos and rolling stock that are used on our local rail network? Everyone seems a little vague about where I may purchase these items here, there are very few around. I would like to build up a local railway yard and surrounds if it’s possible. Thank you in advance to anyone who answers.”
Also, to you Robert, I would like to thank you for your useful information on model layouts. The scenes I have seen are very good, I’d like to incorporate where possible.”
Suggestions from Australian readers can be posted using the green comments link below.
This model railroader is new to DCC and would like to hear from others with more experience:
“Firstly to you Robert – I bought you on-line book and it is great! I also have a DCC question I am hoping your readers can answer for me. Which DCC system do they recommend? I was a model railroad enthusiast as a boy (30 years ago) and now am picking up the hobby again. I plan on running some of my old DC locomotives, and I don’t plan on installing Decoders on them. I recently purchased new Atlas Decoder installed w/out sound locomotive. The guys at the train shop are pushing me to buy the MRC Prodigy Advance 2. They state that this system will give me the ability to use all 28 NMRA functions. I have looked into the Digitrax Zephyr and the Bachmann E-Z Command systems. I don’t see myself investing in many sound equipped DCC installed locomotive, well maybe just one in the future. So what does everyone suggest?”
Suggestions from readers experienced in DCC operation can be posted using the green comments link below.
The MRC Prodigy Advance 2 DCC system is designed for the multi-user. It has 14-28/128 speed steps for precise speed control and can simultaneusly run up to 99 throttles using plug’n play technology.28 accessory functions to handle multi-function sound systems such as: Athearn Genesis and MRC Sound Decoders. The MRC Prodigy Advance 2 has a fast clock with adjustable ratios for running your railroad on an accurate timetable. You can program on the main or on the program track without affecting active locomotives. The MRC Prodigy Advance 2 has a quick readout on the value of each decoder and recall and stack features.
Phillip would like to hear from others about gradients and a saw mill/logging scene he wants to have on his layout:
“I haven’t begun my model layout yet, I am busy researching as much as I can. I would like to include a saw mill/logging scene and a mineral/quarry scene and incorporate a change in level. Does anyone have have any pearls of wisdom on creating different levels and efficient and easy inclines? Also it seems that there is a greater choice of OO/HO kits in America and I am having problems finding any saw mill/logging kits – does anyone know of any?”
I wonder if Phillip got his inspiration for the saw mill/logging scene from the Mountain Ash Railway Tour on video 31 (week 18) at http://www.model-train-help.com/member-only-videos.html
Brian from ‘down-under’ in New South Wales, Australia wants to hear from readers with suggestions on the Hornby train he is looking at purchasing:
“I am looking to build a layout incorporating NSW trains & have seen ho models available in Hobbyco Sydney.I was also looking at a hornby set(virgin train in oo) with a digital transformer.Would a ho model loco & carriages run on this set.”
To help Brian with his Hornby Trains question, simply click on the green comments link below and add your feedback to the blog.
Del would like to hear from anyone with experience operating Marklin locomotives:
“I bought some Marklin trains about 15 yrs ago and due to a number of moves am finally ready to get serious about doing a layout. The problem is that in the meantime the technology has changed to where all the Marklin locomotives have now gone digital, something I know little about.
If it were North Americal trains I was dealing with, there are any number of resources I could tap to gain the knowledge I need. I am located in Saskatchewan Canada and even with a population of 1M people, we have no Marklin dealer in Saskatchewan.
I have been trying to locate the names of some Marklin members to tap their knowledge re Digital etc but have not been able to find any. The nearest dealer is about 300 miles away.
When I know the layout of the tracks etc , I will concentrate on the scenery etc. If any of your readers can help me I would be very happy to hear from them.”
Suggestions from readers can be posted using the green comments link below.
A reader has this question for others:
“I will be using auto reverse units on a dcc layout with one loop and probably two reverse sections. I know I will have to block an area long enough for the train to fit in and it is isolated from the main bus wiring except for powering the reverse unit, and using a sub bus with feeders.
My question for others in the hobby is; when you get into the blocked area, the auto reverse unit tells the decoder in the locomotive of a polarity change. Does anyone know what activates the reverser? I can understand by using a DPDT switch, I need to just throw the switch in the blocked area and the decoder reads a short. Can some tell me from which side of the turnout do I need to wire in your sub bus for an auto reverse?
I hope I don’t sound to whacked out! Any help from others is welcome.”
Suggestions from readers can be posted using the green comments link below.
Leslie wants to hear from others in the hobby about n-scale automobiles:
“I am having difficulty finding classic and modern n-scale automobiles of all American makes and models.I am getting started in n-scale railroading and at present I have 6 sets of trains and plan to create a small town as part of my model railroad display. I have found kits at Michael’s Hobbies and Crafts to create mountains, streams, and waterfalls about this town. Now I face a dilemma of finding nicely detailed classic and modern American automobiles of all makes and models, with rolling wheels, to populate this town scene. I also wish I could find more variety of n-scale fire rescue vehicles. Can anyone suggest websites of companies that produce the items I am searching for? It would be greatly appreciated.”
Suggestions from readers can be posted using the green comments link below.
John wants to hear from readers on Electric Switch Machines:
“I have a train board having 1 1/2″ foam board on top of 3/8″ plywood. Does anyone know how best could I add electric switch machines to my switches? The Tortoise switch machine tells you to drill a hole from the top down and then drill a 1/4″ hole up to bottom of switch. The problem is I’m not able to find a drill bit .032-040 that long.”
Suggestions from readers can be posted using the green comments link below.
Maritz wants to hear from anyone who has scratchbuilt a turntable:
“Is there any modeler that can help me with plans for a turntable in HO scale. I can’t find any on the internet. I would like to scratch build my own turntable from wood. Any plans can help, doesn’t matter how complete. Your help will be appreciated.”
Suggestions from readers can be posted using the green comments link below.
Mike is building an HO layout and has a question to test your knowledge:
“I am just starting my dream layout and my question for readers involves laying curves in HO track. I have heard that you should follow some procedure when starting a curve from a straight (tangent?) track. It involves measuring the curve to meet the straight track, with some kind of adjustment to it. I want to run long (20-30) car trains. Does anyone know of this procedure?”
Suggestions from readers can be posted using the green comments link below.

This effect can be achieved by using heat to deform the plastic outwards to simulate denting from the inside. Again, I warn that this can be tricky and the result is not always as planned. So, be warned, you might want to try out on an old piece of plastic before working on an expensive car. Use a soldering iron (not set too hot) to gently press against the inside of the walls. You could also use a heated screwdriver, but again you need to take care and don’t break right through the plastic.
You may be best to test different techniques on an old train/car before doing any permanent damage to your best rolling stock.


