Everything on model trains, model railroads, model railways, locomotives, model train layouts, scenery, wiring, DCC and more. Enjoy the world's best hobby... model railroading!

model scale railroad houses to construct ho scale n scale oo gauge

Family Work On Model RR Project

A few weeks ago Tim sent in some info about the model train layout he is building with the help of his wife, uncle and nephew. He has now sent in some more details he would like to share with others in the hobby. He aslo gives some tips based on his experiences working on the RR project:

I wanted to share with your readers the beginnings of my model train set. It doesn’t look like much yet, but I am very proud of how far I have gotten so far. I started last spring by building the table. I built my table along the guidelines of the video ‘Building your First model railroad.’

The video provided a very simplistic description of how to build the table etc. I bought birch plywood, but I purchased a 4×8 sheet of plywood that was 3/4 inch thick instead of the recommended 1/2 inch. My uncle helped me build the table. We used the 3/4 inch plywood for the frame and it threw off all the measurements presented in the video so we ended up cutting it down significantly to make it come out right. I searched several places to find wood molding for the braces without much luck. It still remains undone.

A combination of things then slowed my progress. My nephew came over two weekends after finishing the construction of the table and we began laying track on the table. I own several Accurail 89 ‘ foot car carriers so I wanted curves that could accommodate them.

I bought enough twenty-two degree radius curves and laid the track. Unfortunately, it made the track follow the edges of the table literally. While re-snapping the track into place, my Rock Island Geep took a spill splatting onto the floor breaking off several parts. At about the same time, I began building the Rix Grain bins and conveyor leg. I found putting the bins together to be extremely easy. You simply glue the bands together to form a circle. Each band has a piece that sticks up to allow you to glue the next piece on and guide their placement. On the last one, it recommends that you cut them off or bend them to accommodate the roof.

Unfortunately, I found that bending them seemed to pull the rings apart so I personally recommend just cutting them off. Recently, I started building a second set of grain bins for another modeler. I found that if you glue two bands together, let them thoroughly, then use surgical clamps, bending will work successfully. The clamp part must be parallel to the bands.

When I started the conveyor leg, I ran into immediate problems. I found that my Testers Glue simply didn’t bond very well to the small details parts like the platforms. So, after making several frustrating tries, I put it up uncompleted. The high gas prices and long hours at work seemed to drain my interest as well, but that all changed on Thanksgiving.

Many times when my nephew went to his Grandmothers and I came over, he asked to come to my home to run the trains. I normally tried to side step the issue and eventually he would forget.

Thanksgiving after our meal, he asked me to take him to my house to mess with it. He immediately wanted to run the engines so I put my other Rock Island engine on the tracks and he tried to run it. I told him to hold the speed down to prevent the possibility of derailing.

Still concerned out the possibility of losing another engine, I began gathering all the 18 degree curves that I could find. I searched the garage without much luck. I found a few, but it was far from enough to finish the job. I then remembered that I had removed all the track when the train was on the front porch. (My wife found the train set an item of clutter and she insisted that I run it there and eventually she became even more disenchanted with it on the porch and insisted that it go to the garage.)

So I searched and I found as many curves as possible. I then began replacing the 22’s with the 18’s and re-arranging the tracks. My nephew insisted upon continuing to run the engine all this time. He moved the engine slowly up and he then reversed it saying, “I am bringing the work train up to help you.”

I continued placing the track down until I reached the place where I planned to put a lake and river. My nephew loves bridges so I grabbed a butcher knife from the house and I began cutting the foam insulation boards with it (My wife suggested that I place both foam boards on the table). Using the butcher knife was like cutting wood with a dull blade (it just wasn’t cutting it.) So, I simply cut enough so I could place one bridge so my nephew could run “Stanley” over it.

Some days later, I took my wife out to dinner and after wards we headed to Lowes. I immediately searched for a dry wall saw and bought one along with several other tools.

Surprisingly, my wife now agreed to help me work on the table, but when we got home, she began watching television. Undeterred, I went outside in the rain to walk to my garage. I began the process of completing my river. The next thing I know, my wife comes out in her pajamas, fuzzy slippers, and robe. She begins cutting. Well, she cuts straight up and down instead of a 45 degree angle. With foam flying everywhere and me cringing inside, I eventually worked up the courage to explain to her that she was doing it wrong. I politely attempted to explain the proper method and she comes back with a very reasonable answer. Her method added some variations to the bank. I did go back and cut some of the banks to a steeper angle, but I left most of it.

Lessons learned and equipment being used:

I am principally modeling the Missouri Pacific though I have engines from the Southern Railway, Rock Island, and Illinois Central. I am attempting to model from the early seventies to the early nineteen eighties. I am loosely basing my layout on the old CE&I line bought out by Missouri Pacific in 1967. I initially wanted to have a small town with a single farm and a grain elevator for the industry, but I quickly learned that I didn’t have enough room on my 4X8 table.

I immediately simplified it to a couple farms and the grain elevator. In order to add some variety, I placed a river to the west end of the table and a highway overpass to cross a road over the mainline and servicing siding for the grain elevator.

The Highway Overpass

As part of my rr layout, I am building a highway overpass to cross a country highway over the main line and the spur lines at the elevator. The kit that I am using is a Rix Modern Overpass kit. It comes in 50′ foot road sections (measure 7 inches long) and the piers.

I started by painting the pieces; however, this turned out to be a bad idea. I primed them with gray primer spray paint and I then painted them with concrete gray. This creates a couple major problems. First, it makes it difficult to glue the pieces together.

Each foundation consists of holes where piers go. The holes helps hold the tubes in place plus they permit you to adjust the height of the bridge. Painted even with just the primer causes the holes to be almost too small for inserting them. You will most likely tear up the tubes or the pieces that you are inserting them into.

Once I got my first hill up, I realized that my pier was too high (full height is 6 inches). I tried cutting it down, but that caused the plastic to tear. I then had to start over.

Recommendation

Measure the height of the area to be crossed to determine the height for your piers prior to building them (if you need taller piers the company recommends that you use Plastruct tubing).

I also recommend measuring the distance you intend to cross so you can glue the appropriate number of road sections together. This permits you to line up your “I” beams and glue it more securely. Use a strong glue like a gap glue for assembling them due to the weight.
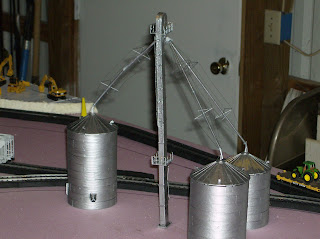

The Grain Elevator

This is also a Rix kit. As stated earlier, I found gluing this together to be difficult. Just before Thanksgiving, I traveled to a new hobby store in Marion, IL called “Chuck’s Depot.” The owner suggested that I use a glue made by Faller called “Expert: Plastic cement” for working with the Rix products. This glue worked adequately to build the conveyor leg shown below.

You must buy the conveyor leg and its bins separately. Technically, it comes with plenty of parts between the grain bin and the leg, but if you make some mistakes or lose some parts you’ll come up short quickly.

Rix’s produces an expansion kit and another that provides extra parts for the bins; however, they don’t yet provide any for the conveyor leg. It requires two auger pipes to connect the leg to a 44′ foot grain bin. Each tube provided is 5 inches long so I cut one inch from each pipe to make them eight inches. I found the Faller’s glue not strong enough for the auger pipes. I recommend a gap glue for those. I put the augers on last and this created all kinds of problems.

In building a second conveyor leg, I glued the parts that hold the pipes in place to the “head” prior to assembling anything else. It allows you to hold pressure to insure adequate bonding without damaging the details on the leg.

I am also planning to use Evergreen styrene tubes for the augers instead of the tubes provided (more on that in a later article). Use a strong glue due to the weight of holding the pipes up (I used Gap glue). I also used Gap glue to glue the platforms together. Don’t wait for the platforms to dry before assembling to the leg. They must be flexible enough to wrap around the leg. I used the gap glue to glue the cage that goes around the ladder. You may use any glue for putting the sections of the leg up. For support wires, I used regular thread, I found the support wires provided with the kit too flimsy. I tried 15 pound test fishing line. This has too much torque and it wants to pull away from the glue and bends the augers.

To submit details of your layout for publication go to http://www.model-railroad-resources.com/my-layout.html

Leave a Reply

Your email address will not be published. Required fields are marked *

Add a photo or image related to your comment (JPEG only)

Reader Poll

Which scale of model trains do you operate or prefer?

View Results

Loading ... Loading ...

SUBMIT YOUR QUESTION

Download Your Free Catalog

Use Tiny Railroad Micro Controllers

N Scale Track Plans

Watch Video

Model Train DCC HELP

Model Train Help Ebook

NEW TO MODEL TRAINS?

FREE Tour Inside Club

Take a FREE tour inside the club.

Scenery Techniques Explained

Scenery & Layout Ideas

Model Railroading Blog Archive