Monthly Archives: August 2014
Everything on model trains, model railroads, model railways, locomotives, model train layouts, scenery, wiring, DCC and more. Enjoy the world's best hobby... model railroading!

 Julie has a question for experienced model railroaders and asks:
“Does anyone have experience with Electro-Luminescent Wire (EL wire) to simulate things like banks of florescent lighting, or shop signs? Do you recommend for or against?”
Add your comment to help.
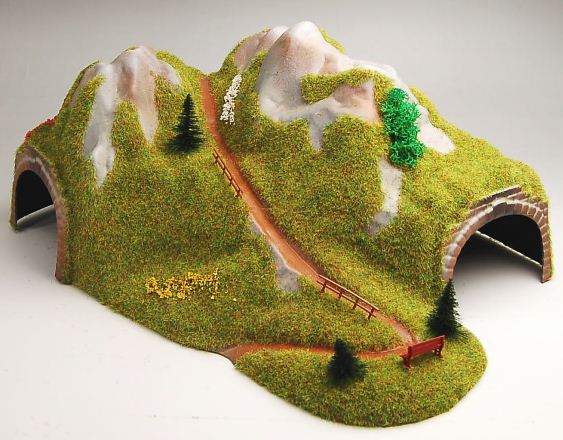 Tunnels can really add interest to a layout with trains disappearing inside a mountain and mysteriously reappearing on the other side. However, there needs to be careful planning to ensure there are no problems inside the tunnel that could potentially cause a train to derail. It is the old “Murphy’s Law” where trains will more than likely derail in the most inaccessible area of the layout. The most hard to get at place is usually inside a tunnel.
That’s why considerable thought is required in the event of such a scenario. This needs to happen at the planning stages, before the tunnel is positioned in place.
 A couple of options would be to include a removable tunnel section to allow access, or an opening in the base where your hand could reach up to retrieve the cars. An access hole in the side of a mountain can sometimes be disguised by clever positioning of scenic features like trees, grass, shrubbery, rocks etc. It could be as simple as removing a couple of strategically placed rocks that hide the access hole, and then slotting them back in position when the job is done.
Another option is to add a layer of plastic between the tunnel and the mountain structure, so that the mountain section can be lifted off in one piece, to reveal the tunnel. Then just lift up the tunnel and retrieve the cars or access the track.
If readers have other suggestions, please leave a comment for other to see.
Although it is almost impossible to avoid all derailments, there are ways to limit the likelihood of them happening. This video has makes some excellent points.
The resource mentioned in the video
Mark used the “Submit Your Question” link in the right hand column to post this question:
“I only have enough space for a new 10ft x 9ft layout but don’t know whether to switch from HO scale to N scale. I already have some HO gear from my last layout but I had more space for that. With less space I can’t decide if I should make the switch to N scale which would give me more room for the scenery etc. What is best for in my 10 x 9 space? Does anyone have a similar size space?”
Warren sent in this question:
“I am in the process of constructing my rural country/mountain layout in HO scale 12ft x 4ft. I’m working on two tunnels right now and am about to lay the track where the tunnels will go. However, I have already had quite a few problems with my cars derailing at the switches so I don’t want to proceed until I can solve the derailments. I have replaced a few wheels on the cars, but the problem still exists. I would really appreciate it if one of your readers could give me some advice. Thanks in anticipation.”
This old piece of footage from 1938 shows how a steam train was built in the workshops at Crewe Engine Works in England just prior to the outbreak of WW2.
Steve used the link on this page to submit this question to readers:
“I only started my layout 11 months ago and am planning a mining or old west town… I haven’t yet decided because I haven’t yet done any scenery or structure stuff on my layout. Has anyone got any good ideas for what types of scenery or structures I could incorporate into a small mining town or wild west town? I am open to ideas. Thanks.”
Richard asks readers:
“I have a whole bunch of older style HO scale cars which I want to change over with automatic couplers. My question is what kind is best and will it be a difficult and time consuming process? Does someone who has done the conversion know?”
Tim used the form on this page to submit this question to readers.
“I saw an earlier question about road widths and thought I would ask my question on track widths. What spacing should I use between N track where my two tracks run side by side? What spacing should I use for my curves? The NMRA standards is gobbledygook to me.”
Model trains will usually operate faster on long straight flat stretches of track, but that can be boring after a while, not to mention the amount of space required to run a long mainline. There’s nothing wrong with having flat level areas of track, but changing the elevations by including gradients (slope of railroad track) can add considerable interest to a layout. Adding grades to a model railroad can increase the option of including tunnels, bridges etc as the trains meander through the countryside or mountain ranges.
However, railroad grades need careful consideration if you are to avoid operational problems such as derailments or stalling locomotives. It’s not just the loco that will need to safely navigate up or down the raised track, it is also the fully laden cars carrying coal, timber, metal, refrigerated foods, fuels, vehicles, livestock, or even people (well, plastic models of people). A long train can be very heavy and this needs to be taken into consideration when going up or down a gradient of a real railroad, or on a scaled down model railroad.
Let’s look at a real life example: A loaded train might have 135 coal wagons, with each one weighing 22 tons (empty) or 143 tons (loaded with coal). 135 cars x 143 tons equates to 19305 tons with the 3 locomotives moving the train (approx. 630 tons). Add that up and the weight could be up to 20,000 tons (40 million pounds).
Those are staggering figures, and the same rules of physics apply on a model layout.
A model train locomotive will need enough power to safely pull its cars up (or down) a grade without slowing to a stop or a derailment happening. A “gutless” engine won’t haul many cars up a steep grade, so if you want steep grades, you’ll require strong locomotives.
In general, more weight means greater wheel traction. A heavier loco might be able to climb a steep grade, whereas the wheels on a lighter weight loco might slip. Following this logic; a larger scale loco might cope better on steeper grades than would a smaller scale loco.
These days it’s often more cost efficient for a railroad to operate longer trains with multiple locomotives. With more pulling (or pushing) power a train can climb a steeper grade and/or have more cars attached. It is not uncommon to see multiple locos on smaller N scale layouts. They are typically at the front of the train, but sometimes there’s a loco positioned in the middle to add more pulling/pushing power.
Using extra locomotives is nothing new. In the days of steam engines the railroads often had “helper” engines standing by to help haul trains up the steeper gradients.
Another method is to use a ‘ghost car’ (sometimes called a cheater car) on your model railroad. This is basically a motorized boxcar or freight car that can be positioned somewhere towards the center of a long train. If the model train is really long, then more than one ‘ghost car’ can be used. They just need to be evenly spaced along the train.
A track gradient is measured as a percentage of rise over the length of the track. So if the model train track stretches for 100 inches, and over that distance the train climbs by one inch, then the gradient would be 1%. That’s a comfortable gradient for most model trains to navigate. Compare that to a short 25 inches of model train track with the same 1 inch rise – that would be really steep and equate to a 4% rise. A steep 4 percent rise could be problematic and likely cause a lot of frustration.
Track grades on real railroads fall into there categories; light grade is 0.8% – 1%, heavy grade 1% – 1.8%, and above 1.8% is classified as mountain grade. Real railroads need to make money, so having trains stall or derail can prove costly.
Broken down trains can block the line (upsetting schedules), derailed trains can be expensive to get back on the tracks, damaged goods (or passengers) is bad for business, and damaged trains or track can run into big money to replace or repair. That’s why real railroads choose to minimize operating costs and minimize risks, by avoiding overly steep gradients. They avoid anything that could have an adverse effect on operations.
The same goes for model railroads; keeping track gradients 2% or below is a good rule of thumb. It can also look more realistic (as long as you have the space) than a really steep grade. As I mentioned earlier, a 1 percent grade poses few problems on most layouts.
As with life-size railroads, the grades on a model railroad will be determined by the weight and length of trains. Other factors will be the number (and type) of locos being operated and the track speed limit. That’s not to say model trains can’t or don’t operate on grades of 4%, 5%, or even 6% – they do. But the steeper grades are more likely to operate short trains, geared locos, and at slow speeds. A good example might be a train hauling logs or coal from a mountain region. So, grades of 4% or higher are manageable on some layouts.
Helper locos are often used when trains need to haul heavy loads especially above grades of 1.5%. Mainline grades are generally below 2%.
The thing to remember is that on real railroads the trains gain considerable momentum on long straight level sections of track. If the track runs level for several miles and then has a small ½ mile run of steeper 2 percent grade, then the power of the train will take it up the grade without too much effort. So, from a railroad management view point, the 2% grade is unlikely to disrupt schedules or add greatly to the running costs. The same can’t be said for a 1.5% to 2% grade that stretches several miles. A lot more pulling power would be required to haul the same train.
More info on model train grades, realistic scale speeds
Curves and bends also influence operations on level ground as well as on gradients. An easement for a curve needs to be gradual, as does the transition into a gradient. A sudden change to track slope or angle is a recipe for disaster, posing a higher risk of unplanned uncoupling or even derailments. Special care needs to be taken when constructing curves within a gradient. This is because curves increase the wheel and rail friction making it more difficult to haul a train up a curving gradient, and less troublesome taking it down.
However, a including curves on grades can give a longer run where space is limited on a model railroad. This can reduce the grade percentage needed. Gradients can add considerable interest to a scale railroad, especially where one track passes over another on trestles or bridges. However height is needed for an over/under configuration, so there needs to be sufficient space for the train to climb and turn.
Including grades is good; including curves is good; but the mix of curves and grades needs to right. Too many, or overly tight, curves can cause problems. The same goes for ‘S’ curves – care needs to be taken when planning the configuration. As long as there are no track or wheel faults, a train will generally run along a straight section of track without difficulties. Add a tight curve, an ‘S’ bend, or steep gradient, and train speed and operation changes.
To achieve continuous running, a layout will need 180 degree curves so the train can turn around without stopping. Due to space limitations, this is not possible on every layout, especially on narrow railroads. The minimum radius of curves will also vary depending on the scale.
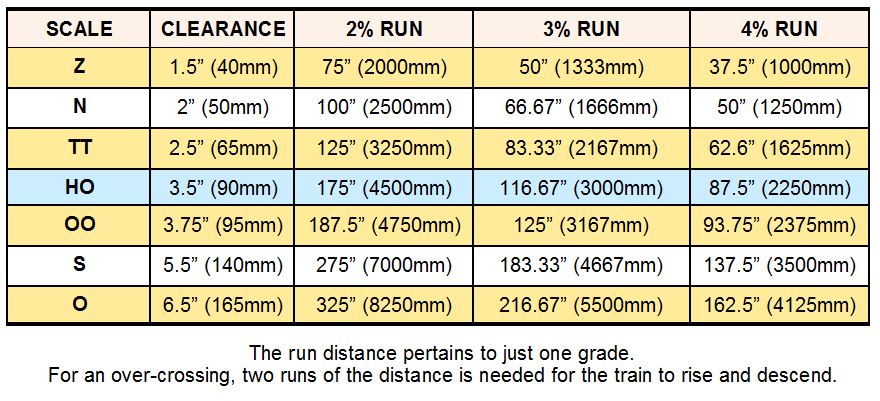
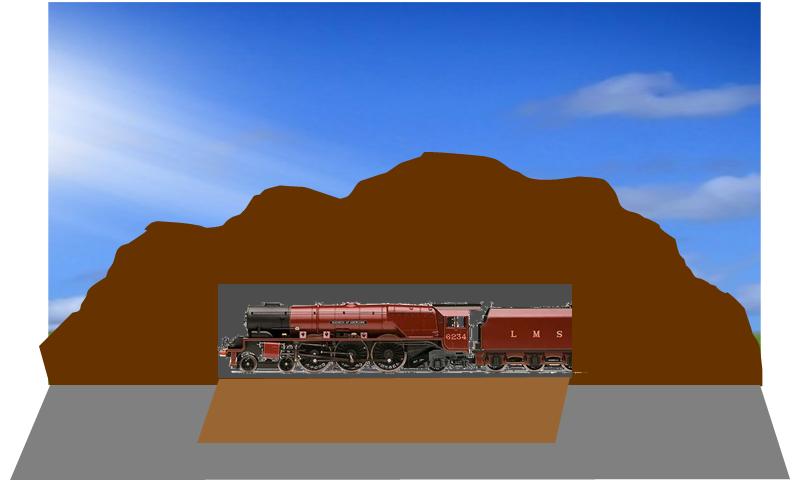
The above chart shows various scale clearances needed when planning tunnels and bridges. Remember that when a track rises it generally needs to come back down again, so the length of the grade will need to be doubled to allow for both the rise and descent.
When constructing a layout it is always best to try and avoid potential problems, rather than try to fix problems after they have happened. Simply things can save a lot of frustration, like testing the trains on your layout BEFORE gluing down the track and grade foam. The trains need to comfortably navigate the track without mishaps. They need to be able to take the curves without derailing and climb the grades without coming to a standstill. Obviously you will need to decide how many cars each train is likely to have to conclude whether the track configuration is adequate for your needs. There’s no point in having a fancy layout that isn’t practical to operate.
Colin asks readers:
“I’ve purchased an HO loco fitted with a DCC chip, and it operates great on DCC, however I can’t get it to move on DC. How can I
fix this?
If you want to submit a question to the Blog Moderator for possible publication, please use the link in the right hand column of this bog.
John asks readers for advice:
“Does mixing track from Bachmann and other manufacturers work. I like the Bachmann ez track but find really good deals on other brands . Would someone let me know through the blog, thanks.”
You are the first to see this brand new series of very authentic looking scale model buildings in low relief. The detailing is all pre-done as is the weathering, so it is just a matter of printing out the plans and constructing each model with corflute, foam sheet, or card.
This new series is available now at
http://www.modelbuildings.org/low-relief-buildings-G.html
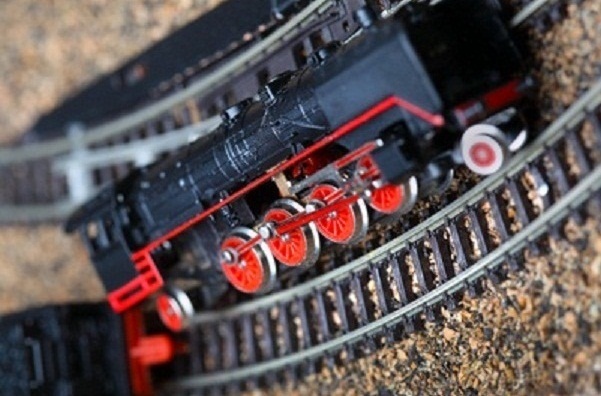
It doesn’t matter how carefully you’ve constructed your model railroad, there will be limits to what your model trains can realistically do. One of the most common ways beginners learn this is through experiencing derailments.
 It takes a while to appreciate that most track curve sections on a model layout are typically more exaggerated than the curves that actual real-size trains run on. The basic laws of physics take over when long trains, or high speeds are combined with tight track curves. Something has to give, and more often than not, the train derails. It happens to all of us at times, even those who have been in the hobby for years.
Whilst it may not be possible to completely eliminate derailments, there are preventative measures that can keep derailments to a minimum.
Driver Error
Most road accidents are caused by driver error and sometimes vehicle defects. The same applies to operating a model railroad. To prevent derailments the operator needs to operate the trains with care and attention. The track needs to be in good order as do the trains.
Model trains need to operate at realistic speeds especially around curves or S bends. Operating a train at full speed can be risky, and speed changes need to be gradual. Model trains need to completely stop before they change direction. The operator will need to examine the routing of switches before the train crosses them. This is a sure-fire way of reducing derailments and saving the trains from expensive damage.
Before operating a layout it is well worthwhile watching real trains in action, and try to replicate the scale speeds. A real-size train will typically take a mile or more to come to a complete stop. In a rail yard the train will generally move at under 4mph when coupling cars together. So those kinds of observations should be taken into consideration when operating a model railroad.
Even though it can be somewhat entertaining to watch a model train derail, especially when it is not your own prized possession, it can cause considerable damage. Kids especially like watching train crashes, so staging a train crash can be a way of involving and educating children with the hobby. Derailments can be a way of explaining the physics of train operation and the need for safety. You might be surprised with how the message sinks in when an actual derailment happens.
Mechanical Faults
Even with the best of care derailments can still occasionally happen. Often the cause of the derailment can be difficult to locate. That’s why it is better to avoid derailments in the first place. Correct and careful laying of track can prevent future problems. The clearances and curves need to be accurate. If multiple cars derail at the same spot, then it is probably due to a track problem. If the same car derails in more than just one spot, then it’s likely the car has a fault. There may be exceptions, but that’s generally a good guide. If just one car is derailing in the same place, then a check of both the track and car would be warranted.
So to summarize:
 If the problem occurs at a particular spot, then in all likelihood the track will need a closer inspection. It may take just a small tweaking to remedy the problem.
If the same loco or car derails regularly, then some adjustments may be required to the car or loco. A simple wheel adjustment might fix the problem. Otherwise it could be a coupler problem, or the weight of the car causing the derailment.
Other factors to consider are everyday wear-and-tear on the trains and track. That’s where regular maintenance comes into play as a preventative measure. Tracks and wheels get dirty, so regular inspections of trains and track is generally well worthwhile. Also, be aware of changes in humidity and temperature as these can affect smooth running.
More help with track work and fixing problems.
Locating Problems
Often the best way to locate a problem is to backtrack what happened by repeating the process. Run the train over the same section of track at about the same speed. Get down close to the track so you can spot any problems. You might need to do this several times until you locate the cause. You might need to slow the loco or car down to spot the problem.
The problems that are most difficult to locate and fix are often those that can’t be repeated. Obviously everything needs to be in gauge as you keep a close watch as the train passes the spot.
Although you might be somewhat of a perfectionist, no matter how careful you are, derailments can still happen. That’s why you shouldn’t get too stressed with derailments, but instead, aim to reduce the likelihood of similar problems occurring in the future.
Ray asks readers: “I am wanting to know the best method for building roads that’s not too difficult for a beginner like me. I am progressing well with my 4ft x 8ft HO scale layout and have more space to expand it in the future. Also, how do I go about building crossings where the tracks meet the roads?. Also how wide should I make the roads for single lane and two lane roads? Thanks in anticipation.”


