
Everything on model trains, model railroads, model railways, locomotives, model train layouts, scenery, wiring, DCC and more. Enjoy the world's best hobby... model railroading!
LEDs have numerous applications in model railroading including:
• Locomotive headlights and internal passenger car lighting
• Warning lights for the rear end of trains (cabooses, passenger cars etc)
• Structure illumination
• Signage illumination
• Railroad signals
• Panel indicators
LEDs also have many advantages over traditional incandescent lights including:
• The cost: It is hard to put an exact figure on it, but LEDs typically are around 20 to 40% of the cost of traditional incandescent light bulbs (depending on the project).
• Long life: Again depending on the usage, LEDs will typically last tens of thousands of hours. They will well and truly outlast traditional incandescent bulbs which almost eliminates the need to replace bulbs.
• Heat: LED bulbs give off virtually no heat so are a lot safer inside plastic structures or enclosures.
• Current: LEDs will typically draw just 10-30 milliamperes (0.010 – 0.030 amperes), which is much less than an incandescent bulb, so on larger projects you might get by with a smaller power supply.
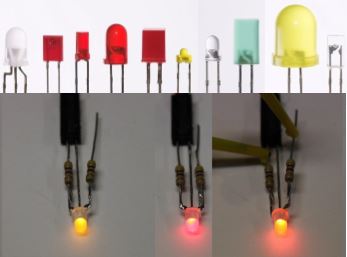
• Color and consistency: You might have noticed how the color of incandescent bulbs becomes whiter when the brilliance increases. This is because they predominantly glow at red wavelengths. When the brightness increases so does their heat output. This also reduces the life expectancy of incandescent bulbs. By comparison Red, blue, yellow and green LEDs are monochrome so their color remains constant regardless of their brilliance.


Although I am still learning these LED’s I find that all that is said above is true. There is a lot more you can do with LED’s verses regular bulbs. When LED’s are against plastics they are generally cooler. My experience so far has been installing them as Head lights in the engines. and they look so much better. Mounting them so they send the light out through the lens of the headlight is as much the work to install them as the wiring. Many standard bulbs are hot enough that they have to keep them in the open to keep them from getting too hot. When keeping them in the open the light also lights up inside engine cabs and places that might not have room for interior details. With what I have done with them so far I am already thinking of ways to light up the steps on the engines and set lighting on the superliners to work with the engines in a stopped or running configuration much like an operating MARS light. Using some fiber optics also will help get the lights to tiny places.
In buildings most folks have used regular condescend bulbs to light interiors and sometimes spot lights to light the outside. With LED’s they are cooler so let your imagination run with you. I have the Burlington station with pillars on the front. with these LED’s I can now install small ones to act like spots to light these pillars. My imagination is already running with all the things I can do with this station.
So if you want to try some of these LEDs, Just start with replacing your headlights on your engines The more things you do the more confidence you will get to do other projects. Now much of what I an talking of engines I am already doing DCC. When doing them in standard DC you might just have different effects. Such as when reversing the direction of the engine the LED’s will not light because they have what I call a positive and negative side to them where they do not short or anything but with power reversed they do not light. So you have to learn which side is a positive side and which one is a negative side. But don’t panic as all you are doing is switching the wires to the opposite sides of the LED Terminal.
Now using the Resisters they can be installed to either terminal wire of the LED It does not matter. But the resister value will adjust the brightness of the LED so try different values when experimenting so you can see the light you will get.
Since DCC has a few more volts, regular bulbs can have a shorter use life. Sometimes a resister is needed for them to help keep the from burning out ( I have already lost a few headlights because of that. My fix will be LED’s with resistors installed. Using LED packages that contain the white lights and the resistors is a good way to start. Later on you can expand your horizons with other resistors. This is something that can be a successful project when learning how to do them. But start with your head lights first and learn how to do them. Headlights are usually an easy way to follow the wiring to get the job done. One last thing: when soldiering your resistors and LED’s make sure you use heat sinks (usually clip on metal clamps or even a pair of long nose pliers that you might need to have someone help hold them These clips or heat sinks absorb the soldiering iron heat from over heating the electronic components. The heat will go out the heat sink rather that through your LED or Resistor. Good Luck and don’t panic in your first projects. If nothing else find someone you can watch as they install these.and build your confidence to do them on your own from Newman Atkinson
Good information. I would like more information on resistors. I know there are hundreds of them but I think for head like and markers, and other light on engines, subsection of size would be good.
Jim I will get the resistance of what came with my LEDs and get back to you. From these values then you would have to get higher resistors or lower resistors to vary the brightness to what you want. Some of it is just experimentation till you get what you would like.
Oh a note for above I just installed a couple of LEDs for front and rear head lights and I couldn’t find my notes so I hooked them up as I thought I remembered and when powered they did not work. Just by reversing the LED terminal pins with your Plus and negative wires took care of it. It does not hurt to have the wires reversed It just won’t work.
from Newman
To solve your problem when using LED’s in DC locos use a small diode bridge. These units are normally used to rectify AC from a transformer to DC. All you need to do is connect the positive and negative that the engine pics up to the AC terminals of the bridge and the LED and resistor to the + and – terminals. The result is that it does not matter which way the DC is supplied to the engine the diode bridge will sort it out. The same can be done to the lights in rolling stock.
See the image for more detail.
I have written an application to help model railroaders with these type of calculations. It can be downloaded from http://www.vansoft.co.za under downloads and is a windows based application at a price that is acceptable to all railroaders, completely free with no strings attached.
from Louis