Scenery
Everything on model trains, model railroads, model railways, locomotives, model train layouts, scenery, wiring, DCC and more. Enjoy the world's best hobby... model railroading!

This is your opportunity to help others in the hobby. Here are three questions from fellow model railroaders who would like your suggestions. Simply click on the green comments tag below to offer an answer.
“I have a 6×10 train o gauge layout. When it comes around the far end of the layout the trains get very slow and sometimes almost stop. What can I do to fix this problem. How can I fix a Lionel coal tender it has a whistle on it, but it rattles & whistles. I see a wheel under neath the goal tender, should I spray WD-40 in the wheel that spins? Please can your readers let me know their ideas. Also I have built a lot of houses and different things out of cardboard, with paint they look pretty good instead of spending money on plastic models. The videos are great thanks a lot!”
“I am having difficulty in finding a book that contains layout plans (particularly n-scale) that includes a track materials list along with the plan. Otherwise it’s just a big guess on what to purchase. I received layout books from Kalumbach ( 101 plans & 48 top-noch plans) but they didn’t help. Any suggestions from your blog readers?”
“I’m doing a landscape design project for a class I am taking and would like to use a railroad flatbed as a bridge over a small creek. Do your readers know where I can get some drawings of flatbeds? I’d like to be as accurate as possible. Thanks for any help your readers can give me.”
To offer your suggestions or thoughts, simply click on the green comments tag below.
Two of the videos in the new model railroad videos series are:
Video #7. Agriculture & Industrial Layouts
There are many clever model railroading scenery ideas in this video. Watch a sugar cane train on its journeys from fields to sugar mill. This layout features: a wheat growing district, a loaded coal train, open-cut mine and port facility. There’s even an outback town with livestock yards portrayed.
Video #8. Soldering The Track

In this model train video tutorial James shows you how to solder and wire track for a reliable connection every time. James talks you through the process step-by-step and reveals a little trick to get a good solder.
Feedback from model railroad fan Roger:
“I just wanted to drop you a line and say how much I have enjoyed your videos. I have already received the first 10 model train videos and they are great. When I received your first E-mail about the series, I was not sure as to whether I wanted to spend the money or not. I must say, just as your Model Train Help book is great, the train videos are great and well worth the money. Your videos have convinced me that I must visit Australia and see this stuff first hand.”
Roger B, Ohio
After a year in the making a series of 42 amateur model railroading videos were finally released today.
These videos do not pretend to be Hollywood productions as they focus more on providing good content rather than flashy presentation.
The 42 model train videos cover a range of model railroading topics and include tours of several private layouts… not normally open to the public.

These videos, available by download, also feature visits to some train shows and include lots of useful ideas and tips to help hobbyists build, or improve their own model railroad. Other video topics cover baseboard construction, electrics, foliage making, DC and DCC operation. The series even includes three videos about building a garden railroad.
These videos range in length but average around nine or ten minutes each. The step-by-step tutorials in the videos provide answers to many common (and not so common) model railroading problems.
Access to these videos is by “membership only” so is restricted to a limited number of keen model railroaders.
To find out more about these model train videos and to read the list of contents and see a sample video click on this model train video link.
Happy railroading!
Model Railroading Article By Bill Murphy
One of the more fun aspects of model railroading is planning and executing the scenery and landscaping that your track and engines will meander through – for some it is almost like playing God in that you can decide and create on any scene you desire.
From fanciful hobbit themes, alien worlds or realistic recreations there is nothing that you cannot create and display, all it takes is a plan, some materials, a little skill and some time.
First and foremost you need a plan or at least a concept.
– Do you want to duplicate an existing landscape?- Do you want a faithful historical recreation of a place now lost in time?- Are you more inclined to creating a never-before seen or unlikely scenario to wow the masses?
Making a choice on one theme for your layout and staying true to that theme is perhaps the most important keys to success. If you change your methods and style in the middle of your landscape the result will be inconsistencies that will detract from the overall impression you are trying to form.
Ideally those you invite to view your work will see a delightful scene and the harder they look the more detail enforcing that scene they will find. Nothing is more enjoyable then hearing those delighted squeals as a viewer notices ever more subtle details as they come closer and closer … and the key to that is consistency.
Once you have a plan for the theme you need to decide on track placement and terrain. Many modelers create the terrain and then try to force the track to follow through that, just as occurs in real life – but one of the advantages of modeling vs. real life is that you can consider all aspects and requirements up front. If you know you will have a bend or a switch at certain points why design rough terrain that you will then try to overcome with ‘grading’ in your models at those points?
Next you should collect your materials – some items you can find around the house, others you may wish to purchase from dealers such as www.oakridgehobbies.com and www.jttmicroscale.com or your local hobby shop but always stay true to your plan. Just because you find an amazing little miniature you long to use doesn’t mean it belongs in this model!
Common materials you will need include:
1. Tables or Stands
2. Plywood (preferably ¾” outdoor grade) for base if using stands
3. Glues
4. Twigs, ‘dirt’ gravel, crushed or powdered stones, herbs etc. for plants and groundcover
5. Paints of various kinds for touch-up, covering the base and backgrounds etc.
6. Poster board, wax paper, aluminum foil, tissues etc. for texturing and shaping
7. Styrofoam blocks and sheets for shaping
Optional items you may wish to use include:
8. Plaster of Paris and / or fiberglass
9. Talcum powder, pepper and salt, cayenne pepper – for texturing and colorants
10. Corkboard and cork ‘paper’
11. Roof repair tar (for road surfaces etc.)
12. Paintable caulks and adhesives for securing items in place
Are you looking for some creative ideas for making model railroad scenery? Visit http://www.themodelrailroader.com for some helpful ideas and tons of other information about model trains.


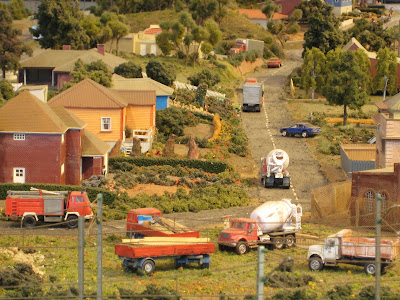
The types of different small scenes that can be included on a model railroad layout are limited only by the modelers imagination. For example, scenes on a model railroad layout could feature: a town scene, cityscape, airport, gasworks, school, port facility, retirement village, sports fields, tennis court, swimming pool, waterfall, gas station, shops, countryside, bushland, farms, factories, coal mining, sawmill, parks, a river, dam, fire scene, monorail, gondolas, suburban streets…these can all add interest to a model railroad layout.

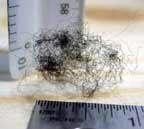
 Lichen is one of the easiest and most realistic materials to use in making small scale trees and shrubs on model railroads, or other hobby scenery. Lichen is ideal when mass foliage or quick and inexpensive greenery is needed.
Here is a quick model railroading tip that you might want to try for creating realistic looking concrete.
As soon as you paint the base color of your concrete, lightly dust some baking soda onto the wet paint. This gives the surface some additional texture and the weathering will have more depth.
Use Floquil’s Antique White with a drop or two of Box Car Red for the base followed by dry brushing rust streaks as needed from attached iron parts, earth colours at the ground level, grimy streaks following water down the wall, and a bit of white where calcium would leach from cracks.
Simple but effective.
If you want to make shop signs, road signs, railroad signs etc for placement around your model railroad layout, you might want to use your computer laser or ink-jet printer. Coat the ink-jet sign with Polly-Scale Flat Finish so that weathering will not cause the color to run.
Under no circumstances use the popular technique of dulling the sign with steel wool. The waterproof seal will be broken and the in-jet inks will run and ruin the sign. Instead use pastels for dulling the signs. This is less of a problem with laser printers or color copiers.
Here is a question on glue and grass and what works best. If you would like to submit an answer simply click the comments tag below the question and contribute your ideas. Here is the reader question:

“I have been working on cementing down the “earth material” as my base for the grass that I will be laying on top for my layout. However, the directions on the cement state that I need to use a sprayer to distribute the cement over the earth material so I can sprinkle the grass material on top.
I bought the sprayer and it sprays a nice fine mist when I tested it out with water but the cement does not come out as nice, even when mixed with water.
I am using the earth and grass materials because it was cheaper than using the grass mat you can buy. Now I know why it is cheaper!
It is very tedious work and wondered if your blog readers have any suggestions that might make this process a little easier.”
Submit your answer to this model railroading question by clicking the comments tag below.

A reader asks this question. Any model railroader who can help is asked to leave a comment on this blog.
“I was wondering if your blog readers know of any websites with layouts having circus or carnival themes. I am building my O scale layout and I want to add my amusement park rides. Lionel ferris wheel, scrambler, swing and merry go round. I was thinking of building above my trains and having them go underneath the amusement park. Any information would be appreciated.”
Here is a question that readers might like to have a go at answering:
“I have a question. I am starting a small HO layout with my 11 yr old daughter. It is for Christmas time but will be up all year round. It is going to be a winter theme with snow ice etc. How would you go about 1) Putting snow down and 2) Make a frozen pond? I have a little bit of idea but could use some experienced help.”
Your contributions to this model railroading blog are encouraged and appreciated.
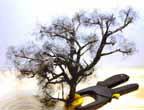
Vance Altman of FSMTREES has kindly allowed me to publish the following tree making tutorial from his website.
Sagebrush Tree Construction
This tutorial will go through a step-by-step process to create realistic looking miniature trees for use in wargames, dioramas, and model train layouts.
Materials:
Description of Materials:
The trickiest part of making this type of tree is finding the correct materials. Sagebrush can be found in several places including specialty hobby shops, online shops, and simply out in nature. Since I do not know of any sage growing in my area, I opted for the next easiest (unfortunately the most expensive) method of obtaining this material. A local hobby shop specializing in trains carries sagebrush for $2-3 per armature. The cost is quite a lot considering there is still a lot of work, which needs to be done to get a tree out of the deal. I do, however, prefer the look of the finished product over anything that can be bought or of any of the other attempts at tree making I have done.
The cheaper the hair sprays the better (usually). What is basically needed is a spray adhesive. Real spray adhesives such as those from Elmer’s should work as well, but I haven’t tried them. I use Unscented Aqua Net hair spray that I picked up from K-Mart and have had good results.As with my other terrain products I use Woodland Scenics flock to add ‘leaves’ to the trees. I use Burnt Grass Fine Turf as the foundation for the trees with a touch of Green Grass Fine Turf to add a bit of highlight.
A pair of clothespins or a small clamp work well to hold the armature while working with it. When connecting two clothespins in an L fashion they also serve as a convenient stand to keep the tree upright when drying.
At the base of each tree I poke a straight pin in to help hold the tree in place when ‘planted’ on the layout. After the pin is stuck in the end is clipped off with a pair of side cutters.A simple pair of side cutters or anything else that will cut a straight pin will work just fine.
Tree Construction Steps:
Prepare the armature. Stick a straight pin into the base of the tree to add stability when ‘planted’. Clip the pinhead off after inserting the pin.

Pull a very small amount of poly fiber from the bag. About 1/2×1/2×1/4 inch section will do. The sections do not and should not be exactly the same size -just keep them fairly small.

Pull the piece apart so it is the density of a three-dimensional spider web. Be sure to pull the fiber out in all three dimensions rather than making ‘sheets’.
Starting at the bottom of the armature, place the fiber on a single branch of the armature. Try not to span multiple branches – each branch should get its own fiber.

Continue the process working your way from the inside and bottom of the armature to the outside and top. Continue until all desired branches have been covered with fiber.
Be sure that the fiber is not too dense. It is tempting to have a very ‘full’ looking tree at this point, but after the flock is applied it will be far too thick. Over a bag or in some other environment set up to catch the overshoot, spray the fiber with the hair spray until the spray beads up on the fiber. Be careful not to blow the fiber from the branches – try to spray in bursts instead of one constant stream.

Carefully and slowly sprinkle on the flock. Darker flock can be applied to the bottom side of the fiber then apply some lighter to the top of the tree to give it a bit of a highlight. It is very important not to overdue the flock.
You should still be able to see through the tree after the flock has been applied. Set the tree aside to dry and admire the creation!

Tap off the extra flock into a container. You can use a small pair of scissors to trim offsome of the excess fibers that are sticking out that are out of place.Give the tree another light coat of hairspray to help keep the flock in place. Doing three or four trees at a time can speed up the process a bit and look nice all out together.
This tree making tutorial for model train layouts is kindly supplied with permission of Vance Altman at http://www.fsmtrees.com/
Many model train enthusiasts make their own realistic miniature trees using a variety of materials including branches and twigs from real trees.
For others however, the option of purchasing ready-made trees is an attractive option. This is where someone like Vance Altman of fsmtrees.com (First in Scaled Miniature Trees) can help out.
This is what Vance has to say, “I supply a top quality sage brush tree armature from mother nature. These allow the modeler to add foliage for a prototype tree or use as is for a Great looking Oak tree for winter scenes or dead trees”.
Vance adds, “Our scaled Sagebrush tree armatures are stand-alone realistic oak trees or add tree foliage for superb model tree scenery. Some have knarly twisted trunks and knots that look like a real natural miniature tree. These Scaled Miniature Trees are natural pieces of real wood Armatures for model train layouts or dioramas”.
Vance supplies quality trees for all scales, N, HO, HOn30, S, O. with delicate realistic branching.
Here is an interesting suggestion from a keen model railroading enthusiast…
Hello Robert, I have throughly enjoyed every page of your Model Train Help and look forward to reading your next edition. The only topic I was wondering about was the use of a mirror placed at the end of a shunting yard used to make it look double in size as the late John Allen used so effectively on the old Gore & Daphetid. Thought you might be able to give this scenic trick some room in your next edition. Thanks for the great product, Lynn
Here is a simple way to age paved streets on your model railroad layout: use a fine point pen to create cracks.
Simply drive around your neighborhood or areas similar to where your modeling and see how the pavements are aging.
Word of caution though, your model railroad layout needs to look authentic, so don’t go crack crazy.
Tunnels and a bridge will add interest to a layout. You’ll need a rail station too. Put operating signals at crossings. Use either a set of crossing flashers or a flasher and drop-arm combo. Kids (and adults too) are mesmerized by these ‘lights and action’ items.
Other ideas like a working grain elevator, water tower, coal loaders, or a control towers help complete a scene. Be creative, but specific, with your scenery.


