Scenery
Everything on model trains, model railroads, model railways, locomotives, model train layouts, scenery, wiring, DCC and more. Enjoy the world's best hobby... model railroading!

Trains don’t just run through an empty landscape, so the scenery (geographical setting) is a vital part of any model railroad layout. Constructing the countryside and cityscape through which your model trains will travel can be tremendous fun.
When creating model railroad scenery you need to consider the era, geographic location, and relative prosperity of the area being modeled. Don’t mix eras – putting 1970s building in a turn of the century Western theme. Or putting a 1980’s Honda model automobile in fifties-era scenery.
Study the architecture of the buildings from that time period. Find out what kind of shrubs and trees are likely to be found in that area. Little details can add to the realism to your model railroad scenery.
Get model trees that look like native species from your hobby shop or make them yourself. A book from the library or surfing the Internet will give you some ideas for your model railroad scenery.
Ask at your local model shop about buying suitable buildings. You may prefer to construct them yourself with balsa wood and paint.
 Model Railroading has been called the Worlds Greatest Hobby, and rightly so. But could it be a descendant of the worlds oldest hobby? About 500BC the emperor of the Q’in (pronounced ‘Chin’. Chin is where the name China came from) dynasty wanted to view all the different regions of his empire. But of course it was impossible for him to be in all the regions of his empire at once. So he commissioned some artists in his empire to visit each region and make models of each region, so that he could view them all from inside his palace in the forbidden city.
Once each diorama was completed, it was placed on a map the empire that was carved into the floor in part of his palace. And so each day he would travel through his whole empire, admiring the beauty of his kingdom. The dioramas were called ‘penjing’.
China in 500BC didn’t have the benefit of Woodland Scenics scatter and trees, or similar materials, and so the dioramas were made from real dirt and rocks, and small trees that were alive.
The art of Bonsai owes it’s existence to these penjings, and it would seem that maybe the ‘art’ of Model Railroading does too!
(Information Source: Better Homes and Gardens, July 2004 issue)
Jim Davis of Kemptville, Ontario started the JPandF Scenic Railway in June of 2000. He and his son Terry laid about 75 feet of Aristo-Craft track on a bed of stone dust, 10 inches wide by 10 inches deep.
The next year, a pond and stream were added and more greenery planted. Over the next three years, a two foot quarry stone wall was built and filled, to allow another 100 feet of track to be laid. Buildings, small trees and home-made, metal bridge were added.
A line through a basement window to a 30 foot staging area was also built. This is to save time setting up and taking down.
The gargen railway is track powered and radio controlled using an LGB power pack and Aristo-Craft trackside Train Engineer. Motive power and rolling stock are a mixture of USA Trains, Aristo-Craft and Bachmann.
Many model train enthusiasts make their own realistic miniature trees using a variety of materials including branches and twigs from real trees.
For others however, the option of purchasing ready-made trees is an attractive option. This is where someone like Vance Altman of fsmtrees.com (First in Scaled Miniature Trees) can help out.
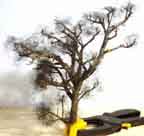
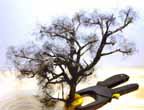
This is what Vance has to say, “I supply a top quality sage brush tree armature from mother nature. These allow the modeler to add foliage for a prototype tree or use as is for a Great looking Oak tree for winter scenes or dead trees”.
Vance adds, “Our scaled Sagebrush tree armatures are stand-alone realistic oak trees or add tree foliage for superb model tree scenery. Some have knarly twisted trunks and knots that look like a real natural miniature tree. These Scaled Miniature Trees are natural pieces of real wood Armatures for model train layouts or dioramas”.
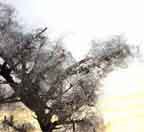
Vance supplies quality trees for all scales, N, HO, HOn30, S, O. with delicate realistic branching.
Vance has also kindly allowed me to publish the following tree making tutorial from his website.
Sagebrush Tree Construction
This tutorial will go through a step-by-step process to create realistic looking miniature trees for use in wargames, dioramas, and model train layouts.
Materials:
Sage brush
Poly fiber
AquaNet hair spray
Flock
Clothes pins or small clamp
Straight pins
Side cutters
Description of Materials:
The trickiest part of making this type of tree is finding the correct materials. Sagebrush can be found in several places including specialty hobby shops, online shops, and simply out in nature. Since I do not know of any sage growing in my area, I opted for the next easiest (unfortunately the most expensive) method of obtaining this material. A local hobby shop specializing in trains carries sagebrush for $2-3 per armature. The cost is quite a lot considering there is still a lot of work, which needs to be done to get a tree out of the deal. I do, however, prefer the look of the finished product over anything that can be bought or of any of the other attempts at tree making I have done.
The cheaper the hair sprays the better (usually). What is basically needed is a spray adhesive. Real spray adhesives such as those from Elmer’s should work as well, but I haven’t tried them. I use Unscented Aqua Net hair spray that I picked up from K-Mart and have had good results.
As with my other terrain products I use Woodland Scenics flock to add ‘leaves’ to the trees. I use Burnt Grass Fine Turf as the foundation for the trees with a touch of Green Grass Fine Turf to add a bit of highlight.
A pair of clothespins or a small clamp work well to hold the armature while working with it. When connecting two clothespins in an L fashion they also serve as a convenient stand to keep the tree upright when drying.
At the base of each tree I poke a straight pin in to help hold the tree in place when ‘planted’ on the layout. After the pin is stuck in the end is clipped off with a pair of side cutters.
A simple pair of side cutters or anything else that will cut a straight pin will work just fine.
Tree Construction Steps:
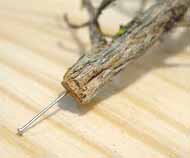
Prepare the armature. Stick a straight pin into the base of the tree to add stability when ‘planted’. Clip the pinhead off after inserting the pin.
 Pull a very small amount of poly fiber from the bag. About 1/2×1/2×1/4 inch section will do. The sections do not and should not be exactly the same size -just keep them fairly small.
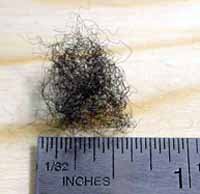
Pull the piece apart so it is the density of a three-dimensional spider web. Be sure to pull the fiber out in all three dimensions rather than making ‘sheets’.
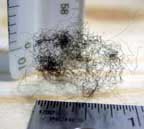
Starting at the bottom of the armature, place the fiber on a single branch of the armature. Try not to span multiple branches – each branch should get its own fiber.
Continue the process working your way from the inside and bottom of the armature to the outside and top. Continue until all desired branches have been covered with fiber.
Be sure that the fiber is not too dense. It is tempting to have a very ‘full’ looking tree at this point, but after the flock is applied it will be far too thick. Over a bag or in some other environment set up to catch the overshoot, spray the fiber with the hair spray until the spray beads up on the fiber. Be careful not to blow the fiber from the branches – try to spray in bursts instead of one constant stream.
Carefully and slowly sprinkle on the flock. Darker flock can be applied to the bottom side of the fiber then apply some lighter to the top of the tree to give it a bit of a highlight. It is very important not to overdue the flock.
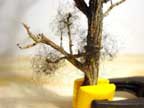
You should still be able to see through the tree after the flock has been applied. Set the tree aside to dry and admire the creation!
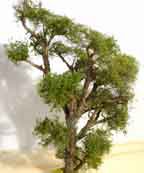
Tap off the extra flock into a container. You can use a small pair of scissors to trim offsome of the excess fibers that are sticking out that are out of place.Give the tree another light coat of hairspray to help keep the flock in place. Doing three or four trees at a time can speed up the process a bit and look nice all out together.
This trees making tutorial for model train layouts is kindly supplied with permission of Vance Altman at http://www.fsmtrees.com/
Charlie Comstock is a keen model railroading enthusiast who has his own model train webpage.
On his webpage called “Charlie’s Railroad Page” he has included several photos worthy of a good look. Among them are these two showing scenery construction using stryofoam sheets.
Here is an snippet from Charlie’s website:
Hillmovers Construction Co. has finally commenced operations around the hamlet of Shelburn (between Bear Creek and Mill City). Although far from finished the basic ground contours are in place and some trees and buildings temporarily placed to help show how it will look when done.
I’ve continued using .060″ styrene sheet for backdrops and just located a supplier that is quite cost effective. Since my backdrops are typically less than 16″ high I can slice each 4×8 sheet into 3 strips getting 24′ of backdrop from each sheet.
These photos show the scenery under construction.


Visit Charlies webpage at:
http://www.bcsj.org/rr/index.shtml
A plant know as “Sea Foam” has great potential to make delicate, realistic looking trees. Depending on where you live it could be sold under a variety of different names. I’ve even heard it called ‘forest in a box’. Ask at model railroad shops and hobby suppliers.
Sea Foam on its own looks like small scale trees, but looks a little artificial and boring without some work. It tends to come slightly curved, so some manipulation will be required to get a proper tree shape. Try assembling a tree from various sprigs of Sea Foam rather than using just one piece. Use a larger piece as the main trunk and to which you will add sprigs for branches.
When joining pieces of Sea Foam together, you may need to strengthen the joints with fine brass wire. To add a greater girth to the bottom of the trunk wind a few pieces of irregularly torn masking tape around the trunk and seal it in with a mixture of wall filler and white glue.
When you’ve finished creating the basic tree skeleton, give it a quick spray with a dark greeny-grey/brown color aerosol paint. When the paint has completely dried, the foliage can be added by spraying the skeleton with spray adhesive or hairspray. The skeleton can then be dipped into fine ground scenic foam of the color of your choice. Alternatively you can apply foliage matting (like from Woodland Scenics) to the tree skeleton.
Another low cost idea is to use dried kitchen herbs for creating scale leaves. Different herbs and combinations of herbs create different effects. Dried herbs like Oregano, Thyme, and Parsley can be easily glued to the Sea Foam branches with spray adhesive. Put some old newspapers under the branches when you sprinkle the herbs over the tree foam. This way you can catch any herbs that don’t stick and reuse them on other branches.
After giving the tree skeletons a thorough coating of the herbs give them a coat of matt Varnish. The matt varnish will help seal the herbs and remove the stickiness of the spray adhesive. The trees can then be left overnight to dry.
After the trees are fully dry, some modelers then like to apply a coating of a white PVA wood glue/water mix by using a spray bottle. This can be done by hanging the trees upside down on some string and again left to dry over night.
If possible, plant the trees on the layout permanently. A couple of suggestions:
1.Use a small length of brass rod (1mm would do) which is glued into the base of the trunk and a small hole pre-drilled in the ground.
2. Or you could simply drill a small hole in the baseboard and then fill it with glue. The trees can then be inserted and the glue left to dry.
Note: Although Sea Foam is reasonably delicate, it is strengthened by the various coatings that are applied. The trees should be sufficiently flexible to withstand the odd brush with a careless hand or wrist. Also note, that some dried herbs can go brown over time, so you may want to add some green paint to the trees.
Sawdust can be an inexpensive material for making ground cover for a model train set layout. Buy some fabric dye from the supermarket or hobby store. Mix up the dye according to the directions and start adding your sawdust. Keep adding the sawdust until all the liquid is gone.
Then put the colored sawdust in a baking dish and put in a warm oven for an hour or so to dry it out. Once it’s dried and cooled, bag it up to store it until you’re ready to use it. You can apply it to the ground with white glue and to trees with spray glue or hairspray.
Get all the latest model railway news and views from the world of model trains. Stay up to date in the most enthralling (ok I’m biased) hobby in the world… model railroading!


