Structures
Everything on model trains, model railroads, model railways, locomotives, model train layouts, scenery, wiring, DCC and more. Enjoy the world's best hobby... model railroading!


This is your opportunity to help others in the hobby. Here are three questions from fellow model railroaders who would like your suggestions. Simply click on the green comments tag below to offer an answer.
“I have a 6×10 train o gauge layout. When it comes around the far end of the layout the trains get very slow and sometimes almost stop. What can I do to fix this problem. How can I fix a Lionel coal tender it has a whistle on it, but it rattles & whistles. I see a wheel under neath the goal tender, should I spray WD-40 in the wheel that spins? Please can your readers let me know their ideas. Also I have built a lot of houses and different things out of cardboard, with paint they look pretty good instead of spending money on plastic models. The videos are great thanks a lot!”
“I am having difficulty in finding a book that contains layout plans (particularly n-scale) that includes a track materials list along with the plan. Otherwise it’s just a big guess on what to purchase. I received layout books from Kalumbach ( 101 plans & 48 top-noch plans) but they didn’t help. Any suggestions from your blog readers?”
“I’m doing a landscape design project for a class I am taking and would like to use a railroad flatbed as a bridge over a small creek. Do your readers know where I can get some drawings of flatbeds? I’d like to be as accurate as possible. Thanks for any help your readers can give me.”
To offer your suggestions or thoughts, simply click on the green comments tag below.
Two of the videos in the new model railroad videos series are:
Video #7. Agriculture & Industrial Layouts
There are many clever model railroading scenery ideas in this video. Watch a sugar cane train on its journeys from fields to sugar mill. This layout features: a wheat growing district, a loaded coal train, open-cut mine and port facility. There’s even an outback town with livestock yards portrayed.
Video #8. Soldering The Track

In this model train video tutorial James shows you how to solder and wire track for a reliable connection every time. James talks you through the process step-by-step and reveals a little trick to get a good solder.
Feedback from model railroad fan Roger:
“I just wanted to drop you a line and say how much I have enjoyed your videos. I have already received the first 10 model train videos and they are great. When I received your first E-mail about the series, I was not sure as to whether I wanted to spend the money or not. I must say, just as your Model Train Help book is great, the train videos are great and well worth the money. Your videos have convinced me that I must visit Australia and see this stuff first hand.”
Roger B, Ohio
After a year in the making a series of 42 amateur model railroading videos were finally released today.
These videos do not pretend to be Hollywood productions as they focus more on providing good content rather than flashy presentation.
The 42 model train videos cover a range of model railroading topics and include tours of several private layouts… not normally open to the public.

These videos, available by download, also feature visits to some train shows and include lots of useful ideas and tips to help hobbyists build, or improve their own model railroad. Other video topics cover baseboard construction, electrics, foliage making, DC and DCC operation. The series even includes three videos about building a garden railroad.
These videos range in length but average around nine or ten minutes each. The step-by-step tutorials in the videos provide answers to many common (and not so common) model railroading problems.
Access to these videos is by “membership only” so is restricted to a limited number of keen model railroaders.
To find out more about these model train videos and to read the list of contents and see a sample video click on this model train video link.
Happy railroading!
Here is a clever, simple yet little known tip for constructing a roof for a building on your model railroad layout.
Single ply toilet paper (without a pattern) can be an ideal material for roofs on structures. Cut it into ½” wide strips and lay the first strip a little on the roof. Make sure that it is slightly longer than the length of the roof. Use some Floquil weathered black or roof brown to paint the lower edge paint in position.
Keep on adding the strips to the roof until one side of the roof is completely covered.
Do the same on the other side.
Cut a thin strip to represent the cap strip and apply it to where the two sections meet at the peak.
Wait for the paint to completely dry before trimming the edges with a sharp blade knife.
This simple model railroading trick provides you with a very realistic looking rolled roofing effect.


One option is to use card models for buildings with the brick walls already printed or to print out a brick pattern and glue the sheet of paper on the walls. Although this can work okay, this technique is without any surface texture and can require additional retouching to add a look of authenticity.
Plastic model kits of building often have brick walls moulded into surface and for scratch building there is embossed plastikard available.
These surfaces provide the contours for brick and mortar, but they are of a plain, a semi gloss color and need extra work to make them look realistic.
For anyone who has modeled brick walls they will know that to acheive a realistic brick wall appearance there needs to be variations in the brick color and mortar lines.
Here is one way of doing it. Start by mixing a suitable color such as “brick red” or “stone gray” and apply it with a brush or better still, an airbrush. Gloss or enamal paints may work best for this part of the process. The next step is to apply a variation of the color onto the bricks. Again, an airbrush can give a subtle effect.
Then paint individual bricks at random in a variety of colors using a fine brush. The colored bricks could vary in range from white through to black including various shades of brown. After you have finished the wall will look too artificial and the colors will look too bold, but don’t worry.
The next step is to soften this effect to give a more realistic appearance. Do this by spraying on a thin translucent coat of brick red paint. An airbrush is best for acheiving the desired effect.
You are then ready to start applying the mortar. The wall will need to be laid horizontal for this task. A mixture of stone gray and white paint is often the right combination for the mortar color. The key is to thin the colors down and using a fine brush applying a drop of this into a corner of the mortar line (as accurately as possible into the recess). When thinned down enough, capillary action will carry the paint along the recess to follow and fill the mortar lines.

Finally, fix the weathering with an airbrushed coat of matt varnish.

Here is an inexpesive technique to use when scratch building structures out of balsa wood. Take a flat piece of thin balsa and then use a metal dog comb with a straight edge to create a board effect on the wood. This effect can look as good as any manufactured siding. The key is to use a comb that is the scale width.
I came across an interesting new Model Railroading blog by a guy named Dayrl where he explains how he incorporated storage tanks on his model railroad layout.
Here is a snippet. For more details visit his model railroading blog at http://www.stpaulrochelle.org/blog/

“Although the layout is 95% complete. I still have a number of projects I am
working on. Most current is the BP gasoline storage facility. Due to lack of
space on the layout, I did not have enough room to model the facility all in one
place. . I have room for loading facilities by the siding track, but not room
for the storage tanks. There is room for the tanks in a corner of the layout
close to the siding. So, I stole an idea from the prototype in Rochelle. There
is a small pipeline bridge over the BNSF tracks that carries fuel to a Rochelle
Municipal Utilities power station. I am using that concept to carry fuel from
the storage tanks to the loading facilities. “
Constructing a custom built scale building or structure can take considerable time and requires a good eye for detail, a steady hand and a lot of patience.
Highly detailed scratchbuild models are not built over night. Some takes days even weeks to complete. However, for many model railroaders custom building their own structures is not an easy option. Sometimes it is due to a lack of time, some lack a steady hand to complete the detail, and others simply prefer to buy ready-made structures and add their own detail and weathering effects. It really depends on individual circumstances, skills, preferences, time available and what you are trying to achieve.
The interesting thing is that many model railroaders are not aware that there are skilled designers who specialize in custom building as an occupation.

These photos are a sample of what a professional designer can create.
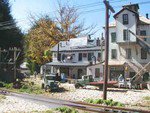
The photos are kindly supplied by Vance from Trains HO. Vance is a pro at custom building HO scale buildings and structures, highly detailed for HO train layouts. Have a look at his HO scale model train website and see some more of the brilliant buildings and structures he has created for other model railroaders.
In southwest Baltimore, near the Mount Clare station stands what’s claimed to be “the world’s oldest railroad bridge still in use.” The 312ft single track Carrollton Viaduct over the Gwynns Falls River in Baltimore was built in 1829.
The two-arch stone bridge is believed to be the first masonry railroad bridge built in the United States. It cost around $58,000 to construct using around 12,000 blocks of granite. An 80-foot arch spans the Gwynns Falls, while a much smaller 18-foot span crosses an old wagon road.
The RIT Model Railroad Club (RITMRC) was founded in early 1996 to promote the hobby of model railroading and to preserve the history of Rochester’s railroads.
Since 1996, the RIT Model Railroad Club has been concentrating on a permanent model railroad project. The HO scale Rochester & Irondequoit Terminal is an ongoing project being constructed using each members areas of expertise. Located in Room A-420 in the Student-Alumni Union, the model railroad features the latest in Digital Command Control (DCC) technology, working wayside signals, and highly detailed models and scenes inspired by the Rochester area.
In 2004, the club embarked on its second most ambitious project to date: a 40’x12′ modular HO scale layout. This yet-unnamed modular layout, based on the latest NMRA standards, allows RITMRC members the continued opportunity to design and construct a model railroad from the ground up. Also powered by Digitrax DCC, this modular layout is portable, allowing RITMRC to travel outside of the RIT campus and show off its modeling talent.

Amtrak Train 65 departs Rochester bound for Toronto. The train is crossing over the top of the historic High Falls. A coal drag heads east towards Rochester yard. That coal is destined for RG&E’s Russel power plant.
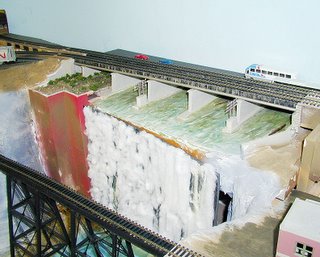
This earlier photo shows the construction in progress at High Falls.
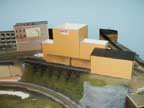
The above photo show how a club member (Otto) built a mock-up for the Genesee Brewery out of colored mat board. The mock-up helps determine size relationships for when the club goes ahead and builds the actual structures.
Secrets of the brewery revealed in this mock-up shot. The brewery does double duty as providing an additional customer for switching, as well as disguising the exit/entrance for the Buffalo staging yard through the backdrop. The mainline curves behind the brewery.
The RIT Model Railroad Club (RITMRC) has its own website http://www.ritmrc.org
The RIT Model Railroad Club (RITMRC) is well worth a visit.
Get all the latest model railway news and views from the world of model trains. Stay up to date in the most enthralling (ok I’m biased) hobby in the world… model railroading!


