Structures
Everything on model trains, model railroads, model railways, locomotives, model train layouts, scenery, wiring, DCC and more. Enjoy the world's best hobby... model railroading!

Bob wants help from readers and asks:
“I have a limited area for my model set up of 8×9 feet. I want to add an incline to a bridge and would like to know what the steepest rate of incline can be over the shortest distance and still work properly?”
Comment below.
Two readers are hoping someone can guide them.
Bill asks:
“When running two HO tracks side by side how much space should I leave between them?”
Pat asks:
“Where can I get an n scale house built from a picture I have? I have a small budget. Thank you in advance.”
Use the green comments link below to answer one or both of these questions.

Laurie wants to share his experience scratch building structures using wall plaster. Here is what Laurie has to say:
I have been a scratch builder of many years. I started at the age of eight, and I’m now eighty four.
I started before WW2, using s fret saw. I made many models out of an old Tea chest. After serving in the war I didn’t really take scratch building seriously until 1951 when I went into Model Railways for my sons.
Since then we have built 5 layouts, largest 6feet by 10 feet, but they have left home now and with a 6X4layout I go it alone, with visits from my grandchildren and great grandchildren. I’ve just purchased and read your Model Train Help E Book, which I found most interesting.
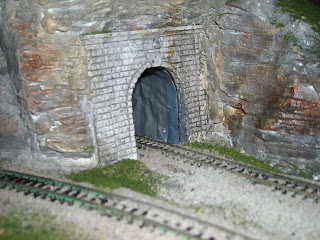
Here is my explanation of Stone type modeling with pictures of some of the models I’ve made using this method.
You can scratch model buildings and walls to give the Stone type effect by using Powdered Poly filler, or powder wall plaster.
Before you start building you need a plan of your building, I first take a photos at different angles of the building I want to model, then sketches are made of the parts you need for the building.
First you need to cut out the building walls to the Railway gauge size you are using, (I work in the 00 gauge, 1:76.2), also cut out the window and door openings.
From hard board, (use the rough side), Balsa wood or a thick Cardboard, (no less than 1/8 thickness), something the plaster will adhere to.
Next, make up window and door frames, and glue these onto the out side of the of the board, also at this stage add a fascia boards to take any guttering, (don’t forget outside chimney breast), glue the sides together forming the shape of the building. You may need to put inner walls at this stage, or Corner formers to strengthen the building.
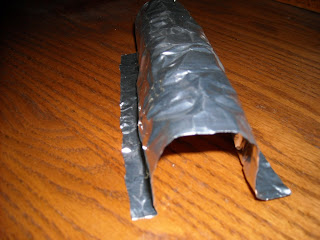
Once the building has stuck and can be handled, mixed up some poly filler (plaster) to a sticky paste (not to wet). Spread this over the wall sides to the thickness of your window & door frames, then without the Wife, Partner or Mother knowing, go into the kitchen and get the “Kitchen Foil wrap”.
Cut this to the shape of the walls allowing a bit extra around the outside edges, crumple it up so it is well creased, flatten it out & press lightly onto the damp plaster, then leave to dry.
Once dry, (properly next day), peel the foil of, you should be left with a stone looking wall, clean off the edges and any spare plaster that has crept over your frames etc:, you can then if you wish mark out the stones with a pointed tool, or you may leave it as it is & just paint it the stone color you want. Next paint the door and window frames, & when dry you can add you Perspex for you windows, curtains doors etc.
You then need a roof, this can be made to your board type your using, covered with Tiling paper, or I have found the back side of hardboard has a etched markings on it that when painted a dark red looks realistic, or with plenty of time and patience, put a layer of plaster on the roof, smooth it out nice and flat, then when dry, mark out a slated type roof.

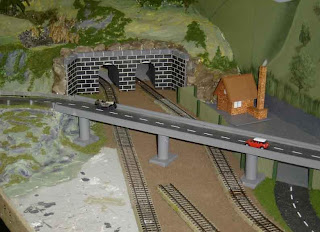
Photo above shows a Goods Shed. (Point of interest, is the lamp over the main double door is from the stem holder of a British Legion Remembrance Poppy, making use of thinks around you).
If you are making an Elizabethan or Georgian type building, when putting in the frames adds you beans, balsa wood is good for this, remembering the plaster is smooth between the rafters. Don’t forget outside fittings such as down pipes, guttering, chimney’s etc.

This a country Public House & has lights (photo above).
If you are making walls of the stone type use the same method, rapping the foil over the top of the wall covering both sides, when dry remember some of these walls have the top layer of stones vertical. If you need bends in the wall, I suggest you use card board for the wall so that you can bend it to shape, and I found it best to glue the shaped card board to a card base so that it maintains its shape, before adding the plaster.
Any matt paint can be used but I have found acrylic best. Lot of patience is needed but I have found that the results have been very satisfying.

This Church has lights and a module for a peel of Church Bells up.

Thanks to Laurie for this excellent contribution. I’m sure others in the hobby will benefit greatly from his ideas. It would be great if others in the hobby would contribute ideas as I know there many regular readers who have considerable experience in the hobby and could be of tremendous assistance to others in the hobby.
Click here to contribute your ideas or share details about your model train layout
Pieter wants to buy some plans for constructing buildings and wonders if readers have a supplier they can recommend:
“I am interested in constructing my own buildings using balsa wood (as I know it in South Africa) and then covering it various with printed designs. Can one of your readers perhaps advise me where I can purchase construction plans of various buildings that I can download to work from?”
As regular readers will be aware this blog does not list buy, sell or swap second-hand items, however readers are encouraged to recommend suppliers who sell reliable products.
John wants to hear from readers regarding their opinions on structure kits. Obviously many in the hobby scratchbuild their structures and others prefer to buy kitset models. John asks:
“Who makes the best structure kits as far as detail, realistic look and price?”
If readers would like to give their opinions then please use the green comments link to do so.

Ron wants to hear from anyone who know about coloring brick mortar on model railroad scenery and asks readers:
“I’ve never undertaken the application of mortar between brick on a structure and need some tips from those in the know! Is there a practical way to color the bricks before applying the mortar? “
If you think you know the answer use the green comments link below Ron’s posting and post your reply.
Charles has a question for readers relating to different scales:
“How can I figure out the size of HO – O & G scale buildings doors, windows and walls etc. and also tunnel portals? Also, is there a scale ruler I can use?”
I hope Charles is not mixing his scales as that could look a bit strange. However, if you can help Charles, use the green comments link below to add your thoughts.


Sixteen year old Adam needs some help and ecouragement from others in the hobby and asks:
“Hi, Iwas planning my layout and I have got no idea how to ballast or landscaping at all. I went to a model show a few days ago and watched a fellow modeller landscape but not ballast he used some specialling builder’s plaster but I don’t know what it is called. Its seem pretty simple to landscape but I have had many tries ballasting and I just can’t get it right.
All my locos keep derailing on it. Would any one be able to help me?”
To help Adam you can add feedback using the green comments link below.
The Model Train Help Ebook has many good pointers on landscaping and track ballasting.
Martin wants to build a brick wall on his RR layout and asks readers for help:
“Can someone tell me how to make a scratch built brick wall please?”
To guide Martin click on the green comments link and add your feedback.
Maritz wants to hear from anyone who has scratchbuilt a turntable:
“Is there any modeler that can help me with plans for a turntable in HO scale. I can’t find any on the internet. I would like to scratch build my own turntable from wood. Any plans can help, doesn’t matter how complete. Your help will be appreciated.”
Suggestions from readers can be posted using the green comments link below.
Thank you for the excellent feedback on my series of model train videos – I’m glad people are enjoying them.

Video #23. Making Scenery Foliage

Jim has a question for readers on lighting a window in a building on his layout:
“I have two model railroading problems to overcome. Firstly, I have a building on my layout that I want to be a showroom. I am making a rv showroom. I want to put several campers inside. I am wanting a big picture window. I have not seen any kind of window frame that will work. Secondly, if I get a window that works I want to put a light inside that wont bleed thru the plastic. Any sugestions from other in the RR hobby would be appreciated.”
To give your feedback click on the green comments link below.
Larry is new to model railroading and would like to hear from experienced model railroaders before he starts his construction project:
“I am building a dedicated ‘train room’ in a new retirement property in Colorado and am a RR novice although the core of my set up will be a 55 yr old Lionel set gifted me in 1952. I need real guidance from a reader on how to build the basic infrastructure that will lead to tunnels and different levels. Thank you in advance.”
To guide Larry click on the green comments link below.
Jim has a cityscape on his RR layout and would like to hear from anyone who has some experience adding tall buildings:
“I am modeling in HO, 1970-1990’s era, and have a large city on the RR layout. I am having trouble finding buildings that would resemble a skyscraper ( I am looking for 12-15 stories). A few years ago I found a Bachmann Spectrum series structure that was perfect, but I want more than one on the layout and they don’t seem to make those anymore. Does anyone in the hobby know of a realtively inexpensive but nice looking source of structures? If so, where? Thanks.”
To comment click on the green comments link below.
A reader ask for your advice or suggestions for creating a stucco look on buildings: