Everything on model trains, model railroads, model railways, locomotives, model train layouts, scenery, wiring, DCC and more. Enjoy the world's best hobby... model railroading!
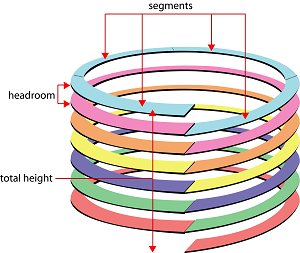
What is a Helix Segment Length?
“On a helix calculator – what is meant by a segment length? Is it measured from what point to what point?
There is a free helix calculator tool at here.


How many pieces of roadbed do you want per one circumference of your helix?. Three segment helixes can be the most economical to cut from an 8′ x 4′ sheet, but you can have as many segments you want. One segment means cutting a circle the size of you helix – and that means you might only get 2 levels from a sheet, where as three segment can, when set out properly can give you at least three levels. I saw an article on this in 2015. With one segment you only have one join to make, with three you have 4. These are best made using a biscuit or tongue and groove join so that the join is no thicker than the rest of the helix. This means you can rely on 3.5″ between levels for most HO layouts. .
The most economical way to cut sections from a wood sheet is to cut them parallel.
Make a compass from a thin strip of wood, hole through one end for your pencil, two
sharpened round nails the other end for the compass point (inner and outer radius of
the section). (Retract nails as required.)
Minimum width of your sheet must be the outer length of one quarter (or third or eighth)
of the circle diameter. Draw a line down the centre for pivot points and mark them out.
As the centre point goes off the end, cut a section out and use it as a template.
The principle is shown in the attached diagram.
______________________________
Dear Mr Moderator,
Please could we submit diagrams in GIF format ?
Saving them as JPG makes diagrams blurred (and files become larger !).
I too made my helix using quarter segments as per diagram but used 2 layers of 4mm plywood bonded together with staggered joins to make a continuous coil that can then be pulled upwards to fix in place as seen in the photos of my layout which is coming along nicely. Richard