Planning
Everything on model trains, model railroads, model railways, locomotives, model train layouts, scenery, wiring, DCC and more. Enjoy the world's best hobby... model railroading!

Andrew wants to know how many pieces of track you need to form a circle and asks readers:
“Who knows what is the smallest circle n gauge can go around? And, how many pieces of track does it take to make one circle?”
If you think you know the answer to Andrew’s question please let him know. Use the green Comments & Feedback link below Andrew’s posting.
Dick wants to build an HO layout and has a question for other HO enthusiasts:
“I am just starting to research things before buiding an HO layout. I am an experienced 64 yr old modeler, but have not done railroading in many years. I built highly detailed wooden ships from scratch for years. I’m in to detail. I want to do a train layout with similar detail. I’ve looked at track and some of the combination track (with roadbed) looks toy-like to me. Can someone please give me some specific advice about track ie. Manufacturer, 83/100, track alone or roadbed/track combination, type of roadbed. Thank you.”
Michael has a question on HO compared to OO and asks:
“I would like to own one of the American Locos but all of the ones I like seem to be HO scale. My question is are HO scale locos compatible to run on a OO DCC track?”
Robert comments – HO (USA) and OO (British) are not the same scale (the difference between HO and OO is 12.5%). Most people would find it hard to spot the difference at first glance.
HO has a ratio of 1:87 and is 3.5 mm to the foot with a standard track gauge of 16.5mm or 5/8″.
OO has a ratio of 1:76 and is 4mm to the foot with a scale track gauge of 18.83 mm.
Most model train manufacturers have made their wheels fine enough to work on HO track.
Perhaps some of our readers could comment on their experience with running OO and HO together and perhaps their thoughts on mixing OO and HO buildings etc.
Add your feedback using the green comments link below.
Bev is planning a portable layout and wants ideas from readers:
“I am planning on building a very small portable winter scene layout (about 26″ x 4 feet) that I can set up on a table at work during the holiday season. What is the best material to use as a foundation base for an extremely lightweight layout? Any other comments or ideas from anyone would be appreciated.”
To help Bev click on the green Comments and Feedback link below.
Gordon wants to hear from any readers who have used layout design software and asks:
“Can anyone recommend a layout design software that is easy and quick to use. I have a 4×8 layout and I have moved into a new home and I have a 10×20 ft space available. Can anybody give me some advice please?”
To help Gordon use the Comments and Feeback link below his posting.
Steve wants to hear from other model railroaders BEFORE he starts work on planning and building his layout. Steve has a question on turnouts:
“I have not yet started my layout because it’s possible we might sell and move if the economy ever changes. My question is what is the difference from a # 4, #6 or what ever the number may be, which # should be used for a turnout for a siding, or a turnout for just starting another run of track? This may sound silly, but if and when I do construct a layout these are the kind of little things I will need to really now. I built a layout years ago with my sons, but I don’t remember having a choice, we just bought some turnouts and they did the job. However, I would like to now why 4’s or 6’s turnouts could make a difference or not.”
To help Steve click on the comments and feedbacl link below.
Steve, can also refer to the section in my Model Train Help ebook for some assistance with his answer.
Readers in colder areas might have some suggestions for Jim:
“My son and I would like to put up our RR layout in our barn/workshop. We don’t have room in the house, and the barn is unheated. If we use a space heater to warm it up when we’re out there and it freezes otherwise, will we hurt our engines? Is there a temperature that they won’t run below?”

Frank wants to hear from those of you into garden railroading and asks:
“I would like to have some information on G scale track layouts, construction materials for outdoors including bridges, track bedding, wireless DCC controls and the basic construction of outdoor G scale construction materials. Can anyone help me please?”
Frank, you will be fascinated by the 3 Garden Railroad videos in my 42 train videos series.
In the videos experienced garden railroader Colin takes you on a tour of his 650-foot garden railway 18 months into construction. He explains the A, B and C of the design and planning process and reveals 17 important questions about building your own garden railway. He gives some valuable tips and shows you how to avoid problems you may not have thought of.
Colin then continues his garden railway tour explaining how and why he built the elevated track sections. He reveals the two ‘must-have’ features of any garden railway and discusses the effects of climate, lighting and the different train control systems. Colin then demonstrates an electrically operated Baldwin Steam Locomotive and gives some tips on ‘points’ and structure building.
Colin then explains his dug-out steaming bay and power control panel. He gives you a close look underneath the Union Pacific RS3 locomotive and how it operates.
Stan wants an HO layout plan and asks:
“I am looking for a plan for a 8×15 HO layout with end extensions. Has anyone got one? All I have found so far is cut and paste – not one of my strong points.”
To help Stan click on the green comments link below.
Craig is deciding between HO (similar to UK OO) or N:
“I am new to model railroading and trying to decide which scale to go with. I have a medium size space, think corner of a garage. I would like to run fairly long trains though I am not sure what my layout will look like. I am getting older, think 50 and the old eyes can’t see the small things anymore. What are the pros and cons of each?”
Yes, Craig you are correct, the smaller the train the more fiddly they are to work with especially if you have unsteady hands. N scale is smaller than HO. There are certainly pros and cons of both N and HO depending on the space you have available and what you really want from a layout. N would allow you to build a layout in a smaller space, or put longer track runs in the space. If you look at the results of the poll on this blog you will see that HO is more widely used than N, and for that reason there is an large selection for train supplies and accessories available in HO.
I would certainly suggest you read about the various scales in my Model Train Help ebook. You will find it particularly helpful.
I’ve had several people ask about constructing a shelf layout, or ceiling platform, to run trains around a room. If anyone out there has got such a layout, I’m sure readers would like to see a photo and hear about what you have constructed. You can either add your feedback using the green comments link below or submitting details of your layout at http://www.model-railroad-resources.com/my-layout.html
Building a small shelf layout can give you time to focus on on operation and detail and be less expensive than a larger layout. However, at a glance I can see some issues that need to be considered before building a perimeter layout:
1. What scale? Carefully consider the size of the room and how you are going to support the baseboard and layout. Obviously HO or OO would carry less weight than larger trains. As a guide – N scale trains with 20 cars will be about four and a half feet long. With Z scale you would have even more space but they are more fiddly if you have unsteady hands.
2. How visible or accessible will the trains be from a child’s or adult height. Safety needs to be a consideration here too.
3. Do you need to put up a wire guard rail, or see-thru perspex plastic (flexi-glass) to stop the trains crashing on the floor from a great height? Trains don’t liker being dropped!
4. Will the trains run in one direction or will you be running parallel track?
5. Locomotives and rolling stock can derail on curves so you might want to install track rerailers after every turn to help rerail.
6. Would you be best to paint the baseboard black to help things stand out? How are you going to incorporate scenery and structures?
7. A shelf layout can attract dust and humidity can build up causing rust. You will probably need to clear the track more often and consider a track cleaning car for easy access.
8. Consider how trains will enter and exist the scene. You may want to adding a staging area at either end of the layout. You could make it removable and store it when you are not using it.
9. You might want to consider starting with a simple shelf layout before expanding it to run around the entire room perimeter in a continuous loop.
Building a shelf layout can be a lot of fun and a shelf layout can be an excellent solution if space or finances are limited. The important thing is avoid potential mistakes and carefully plan your layout before rushing in.
If you have a shelf layout add your comments here.
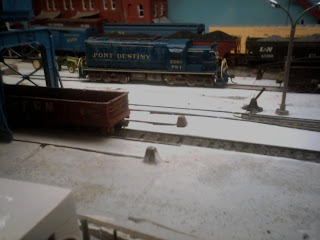
Andrew would like to share his layout progress with others and has sent in this information and photos for publication.
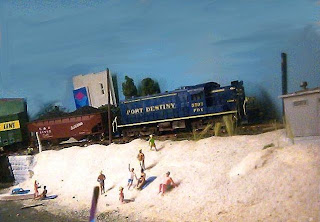
Photo above is Port Destiny Terminal RR’s rebuilt alco rsd4 with an emd engine heading out of the yard heading for the interchange .
C.E. is working on an HO train yard a wants readers feedback:
“I am in the process of rebuilding at train yard that was given to me, the name of the yard is Maudville Yards. Does anyone know of this yard and are the any plans available or anything?”
Richard has a question about Bachmann locomotives and wants to hear reader’s thoughts:
“I see a bunch of HO locomotives by Bachmann that are called “Spectrum”. Can someone tell me, do these HO locomotives have power to all driving wheels? If not, what sets them apart from the other Bachmann locomotives? Thank you, Richard”
Add your feedback to this posting.
Paul is planning an HO Helix and wants to hear from model railroaders who have built one:
“I am planning to build a helix on my railroad plan to go form one elevation to another. I am wondering what would be the minimun space needed for the elevation. Does someone out there know? Thanks.”
Talk to Paul using the green comments link.
Ray wants to know your opinion on the future of TT scale:
“What is the future of tt scale? I predict that whoever is bold enough to bring back could make do really well. I would be interested in hearing the opinion of others re TT scale.”
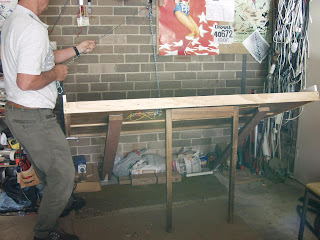
Colin has sent in this summary of his layout progress for publication. Here is Colin’s contribution:
My layout illustrates how a useful size of board can be installed in a very small space and yet allow ease of access and usability.

I had a need for a moderate size track mainly for test purposes but didn’t have a spare room at the time. The solution was to construct a foldaway track in the garage using recycled kitchen panels. I realised that there would be significant problems manhandling what is quite a weight if I simply hinged the back edge of the board to the wall at the appropriate height and had some means of hauling it up out of the way.
The solution was to suspend the board on 2 lengths of timber hinged at each end as shown in pic (Stowed). The hinges on the floor are set out a little way from the wall so that when it is against the wall, the board is ‘overcentre’ and requires no fastening ie it’s weight holds it against the wall. From this position the top of the board is simply pulled outwards until the hinged legs underneath swing down to touch the floor.
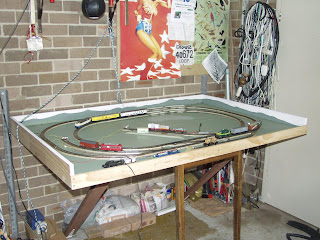
A rope and 2 pulleys is then used to lift the back edge up until it is horizontal and 2 sliding bolts lock it into the metal angles each side. One man can do this quite easily despite the considerable weight (the board is approx 1.1 x 1.7 M and has a 110 x 19 timber on 3 sides to stiffen it.
A smaller piece of timber at the front stops expensive controllers from falling onto the concrete garage floor! The height of the perimeter timber also means that the accessories such as signals, buffer stops etc are not damaged when the board is stowed.
This track was built mainly so that I would have a simple layout to test the Locos that I convert and repair for myself and friends. It has 2 interconnected loops and 3 sidings with a selection of accessories although a lot more track could be placed on a board this size. I have completed more than 10 analog to digital conversions of a wide range of Marklin Locos.
The track is usually powered digitally but can be operated conventionally as well. (Not at the same time!!!) Of interest to Marklin enthusiasts, it uses old style M track and accessories. These, eg the points and signals, have been converted, by separating the lights from the solenoid operating supply and running a new wire for the lights to the centre track supply.
The solenoids are supplied from a separate supply via standard Marklin control boxes.
As a result of my conversions and adaptations I can successfully use all my old M track, Locos and accessories with Marklin Digital which should keep me happy until another kid moves out and frees up some space for my larger layout.


