Tips & Resources
Everything on model trains, model railroads, model railways, locomotives, model train layouts, scenery, wiring, DCC and more. Enjoy the world's best hobby... model railroading!

Beginner to the hobby Orjan asks:
“Sorry for my ignorance but in simple terms what does code 100 mean? If I go with code 100 would I always need to use the same track code?”
You can send in your own question for publication by using the ASK A QUESTION link below.
Allan posted:
“I’ve decided on N scale for my new layout which has the potential to be 2ft-3ft deep in places in my 8ft x 10ft space. I also decided to model the late ’90s to the present day, but haven’t yet decided on an industry (industries) to incorporate. I had thought of logging & lumber, but there are probably better options these days. Ideas are definitely appreciated! Thanks in advance!”
You can contribute your suggestions below.
Gerrie writes:
“I don’t want to sound like a scrooge, but the price of model paints seem expensive ranging from $4, $5, $6 for tiny bottles/cans up to $12 or more for spray rattle cans. I want to repaint an old 4-6-0 I picked up on eBay so presume enamel would be best? Scenery/structures I am thinking acrylic? Spray, can, bottle… not sure which way to go? It seems like I could end up buying dozens of different paints. Is there any easy cheaper way? What do other people have?”
Have your say below… and, see what others say too.
David K Thompson author of the DCC Help e-book contributed this article to share:
Is DCC what I am looking for?
The DCC layout has several advantages over the conventional DC railroad model, but the end decision on whether or not you should get it for your project depends upon your considerations and requirements.
At the end of the day, it is all about ease of use, functionality, and worth based on the money. So, make sure you keep the following points in mind before deciding upon DCC as your final choice for your personal railroad model!
Kayla writes:
“My son was just given an HO scale train set. It is a Golden Spike II with a Santa Fe engine on the box, but the model engine is a Burlington Northern. It is a 105 piece set. I am just interested in some information on the set. I tried searching, but I am a complete novice. Thank you in advance!”
David Thompson author of the DCC Help e-book contributed this article to share:
Can I Fit a Decoder on My Own?
Yes, you can! Installing a decoder on a locomotive is not a very difficult task, once you get the hang of the basic concepts involved in its operation.
However, it is advised that the first time you operate on a DCC layout; you get a decoder-fitted train to work on the model.
This will give you some time to learn about the working of the equipment and get familiarized with it before starting from scratch. Once you attain the knowledge and get familiar with the working criteria, you are all set to try the installation on your own!
In a nutshell,
• Decoder is like the working muscle in the DCC layout.
• It is responsible for assigning an address or loco number to the train.
• It also detects the signal incoming from the command station on the track rails and decodes it into the requested action for the locomotive.
• The decoder commands and powers up the motor for controlling its speed and basic direction settings.
• Optional commands that can be controlled by a decoder include controlling the back EMF and momentum and updating the speed table.
• The decoder also acts as a switched outlet and functions to power up the additional equipment like the driving headlights, any special light effects, and the sound.
• It is packaged as a chip, ready to be installed in the locomotive with a ‘plug and play’ action. Many locomotives also come with the ‘DCC fitted’ option, which means the decoder is already installed in them and they can be used as it is by the user. Such systems are ideal for beginners. Advanced users can program and install the decoder themselves as well for defining more custom functions and features.
• The price for the decoders depends upon the number of features it offers.
• When selecting the decoder, it is a good idea to go for NMRA compatible models so that they can work in conjunction with any throttle or command station you are using. Also, look at the power consumption of the decoder before adding it on to your locomotive.
• You can easily install and fit a decoder on your own, but opt for assistance from a friend or a technical professional in case you are confused about the different steps involved. You can also seek online help in this regard, there are a number of resources available that guide on the model and type of decoders that you should go for.
• There is no specific decoder that can be termed as the best choice for your locomotive. Different versions and brands seem to work for different people. So, at the end of the day, it is all about what you seek from the equipment and your own requirements that make the layout work like a charm for you.
Neil sent in his quick tip:
“I discovered an easy way to make unpaved areas of ground surface such as gravel or sand. I now use differing grades and colors of sandpaper and adhere to your surface. I wish I had found out earlier. That’s life I guess.”
Lester has this question:
“I decided to build a retaining wall on a longish section of my layout and want to use the right adhesive. I imagine it will need some clamping to the wood while it dries in place, but I am concerned that contact cement might grip too quickly and not allow enough time for me to adjust and check the positioning. By the way, I thought foamboard might be the best and cheapest material to use for making the wall. I would be interested to hear any ideas. Thanks.”
Owen sent in this tip to share:
“This might help someone with the same problem I had. My Baldwin 4-6-0 loco was derailing after exiting a turnout onto my straight track section. No problem with my other 3 locos. I eventually checked the rail spacing widths and found the rails narrowed just enough causing the front wheels on my 4-6-0 to ride up and come off the track. It was hard to spot because by the time the loco stopped part of the 6 wheels would already be off the track. I think I might have accidentally narrowed and slightly bent the track when laying it. Apart from being careful handling track, this experience taught me to measure track and check rail spacing using a gauge, and to run the locos very slowly through troublesome areas to hopefully identify any problems. I hope my experience with this problem saves other people some time and frustration.”
You can submit your question or tip to the Blog Moderator for publication. Use the ASK A QUESTION link below. No login is required.
Usually, the advice from experienced model railroaders is to buy quality over quantity, but as James points out that is not always the case:
“Now if you are going to buy cheap, buy real cheap and use them for show. I buy real cheap Cars and use them on the layout in a number of ways. Old flat cars can be used for bridges, etc.”
Thanks for the quick tip James.
Alistair asks readers: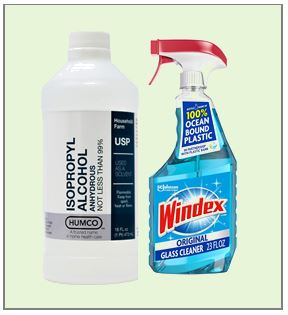
“I not keen on using solvents like isopropyl alcohol (rubbing alcohol). Is there any alternative I could use as a ballasting and scenery wetting agent? I have successfully used Windex glass cleaner in my airbrush to thin water-based paint. Would glass cleaner work as a wetting agent instead of isopropyl alcohol? Has anyone tried it or anything else?”
Add your comment below.
Jim Brown kindly sent in this informative article and photos to share and would like some feedback from others.
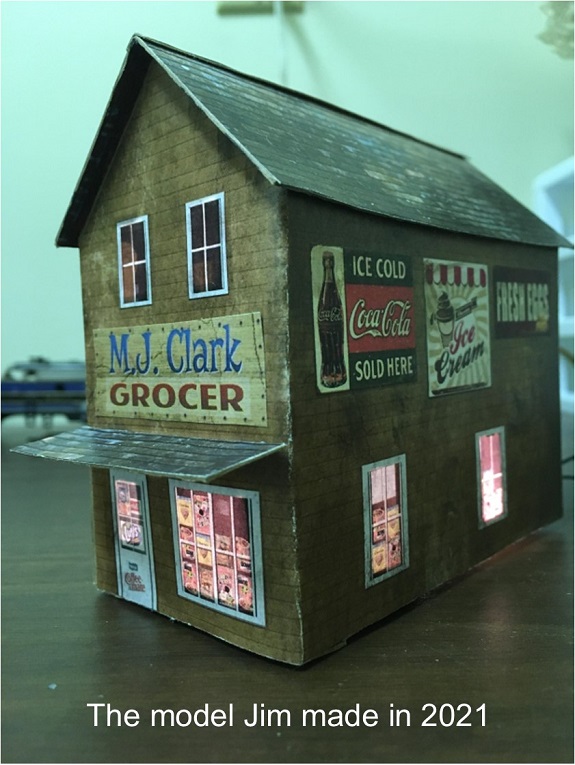
Jim made this general store building from a plan he downloaded at https://www.modelbuildings.org
“I downloaded your the small general store plan from your website and was very impressed with the results. I wanted to share a modification I made to the model that turned out better than I expected.
I like to have my models lit, so before I glued down the paper I decided to mark the inside corners of the windows on the cardboard with a straight pin, remove the paper and cut out the opening, and then glue on the paper.
To elaborate, what I did was cut out the cardboard and the picture separately. Then I put the picture over the cardboard and marked each inside corner of the windows with a straight pin. I wanted the holes to be as inconspicuous as possible on the paper copy. It is important that you mark the inside corners of the windows to get the right effect. Next, I removed the paper and connected the window dots that were made by the straight pin and cut out the openings in the cardboard. After all the openings were cut out I glued the paper onto the cardboard cutout, assembled the store, and voila, when I lit the store here is the effect I got. The only difficulty I had was keeping the cutouts registered with the paper’s windows when I folded the store into shape.
When lit up the results were very good. What impressed me was the illusion that the window looked like it was inside the store when lit. This was a fun project. I would really love some feedback on what you think of my modification.
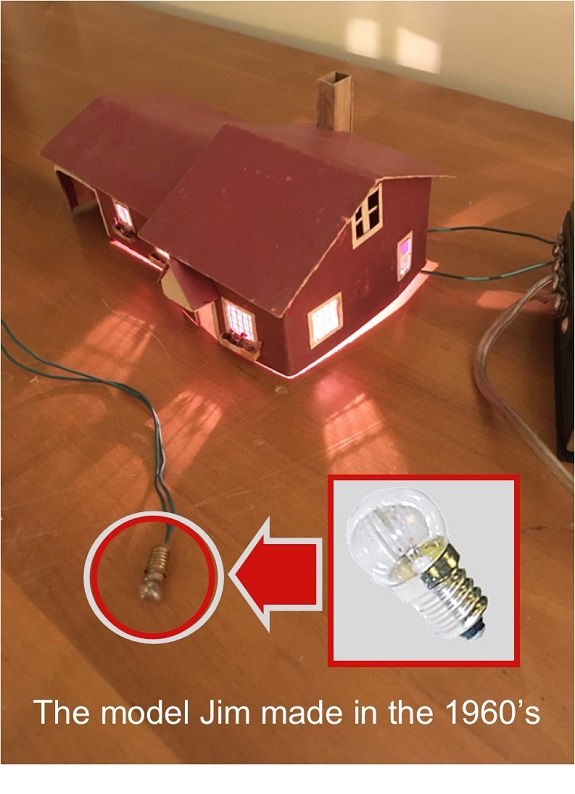
Jim made this building as a youth in the ’60s. He cut out the windows and used low voltage incandescent lights hooked up to his transformer accessories.
As a youth, back in the mid-60s, I had a small HO train layout. I made this for my grandchildren who are now getting into HO trains. They loved it. I will be using this technique on future projects.
On the topic of electrical safety and heat output from lighting buildings, especially paper ones, I don’t have the expertise to advise anyone.
I don’t personally believe low voltage LED’s can produce enough heat to create a fire hazard, even in an enclosed space like the paper store model I made. I have not found any low voltage LEDs that have gotten more than warm to the touch.
The buildings I made in the ’60s as a youth had all the windows cut out and I used low voltage incandescent lights hooked up to my transformer’s accessories, so there was plenty of ventilation. For the picture I sent you, I set the store over one of the lamps I used back then.
My plan for the grandchildren is to use low voltage, warm white LED’s mounted on a stand or onto their layout board itself and set the buildings over the lamps. I feel comfortable with this decision, but I don’t feel comfortable advising others on the subject. It is something to think about when using this technique with your models.
The photo above is the house we lived in that I made as a youth for my train layout with the lamps I used. I have 5 other homes I made that were all lit up the same way. Considering how young I was at the time and the resources available to me back then it made for a nice looking layout.”
Jim has indicated he would like to hear ideas from others in the hobby, including comments on using LED lights, heat output, etc. If you have an article and photo you would like to share with others, please contact the Blog Moderator with details by using the ASK A QUESTION link below.
A free catalog of 200+ model building plans is available from https://www.modelbuildings.org
Andy sent in this question:
“I’m in the very early stages of planning a layout which won’t be started for at least 12 months. The absolute max area will 12 x 5 feet. Probably a bit smaller than that. Based on the logging and mining operations on Vancouver Island pre 1950s, I will include, a logging camp, a coal mine, and a small port. I was thinking of using N scale but there aren’t as many detailed accessories as available in HO. Any suggestions, please? Thanks.”
Grant sent in this photo to share. It features an ariel view of a water scene on a layout displayed at The National Train Show in Salt Lake City, USA, in 2019. The illusion of different water depths adds to the realism.

If you have a photo to share or a question to ask, send details to the Blog Moderator by using one of the many ASK A QUESTION links on this Blog. If you have a photo or drawing for publication the Blog Moderator will contact you advising how to email it.
John from the UK explains how he cleans his ballasted track:
“First I Hoover all the ballast with the brush on the Hoover. I then spray the ballast with water, as if you are just ballasting your track. Then I leave it for a few days to dry. I then clean the rails with a rubber eraser and Hoover the track again, and it will look as if you have just ballasted the track. It looks nice and clean.”
Ross sent in this question:
“Hi to everyone. Just wondering the best way to uncouple stubborn cars during an op session? I’m very new to things, but already not a big fan of the Kadee magnets, which I’m finding a bit inconsistent when I want to keep my fumbling hands and elbows away from the scenery. I saw one guy on video using a pick thingy sharpened and flattened at one end. He wedged it between the coupler jaws and opened the couplers with a little twist. What do people use?”
Mervyn asks:
“I’ve airbrushed and weathered most of my 136 freight cars and have got them looking good. A lot of work but worth it. I now want to remove any grime and gunk build-up on the car wheels. From experience, I know it will take at least 15 minutes to clean all 8 wheels on just one car by swabbing an Isopropyl Alchohol soaked Q-tip against the wheel tread and rotating the other axle wheel. I calculate about 34 hours of repetitive work. Is there an easier/quicker way?”
If you have a question you would like to have published, you can send it to the Blog Moderator by using the ASK A QUESTION link below. If you have a photo or drawing to include, then you can easily advise the Blog Moderator when you are submitting your question. He will reply and tell you how to do it.
Neil posted this question:
“I just watched a video on how to spray the track with Earth Brown paint. The dried paint on the top of the rails was then sanded with #2 sandpaper. Sanding rails didn’t seem smart to me? Has anyone done this, or am I worried about nothing?”
Get your question published on the Model Train Help Blog. Use one of the ASK A QUESTION links to submit your question for review by the Blog Moderator.


