Tips & Resources
Everything on model trains, model railroads, model railways, locomotives, model train layouts, scenery, wiring, DCC and more. Enjoy the world's best hobby... model railroading!

 Newbie Martin is looking at HO scale and asks:
“Just starting off I will build two tracks code 100 seems the most commonly available? I like the look of the Bachmann 66801 HO Scale EMD GP38 2 DCC Santa Fe, so might make it my first engine. Tell me if there’s something more suitable.
My plan is to operate DCC for engines, accessories, lighting, etc. I presume a wireless throttle is the way to go? I haven’t committed to buy anything or any particular make yet, so would appreciate any suggestions? I noticed several ads for the NCE Pro Cab – any good? A lot of questions I know, but I am just trying to get my head around things before committing.”
Add your own comment or suggestion to assist Martin with his project. See the COMMENTS link below.
Clint writes:
“Before attaching my track directly to ply should I lay down cork first? What should I use – track tacks/nails, or glue what type?”
Add your comments below. And, remember you can have your question published too. See the ASK A QUESTION link below.
Howard posted this:
“I am finally changing to DCC a big change, and want to buy a couple of new diesel sound mainline engines but not sure which manufacturer to go with. My layout is US 70s/80s and I’m open-minded on the livery. I was wondering who is the best manufacturer of these engines, and why you like them? I have done a quick search of these online but haven’t settled on anything yet – Proto2000, Atlas, Bachmann, Athern, Kato, and Mantua.”
ASK A QUESTION or post your COMMENTS below.
Roger kindly shared this tip for making barbed wire:
“I wanted a small section of barbed wire on a fence, so used some fishing line and tied knots in it. With a little trial and error, I cut the knots so that tiny bits stuck out to make the wire barbs. I test sprayed a length in silver and touched up some areas near the barbs with brown and rust-colored paint. There might be other ways to do it, but mine after weathering looks real and was cheap and easy to make.”
Jim kindly sent in the idea to share with others:
“Not a question — but a great suggestion. Someone posted a question earlier about lighting in buildings. Here is a suggestion for blocking the light on the walls. Instead of using black paint or construction paper, try contact paper – wood pattern which works just fine. Cut and stick!!!”
If you have an idea to share, send it in using the Ask A Question link below.
Andrew is new to OO and posted this question:
“I am a beginner. I have been told to buy Peco track. What are the advantages of Peco or Hornby track and what can you advise me to buy?”
If you can offer Andrew some words of wisdom, please do.
Test out the helix calculator, scale calculator, train speed calculator, scale to scale conversion calculator, track gradient calculator. These 5 tools are available free of charge with the compliments of ModelBuildings.ORG
These 5 free tools are available with the compliments of https://www.modelbuildings.org You’ll find them by following the ‘Railroad Resources’ link at the top of the website.
Michael R kindly sent in these tips to share:
I have had a bit of experience working on locomotives to get them working efficiently, so can share some things I learned so far. I numbered the key points:
1. Take your time. Fixing or servicing a locomotive should not be rushed.
2. An older or well-used locomotive needs to be disassembled to locate any faults or to be properly serviced.
3. That is the only way to see inside to inspect and clean everything including all the moving parts.
4. That involves checking and removing the trucks, U-joints, wheel bearings, gears, electrical contacts, and other things.
5. When taking things apart, you might find some broken parts. If so, replace them if doable.
6. Consider substituting spare parts from other locomotives that couldn’t be repaired.
7. Occasionally gears can get cracked and dirt gets can into things. Take your time because cracked gears are difficult to spot. A missing gear tooth on the other hand should be easy to see.
8. When your inspection is complete, you can lubricate everything when putting the parts back together. Use proper greases and oils.
I just tried to keep to the basics, but other people might want to add to my list.
John P sent in this tip to share:
“I was surprised a friend of mine who has trains didn’t know to do this, so I’m sharing it on the off chance some others don’t either. My tip is…I make use of very small screws for track ties. By using screws it is easier if I need to lift the track for repairs, or readjustment. My drill has a screwdriver attachment for the crosshead screws which keeps them in position until the tiny screws are nearly fully screwed in. I can then release the screw from the screwdriver grip. It is then a simple matter of a few final turns to securely seat the screw in place. I have always done this, but it seems not everyone does?”
Add your suggestions or comments below.


Download your FREE train room signs from https://www.modelbuildings.org
You’ll find the link in the Railroad Resources Category in the top NAV bar on the website.

Model railroad grades are expressed as a percentage by dividing the rise over the run.
For example, a 3″ rise in 100″ run of model railroad track is 3% (3/100). Put another way, if you have 100 inches of track and your train climbs one inch, then your grade is 1 percent. When 25 inches of trackage rises 1 inch, your grade would be 4 percent. However, be aware your track will need to transition from the flat level to the gradient and back (see graphic). This will add to the run needed for your given gradient.
Real-world railroads might have three grade classifications: 0.8 percent to 1 percent which is considered ‘light grade’; 1 percent to 1.8 percent would be ‘heavy grade’; and anything steeper than 1.8 percent would be ‘mountain grade’ track. Real railroads operate for efficiency, whereas visual aesthetics are factors to consider on model railroads.
On a model railroad, grades can be used to enable more movements in a smaller space, and to make a train layout more visually appealing. Having a train pass on a track over another on a bridge can look particularly impressive. Even though grades on model train layouts are often steeper than on real railroads, grades greater than 2% can still pose problems. If you are using tight radius curves that can compound grades. Where possible, grades are best kept below 3%, however, some layout can and do accommodate steeper grades.
Grades on model railroads are generally steeper because, unlike on a real railroad where very long trains operate, there isn’t usually enough space to replicate a gradual gradient of several miles. However, the same principles need to be considered: the weight of your locomotive, the power of your locomotive, along with the weight and number of cars in your trains. A weak loco won’t be capable of pulling many cars up a grade. The steeper the grade is, the harder it will be. The greater the weight, the greater the traction… which means the wheels on your lighter locomotives could slip on grades that heavier locomotives can climb. Another thing to be aware of is that larger-scale locos will generally cope with steep grades better than smaller loco scales. As an example, a powerful N scale locomotive might pull around 14 to 16 cars up a 4 percent grade. Some train enthusiasts might think 14 to 16 cars is too short a train consist.
Feel free to share this graphic with friends, on Facebook, or on your website if you think it will be of help.
To use this FREE tool, simply click on the Railroad Resources tab in the top NAV BAR on the website. Then click on the “Get your FREE calculators here.” link. That will take you to several free calculators you can use including the FREE grade calculator. https://www.modelbuildings.org
You are welcome to share this link with your friends by email or post the link on your website or Facebook page.
Allan Wright shares these Thoughts:
“A friend across the other side of the country mentioned in passing that he would be sticking with DC because he had so many locos it would be impossible to convert his entire stable to run on DCC. It made me wonder how many others are in the same predicament because, in reality, you don’t need to convert every loco. Most people don’t operate every loco on their layout. If you are like me, you will likely operate a handful of personal favorites… the ones you can rely on. If you were to operate all your locos, you could allow for a line on your layout to be isolated from the DCC circuitry and controlled by DC. For some switches, you could share the line between DCC and DC. Just a few thoughts I wanted to share.”
Doug H writes:
“Has anyone had success with painting their track to remove the unreal looking shine and black ties? To me black is not the right color as many ties were creosoted and darkish brown not shiny back. Real rails to me look rusty except on the top surface where the trains run. Feedback would be good please.”
Ed asks:
“I have a number of HO Märklin cars that I would like to convert wheels and couplers to be usable with my DC engines and cars. Can anyone advise me how best to make these conversions – suggest the couplers to use and how to change out the wheels, including what wheels to buy? Thanks a lot.”
Mike writes:
“This is not really a question but a great tip. I stumbled on a video showing a very fast, easy ballasting technique. Ballast mixed with DAP WELDWOOD PLASTIC RESIN GLUE. It is a dry glue mixed with the ballast at a 2 part ballast 1 part glue. Once you have the ballast where you want it, mist it, not spray, use a mister commonly found at Optometrists or in the pharmacy dept. A spray bottle, puts too much water out, mister is great but you still need to keep you distance. WET WATER is used in the mister, I use a drop of dish liquid and about 4 oz of water. Wipe your tracks and come back tomorrow!! The same concept works on ground foam as well.”
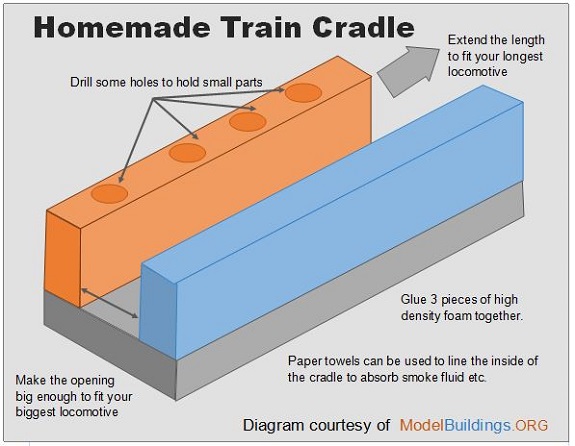
Bob has HO trains and posed this question:
“What are modelers using for train cradles to protect cars and locomotives from damage while working on them?”
There are many possible solutions. Here is one home-made design made from 1 inch thick high density foam. It could easily be adapted to individual needs. You could cut a variety of different sized foam inserts to simply put between the train and the sides to make the engine fit nice and snugly. You could angle cut edges of the foam if you find that easiest. Add your comments, and suggestions on what you use, or how to improve on the design shown below.
Online Train Club Member Terry sent in this quick tip to share:
“I know there are ways to simulate real smoke and steam with smoke machines, but I use an old tried and proven cheap method. All I do is take a tiny amount of cotton and stick inside a steam stack or diesel exhaust. The trick is to not use too much, or make it too high, because that could look fake and even catch on the top of tunnel portals and other things. Use a very small wisp of cotton, just enough to catch and trick the eye into believing the smoke or steam is real and moving upward. It works for me.”


