Everything on model trains, model railroads, model railways, locomotives, model train layouts, scenery, wiring, DCC and more. Enjoy the world's best hobby... model railroading!

Trackage

Rise And Curves Of HO Helixes Unknown

Larry has a problem with building a helix on his HO layout. If you have built a helix you might want to share your experience by helping Larry with some tips and advice. Here’s Larry…

“Hi, am planning on building a Helix for my bench and this is a new critter for me….making sure I get the correct grade as well as the correct radius or diameter of the curves. I know they have pre-made ones you can get, but it won’t work for me so am building my own……or attempting to.

I will be using 3/8 inch threaded rods for the uprights and masonite for the trackbed between them. I have been experimenting with different grade percents and plan on using a easy grade rise of about 2 inch rise for every 12 feet.

My engines are not expensive ones and it seems anything greater than that the engines have issues with.

I was wondering if anyone out there has built a helix and what rise you used and also the diameter or radius of the curves in the helix?

The widest area of my bench is 5 feet, or 60 inches, and the bench is 10 feet long and that is where I plan on putting the helix. I also have an area that is 46 inches wide x 9 feet long and I was wondering if that area would be wide enough for it?”

Help Larry by adding your comments using the green comments link below.

Click To Add A Comment  Ask A Question

Rail Descriptions Confusing

Railway terminology can be confusing at times, especially if you are new to the hobby. Mike has question for you relating to railroad terms you might like to help him out with.

“Hi all. I am relatively new to the world of model railways and I am unsure of the correct terms of various sections of rails. Some layouts show single track, others show two or even up to six. I have been told about the up fast line and the down slow line, could this be explained to me? Also other terminology like head shunt. Any information will be greatly recieved.”

Click To Add A Comment  Ask A Question

Derailments Concern Railroader

Eric is having a problem with derailments on his HO layout. So much so, he is considering major layout changes to try and fix the problem. If you can help Eric with some suggestions, I’m sure he will be elated!

Here is what Eric has to say:

“I have a curved bridge on my lay-out … When my boxcars are pulled over the bridge they derail. When the boxcars are pushed they stay on the track. Adding or subtracting weights to the boxcars do not seem to make any difference. My question is; What other fixes could I try to solve this problem before I rip up my mountain layout and just go to a flat layout?”

Click link below to answer.

Click To Add A Comment  Ask A Question

Helix and Connected Level Confusion

Tom has a question on HO & HOn2 Helix:
“Has anyone had success creating a layout with 3, or more (?), connected levels without the use of a helix?”

Quick Helix Definition: A Helix is spiral of tracks, raising or lowering on a model railroad. A helix is used on multilevel model railroad layouts.

Click To Add A Comment  Ask A Question

Help With Peco Track on On30 Layout

Can you suggest an answer to Dan’s On30 layout question.

“I have an DCC, On30 layout with Peco track on cork roadbed afixed to two inch extruded foam. One switch in my wye is a little far for me to reach from inside the layout. I also have very little clearence under the layout (in this area). What would be the best switch machine for remote mount to work the switch?”

Click To Add A Comment  Ask A Question

Ballasting Made Easy On Model Railway Video

Two of the videos in the new model railway videos series are:
Video #9.
Model train layout of suburban trains in Brisbane Australia. You’d swear you were watching real commuter trains running on a suburban line. This model railway layout tour features some interesting model railway scenery ideas like sports fields, suburban housing, a footbridge, roads and more. Very realistic!
Video #10.
Ballasting Made Easy’ Discover how to lay and fix ballast on model railway track-work to get the most realistic look. Everything in the model railway video is explained step-by-step. http://www.model-train-help.com/member-only-videos.html

Click To Add A Comment  Ask A Question

Rail Joiners On Model Railroad Layout

Robert is away this week so I am posting this question from a reader. If someone would like to help this model railroader they can click the comments tag below and submit an answer.
Adele

“I have a H.O. scale set that has a section that I want to bring back the opposite direction. I have the unit to reverse the polarity in the track. And I know how to wire it the right way. The problem I am having is trying to find where I can purchase the Plastic Rail Joiner’s.

I’ve tried everything from shaping a piece of wood to using a piece of wire coating, slicing the wire coating down the middle. To no avail has this helped me keep the track from touching each other. Would your readers please help to find these Joiner’s.”

3 comments  Ask A Question

Model Train Videos With Australian Trains

Two of the videos in the new model railroad videos series are:

Video #7. Agriculture & Industrial Layouts

There are many clever model railroading scenery ideas in this video. Watch a sugar cane train on its journeys from fields to sugar mill. This layout features: a wheat growing district, a loaded coal train, open-cut mine and port facility. There’s even an outback town with livestock yards portrayed.

Video #8. Soldering The Track


In this model train video tutorial James shows you how to solder and wire track for a reliable connection every time. James talks you through the process step-by-step and reveals a little trick to get a good solder.

Feedback from model railroad fan Roger:

“I just wanted to drop you a line and say how much I have enjoyed your videos. I have already received the first 10 model train videos and they are great. When I received your first E-mail about the series, I was not sure as to whether I wanted to spend the money or not. I must say, just as your Model Train Help book is great, the train videos are great and well worth the money. Your videos have convinced me that I must visit Australia and see this stuff first hand.”
Roger B, Ohio

Click To Add A Comment  Ask A Question

42 Amateur Model Railroad Videos Released

After a year in the making a series of 42 amateur model railroading videos were finally released today.

These videos do not pretend to be Hollywood productions as they focus more on providing good content rather than flashy presentation.

The 42 model train videos cover a range of model railroading topics and include tours of several private layouts… not normally open to the public.


These videos, available by download, also feature visits to some train shows and include lots of useful ideas and tips to help hobbyists build, or improve their own model railroad. Other video topics cover baseboard construction, electrics, foliage making, DC and DCC operation. The series even includes three videos about building a garden railroad.

These videos range in length but average around nine or ten minutes each. The step-by-step tutorials in the videos provide answers to many common (and not so common) model railroading problems.

Access to these videos is by “membership only” so is restricted to a limited number of keen model railroaders.

To find out more about these model train videos and to read the list of contents and see a sample video click on this model train video link.

Happy railroading!

Click To Add A Comment  Ask A Question

Deciding Grades For Rising Track

A common question from model railroaders is how steep to make the slope of a track before having problems with derailments, burning out the motor, or poor wheel traction.
Rule of thumb means generally anything over a 3% slope (3 inch rise in 100 inches run) is going to cause a problem for trains.
Approximately 2ft of run is needed for a 3/4″ rise. That provides roughly a 3% grade. If you are prepared to run shorter trains, then you can go steeper than that.
The danger is in burning out the motor if the locomotive has to work to hard to pull the train up the grade. Traction tires make it possible to run longer trains up steeper grades, but remember the risk of burning out the motor.
You can also go steeper on a short grade where less than the full length of the train is likely to be on the grade.
However, if you want your trains to have the longest run then it is usually best to make the grade as gentle as possible.
Another little model railroad tip relates to curves. If the grade is on a curve, make the grade less steep. This is because the curve adds drag.

Click To Add A Comment  Ask A Question

Clearances for Model Railroad Tracks

As with the prototype, model railroad tracks pass various types of scenery, including platforms and buildings, and cross over or join other tracks. To do this properly, without causing grief to the railroad company, a set of clearance standards are applied to the area around the track.
Sometimes when railroad companies merge, the clearance standards for the merging companies are different, and so a new set of clearance standards needs to be reached. This may mean cuttings need to be made wider, new tunnels may have to be cut, curves may have to be made broader, sidings may have to be moved, and signals and signs relocated.
For the model railroader the situation is similar, but with a little careful planning we can escape the clearance problems of railroad companies. We need to have a set of clearance standards to help us lay our track, and build scenery around that track. The clearance standards we set for ourselves should take into consideration the following:
  • Length of rollingstock you want to operate
  • Height of rollingstock you want to operate
  • Width of rollingstock you want to operate
  • Space between tracks or scenery objects to allow you to pick up a derailed car etc, without causing damage
  • Available space vs desired track arrangement

My ebook has more helpful model railroad tips for you.

Click To Add A Comment  Ask A Question

The Arrival Yard On Model Train Layouts Explained

The arrival yard is where arriving trains drop off the cars of their train. The cars are then moved to the classification yard, being switched back and forth as necessary to get the right cars onto the right trains. The trains are then built out and moved to the departure yard. After getting a new caboose and locomotive, they then proceed to their next destination.

Click To Add A Comment  Ask A Question

N Gauge Ballast Techniques

Here is an opportunity for experienced model railroaders to share their ideas with others involved in the hobby. An N gauge enthusiast has this question:

“What precautions / technique are needed to ensure N gauge points are not gummed up by ballasting when using the accepted ballast -diluted PVA method?”

If you would like to offer an answer to help this fellow model railroader, simply click on the “comments” link below and submit your answer to the moderator for publication.

Click To Add A Comment  Ask A Question

Popular Track Cleaning Method

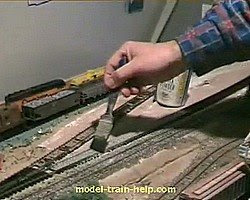
Cleaning model railroad track is one of the best ways of improving model train performance.

Several track cleaning methods are available to the hobbyist including using Goo Gone®. This product is a general cleaning agent that seems to remove much of the grime that build up on railway track.

Goo Gone® is a combination of Citrus Power and scientific technology designed for tough cleaning problems.

Goo Gone® has minimal impact on the environment and is safe to use on almost any surface.

When cleaning rails use a small amount of Goo Gone® on a rag and just wipe. If the railroad track is rusted or corroded use fine sandpaper or a track cleaning block after sanding the rails. Then wipe with Goo Gone® or other cleaners.

Some hobbyists also use Goo Gone® on the wheels of their locomotives. Goo Gone® or fine sandpaper can be used to make the wheels bright and shiny.

As well as using Goo Gone® on model railroads, the product can also be used on: carpets, upholstery, clothing, tile, glass, grills, appliances, vinyl, wood, draperies, autos, boats and fiberglass.

The manufacturers claim Goo Gone® is effective on: gum, tar, crayon, fresh paint, tree sap, oil and grease, blood, ink, asphalt, scuff marks, tape and tape residue, makeup, lipstick and mascara, adhesives, candle wax, kitchen grease, shoe polish, soap scum, bumper stickers, duct tape and bicycle chain grease.

Click To Add A Comment  Ask A Question

7 Useful Model Railroad Tips

The Model Train Help Ebook includes hundreds of quick tips and ideas for designing, building and maintaining a reliable and spectacular model railway layout. Here are 7 quick model railroad tips from the ebook:
1. Cleaning the wheels or electrical contacts with ‘wire wool’ is NOT recommended. The wire wool is made of steel so is attracted by the magnet and will cause damage. Strands of wire wool can also cause electrical shorts within a locomotive.
2. The same rule applies to cleaning the track. Never clean the track with wire wool as it will leave strands potentially causing a short across the track to trip the controller. The ebook explains several good options for track cleaning.
3. Ensure all loose track pins have been removed from the track before running trains. The magnets will attract the pins into the motors and cause damage.
4. Be careful when laying ‘loose’ ballast around point blades. This can cause problems if the ballast gets distributed in the wrong place.
5. When laying ‘loose’ ballast never run the trains until the glue has fully dried. Vacuum the track clean to ensure no loose ballast remains.
6. When wiring your layout to operate points, lights, power feeds, etc. always use different colour multi-stranded flexible wires. Plan first with a diagram and record the colors used for each function for future reference. This can prove invaluable when checking for faults later.
7. Avoid touching the running gear on the sides of a locomotive when using your fingers to pick a locomotive. Touching the running gear on the sides of the locomotive can damage the alignment of the running gear.
More helpful tips and ideas for designing, building and maintaining a model railroad layout are in the Model Train Help Ebook.

Click To Add A Comment  Ask A Question

Low Cost Ballast Ideas For Trackwork

When viewing a model railroad layout the eye tends to focus on the scenery, buildings, the trains and track. Making the trackwork look realistic is therefore critical to any layout, because it defines from where your line is coming to where it is going.
Apart from the track itself, ballast is the other major component of the trackwork and can take considerable work (and money) to achieve the ultimate effect.
Fortunately there are many very good ballasting products specifically produced for model railroaders, but these can prove reasonably expensive, considering the quality required to complete most model railroad layouts.
Masonry sand is an option worth considering for those working on a tight budget. The good thing about masonry sand is that it is available in a range of pigments with different degrees of coarseness. If the desired color is not available, the masonry sand could still be used as a base coat with regular ballast laid on top.

Masonry sand is generally sold to builders, so is likely to be available from a hardware store, or building supplies depot. The sand generally comes in minimum size bags of approximately twenty-five pounds. Although this sounds a large quantity, it will soon be used up when spreading it around track areas of an average sized model railroad layout.

One big difference between builders masonry sand and regular track ballast is the price. The masonry sand is considerably cheaper to buy.
A quick word of warning. Some masonry sands do contain iron which would be the same as soldering a wire between the rails. A strong magnet will detect any iron in the sand and could be worth using before buying the masonry sand.
Test the product in store using the magnet. Sand sticking to the magnet is a sure sign of iron content. If this happens do not buy the sand and instead test the magnet on another color.

Click To Add A Comment  Ask A Question

Track Cleaning Devices

Here is an unusal track cleaning device called the Noch Snap On Track Cleaner. The cleaning brush is built into a strong plastic frame that clips onto an axle of a model train piece. It apparantly works in the forward or reverse direction and is suitable for HO models in DC or AC track systems.

Click To Add A Comment  Ask A Question

Different Track Cleaning Option

Clean track is essential for any model railroad layout because the power for the locomotives motor comes from the track up through the wheels. Keeping the wheels clean is therefore critical as good performance depends around 90 percent on clean locomotive wheels and 10 percent on clean track. Both track and wheels affect smooth running on a model railroad layout.

The Model Train Help Ebook discusses this in more detail and covers several methods for track cleaning and gives many helpful tips on keeping the track clean.


One option not mentioned in the ebook is the Gaugemaster electronic track cleaner. According to Gaugemaster, “The 12v D.C. controlled output from the controller is passed through the unit. Connection between unit, power source, controller, and track is completed via six terminal connections. The unit superimposes a harmless high frequency signal over the output from the controller. When a poor contact between loco and rail is detected the unit switches on, ionising the gap and burning off the dirt, switching off again when contact is restored.”
Personally, I haven’t tried the Gaugemaster track cleaning system so I can’t personally recommend it, but it is another track cleaning option to consider. Also, worth nothing is that Gaugemaster offer the track cleaner as a single track cleaner or a twin track cleaner.

Click To Add A Comment  Ask A Question

SUBMIT YOUR QUESTION

ho scale house

Model Railroading Blog Archive