
Everything on model trains, model railroads, model railways, locomotives, model train layouts, scenery, wiring, DCC and more. Enjoy the world's best hobby... model railroading!
I’m sure other model railroaders reading this blog would love to hear about your RR layout and see a photo.
If you would like to share your experiences and information about your layout then you can submit your train layout details for publication here.
Ian has a question for readers about an early DCC controller and asks:
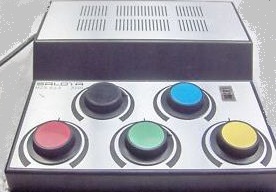
“My grandson has been given the knocked down layout together with engines all controlled by a Salota 3701 controller by someone whose father had died and her children did not want it. This is obviously an early DCC unit. Can anyone provide some information on this system?”
Comment below.
Just a reminder that only about 50% of the questions submitted get published. To maintain standards all questions go through a moderation process edited by a real person. Many questions fail because they don’t make sense, or don’t have sufficient detail for someone to understand and provide an accurate answer. Other questions fail because they use txt language and are filled with spelling errors, or are in ALL CAPS. We want to maintain standards and publish good questions and good answers. It is in everyone’s best interest.
“My grandson has been given the knocked down layout together with engines all controlled by a Salota Type 3701 controller by someone whose father had died and her children did not want it. This is obviously an early DCC unit. Can anyone provide some information on this system?”
Rob asks readers:
“I am using dcc and I want my light signals to work when I change the points. Is there a way they can be controlled to do that? I am using the Hornby select dcc controller with side mounted point motors controlled by the decoder box. Many thanks”
Readers can answer this question below.
Steve has a question that is already answered in my Model Train Help ebook. However, someone might like to offer some advice here:
“I have a dcc engine and it moves but it makes a load mumming noise. What could be wrong with it?”
Readers can offer suggestions below.
John from the UK has a wealth of knowledge and is happy to share it with others. He writes:
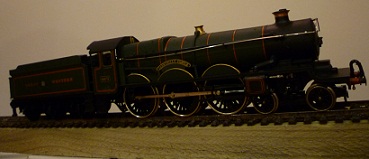
In about 1895 the Scottish locomotive designer Dugald Drummond then C.M.E. for The London and South Western Railway, was required to design a fast suburban passenger locomotive with a snappy performance for stopping commuter trains into London from the south west. The result was the M7 0-4-4Tank locomotive.
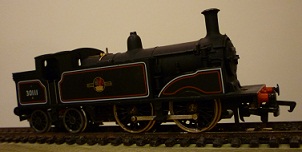
These engines lasted in service for more than sixty years. After electrification ousted them from suburban commuter trains they continued in use on branch and lesser cross country lines but most especially on empty
coaching stock trains at Waterloo to and from Nine Elms Yard where coaching stock was serviced and prepared for its next journey. Just two examples of this locomotive have been restored, one at the National Railway Museum, York the other, no. 30053 privately. This was running at the Swanage branch, an impressive private restoration of a complete branch line which is now being reconnected to the main line giving full interchange facilities to and from British Rail with whom connecting services are to be run.
My model is of a ‘push-pull’ variant in British Railways days and uses a kit built chassis with a body purchased through ‘Railway Modeller’ magazine for a mere £8! The whole loco cost about £36 to build. While the motor and gearbox are ‘in the firebox'(!), there is a heavy steel weight mounted in the front of the boiler and smokebox directly over the driving wheels. As a result my loco will pull eight or more bogies.
Drummond died on the 8th November 1912 having produced the designs of a large number of locomotives. His most successful loco was the T9 ‘Greyhound’ that like the M7 tank lasted almost to the end of steam traction on British Railways. I have a T9 model and will send pictures of that in a later blog. Drummond had recognised that as trains became longer with heavier bogie stock replacing four and six wheel coaches there was a need for a new generation of much bigger locomotives. His last design was the 4-6-0 T14 ‘Paddlebox’, that was only partially successful on account of high coal consumption.
Drummond was succeeded by Robert Urie who had a\lways been Drummond’s understudy from when they both worked on the locomotives for the North British Railway in Scotland. Like Drummond, Urie was also a Scot.
After Drummond’s death Urie took the design of the T14 and produced two new 4-6-0 locomotives. These were the N15 (Express Passenger loco) and the S15 (mixed traffic) with smaller wheels. The N15 locos were given names according to the stories of King Arthur, his Queen Guinivere, his court at Camelot and the associated Knights of the Round Table. Thus the N15 class came to be known as ‘King Arthurs’.
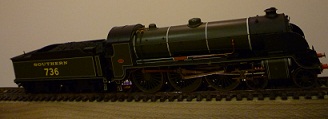
My model shown above shows the large diameter driving wheels, the smoke deflectors with their frontal curvature thereby giving the locomotive a very imposing appearance, and the large bogie tender. There was a reason for the large tender because the Southern Railway as distinct from the other three British main line railways, had no water troughs. On the Central and Eastern sections where the journey distances were fifty to seventy miles only, this did not matter and smaller tenders could be used. However the western section which ran right down to Padstow in Cornwall and right past Camelford which is believed to be the site of King Arthur’s Camelot, was more than 200 miles. It was necessary therefore to have adequate supplies of coal and water on the locomotive.
My model is of no.736. It is named ‘Excalibur’ after King Arthur’s legendary sword.
When Urie died in 1937, his successor was an Irishman, Richard Maunsell. He produced improved King Arthur class engines with a more streamlined cab design but most importantly, higher superheat and longer valve travel. Where the Urie Arthurs could run short on steam, the Maunsell Arthurs had the ability to produce steam more freely and could therefore just keep on going on the long and heavy gradients of the West Country. No. 777 Sir Lamiel has been saved and is run from time to time on main line excursions.
Maunsell also produced a more compact Express Passenger loco for the Dover and Southampton boat trains. These were 4-4-0 locos still with the same general appearance with the frontally curved smoke deflectors and were named after the principle and exclusive secondary ‘public’ schools of Britain including Eton, Harrow and Winchester. The ‘Schools’ class took their place as the largest and most powerful 4-4-0 locomotives in Europe and were very popular with the men who drove and fired them.
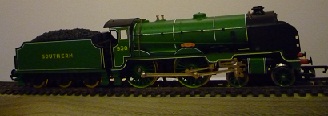
My model is of no. 930 ‘Radley’ and is seen in the above photo.
Three Schools are preserved. They are Stowe, Cheltenham and no. 926 Repton. This last-mentioned loco ran for a time at Steamtown in Canada. It is now undergoing heavy overhaul at The North Yorkshire Moors Railway in the north of England.
Unlike the irascible Drummond, Maunsell was very popular with his workpeople. Maunsell would say to a newcomer to his design team, “You either will last only a week or you will be here for the rest of your working life.” ALL his team never left him until it was his turn to retire.
Maunsell’s locomotive and carriage designs restored the reputation of the Southern Railway. that had previously lagged that of the other three companies.
The final photograph is of a great Western Railway locomotive. The above photo shows my Castle Class locomotive. It is recorded that in 1904 the magic 100 mph was achieved for the first time by anything man made. At that time the peregrine falcon was the fastest creature on the planet and is now known to reach 160mph when diving on its prey. On 9th May 1904 Locomotive no. 3442 ‘City of Truro’ reached 102.3 mph between the eastern portal of Whiteball Tunnel and Taunton, Somerset on an ‘Ocean Mails Express’ taking mail which had come ashore at Plymouth from New Zealand and Australia to London. At that time the Great Western was competing against the London and South Western for the carriage of the mails from the Commonwealth.
City of Truro was to a design by a former GWR Chief Mechanical Engineer, William Dean. When Dean’s mental faculties began to fail in 1902 his understudy, George Jackson Churchward took over although Dean continued to be nominally CME until his death three years later. Churchward modified the City Class locos including no. 3442 in line with his own ideas of longer travel valves and higher boiler pressure. Thus City of Truro began a tradition of speed on the GWR that has continued into the modern age. Churchward went on to design the 4-6-0 Star class and when he retired in 1922 his successor Charles Collett improved the Stars and produced the designs of the Castle Class. My model is of no. 4073 Caerphilly Castle the first Castle built in 1923. In 1946 I saw 4073 bring the 14 coach ‘down’ Cornish Riviera Express through Reading Station. The locomotive is kept at the Steam Museum at Swindon Wiltshire in pristine condition. The Castle was not the last express locomotive of the Great Western and in 1927 Collett brought out the nominally more powerful King class. GWR footplatemen have told me though, “There is nothing a King could do that a Castle couldn’t also do just as well!”
It is an interesting fact that while only 30 Kings were built between 1927 and 1929 production of Castles continued up until about 1950 when the last one, no.7037 Great Western left Swindon Works. Because a number of Stars were rebuilt as Castles including no. 4037 ‘South Wales Borderers’ I am honestly not sure exactly how many there were, but it was around 160. There are seven in preservation including Nunney Castle second locomotive in the attached double headed formation.
In about 1895 the Scottish locomotive designer Dugald Drummond then C.M.E. for The London and South Western Railway, was required to design a fast suburban passenger locomotive with a snappy performance for stopping commuter trains into London from the south west. The result was the M7 0-4-4Tank
locomotive.
These engines lasted in service for more than sixty years. After electrification ousted them from suburban commuter trains they continued in use on branch and lesser cross country lines but most especially on empty coaching stock trains at Waterloo to and from Nine Elms Yard where coaching stock was serviced and prepared for its next journey. Just two examples of this locomotive have been restored, one at the National Railway Museum, York the other, no. 30053 privately. This was running at the Swanage branch, an impressive private restoration of a complete branch line which is now being reconnected to the main line giving full interchange facilities to and from British Rail with whom connecting services are to be run.
John from the UK has sent in this article for publication:
All my locos are either Hornby or Bachmann bought new. There are three exceptions to this:-
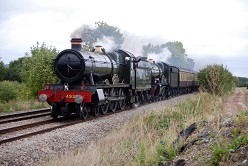
1. Airfix GWR Castle class 4-6-0. Castle class locos were the front line express passenger locos of the GWR from 1923 until the end of steam. In the nineteen thirties the ‘Cheltenham Flyer’ was declared The Fastest Train in The World and held the title until 1937. The fastest run of all in June 1932 was hauled by no. 5006 Tregenna Castle (It was always hauled by a Castle Class engine) in which the 77.3 mile journey was covered start to stop in under 57 minutes, an AVERAGE speed of 81.7 mph. A total of 165 Castle class locos were built, the last 38 after Nationalisation in 1948. No fewer than seven Castles have been saved for preservation. Recently no. 5043 Earl of Mount Edgecombe was sharing a 500 ton load in 14 bogies with Tornado no. 60163, the new build Peppercorn Pacific (LNER) over the Devon banks. Here there are sections as steep as 1 in 30. This special train was actually delayed by a failing diesel HST125. The 125 mph modern train was struggling with a deposit of wet autumn leaves on the track. The steam locos had dry sanding gear and made light of it.
My model is an excellent loco with tender drive but I may have to add weight to the main loco body because there is some skidding of the main driving wheels. The pulling ability of this loco is very good and it has taken 20 bogies away no trouble.
2. Airfix GWR 61xx ‘Prairie’ 2-6-2T heavy suburban passenger tank loco. This pulls fine but runs unevenly and I have never succeeded in finding out why. I have bought a new chassis kit, wheels, motor and gearbox from ‘Comet’ Models and will build this new chassis and fit when I can find the time.
3. Scratchbuilt Southern Railway general purpose tank engine type Drummond M7 0-4-4T. These engines were used on empty stock train duties taking empty coaches back to Nine Elms depot for cleaning and servicing. M7’s also brought serviced stock back into Waterloo from Nine Elms Yard in preparation for departing trains for Bournemouth, Weymouth and the far south west (Devon and Cornwall). Some M7 locos were fitted with special gear for running on “push-pull” two coach branch line trains in which the driver operated the train from a set of controls in the end compartment of the second coach. This was done to save the need to “run round”. Thus the crew were together on the footplate when running in the forward direction only. This was done on the Swanage and Seaton branches especially. My model hauls a train of ten bogies or thirty goods wagons and is a perfect runner.
I believe the problem with the Prairie tank is too much side play on the leading and trailing driving wheel axles causing jamming of the coupling and connecting rods. If I can put in washers under the driving wheels on these axles it may cure the problem but I have been told that the Airfix chassis leaves much to be desired and I should build a new chassis. This was a new loco but Airfix no longer exist so I have to deal with it myself.
If you have a double headed loco hauled train I have found by experiment that one transformer/controller unit will satisfactorily convey the current draw of the two locomotives without overheating and tripping out through being overloaded. My layout is absolutely flat. There are no gradients anywhere. This is deliberate because I want to run trains of reasonable length.
I am building a number of UK Southern Railway electric multiple units. Each unit consists of a trailer car and a motor car with one motor bogie based around a Mashima 10/24 motor. I intend to run a six coach train.
On the face of it, two pairs only will be motored as this is commensurate with the double headed loco hauled train which we know imposes a safe level of current load. The third unit pair will have a dummy motor bogie i.e. it is in fact two trailer cars only. Thus each motor bogie is hauling three cars each only.
Here comes the question.
If the third unit is motored there are still only six coaches total. So that means each motor bogie will only draw two-thirds of the current as each will only now be powering two cars instead of three. Therefore if I am interpreting Kirchoff’s Law correctly, then the transformer/controller unit will still not overload.
What do you think? I would respect your opinion – especially as American freight trains have as many as five locos in multiple. Please don’t tell me that it can only be done using DCC!!!
If that is your opinion I will cry tears of blood!!
To comment on John’s question, or to offer a solution, please use the green Comments link below.
“I am just getting started. I have purchased a lot off of e-bay. What is the best track to use. Code 100 or Code 83? And how can I run 2 trains on the same track?”

We would like to hear from you if you think you might be interested in supplying content (words, photos and/or videos) for a new model train web site project. There will be payment for quality contributions from anyone experienced in one or more areas of the hobby. Contact here.
Comment below.
Comment below.
"This is my first layout I've now done and I jumped into DCC straight off. I'm glad I did it but I have just invested in a Kato Bullet train in analogue. It is blisteringly fast but once the Decoder board is inserted it slows down. I have set the acceleration and top speed and volts on the board to maximum but even this programming has not changed things. I tried removing the decoder chip from a Dapol loco and that increased it's top speed so it was not the decoder chip at fault. Does anyone know if this is to be expected and if not what I may have done wrong?"
Readers can offer suggestions below.
You will also need to have reasonable writing skills and have the ability to communicate your thoughts clearly in simple to understand language (in other words… not so technical that only a few people will understand).
This won’t be a highly paid project, but there will be some payment involved.
If you think you have the skills and you might be interested in helping out, then click here for more information.
Readers can comment and offer suggestions below.
David has kindly sent in these tips to share with others in the hobby:
Just read your tunnel problem with not being big enough and thought I would add something to it.
When getting ready to plaster a tunnel use heavy duty aluminum foil to line your tunnel.
It won't allow any drying plaster debris or anything for that matter to fall on your track. At the tunnel portals area you can actually crunch the foil to resemble rock work inside the tunnel and spray paint it to look like rock work. Keeps your tunnel free from all debris and keeps track clean.
I have actually been using it instead of wire to form mtns. and hills and then using the plaster cloth on top of foil. You can spray paint foil first-add plaster cloth-then do your ground or rock work. Easy to use and very inexpensive. I have also crunched foil up to resemble rocks and used the foil as a rock mold and poured hydrocal in and made really large rock formations. It really makes great looking rock formations.
Take a sheet of foil about 12" in length and just crumble it up-then carefully spread it back out and you will see the wrinkles and the rock formations appear and then add your plaster cloth and try settle it into formations. Give it a try. Can be used over for molds. Spray with wet water befor pouring hydrocal into foil mold.
Readers might also like to look at these tunnel tips submitted by Geof http://modeltrainsetshelp.blogspot.com/search?q=tunnel


