Everything on model trains, model railroads, model railways, locomotives, model train layouts, scenery, wiring, DCC and more. Enjoy the world's best hobby... model railroading!
Auto Reversing Module
Gopal from India models N scale and has this question:
“I hope someone can help me in getting AUTO REVERSING/FORWARD module with a pause of few seconds for my ROCO N scale train outlay. Please help. Thanks”
How to Remove Paint from Locomotive Shells
Club member Matthew R asks readers:
“I would like to know how to remove paint from N scale engine shells. The previous owner spray painted them and covered most of the details on the shell. I got them cheaply second hand off the net so shouldn’t complain. A messy job!”
The ASK A QUESTION link is under every post if you have a question you would like published.
Beginner Needs Advice on Model RR Basics
Roger S posted this question for readers:
“I now have an HO scale train set inherited from my late Dad. Its not a big set, but considering I know very little about trains it’s probably a good starting point. I think he would be proud to know I am finally showing some interest in the hobby. The set with 4 locomotives hasn’t been used in probably 5 years. I’m not too bad at carpentry so thought I would set it up on a 4′ x 8′ sheet of plywood, which I understand is standard.
I wouldn’t mind some tips on how to clean and maintain the various components: locomotives, rolling stock, and the track etc. Thank you.”
The ASK A QUESTION link is under every post if you have a question you would like published.
Installation of a DCC ZEN Series Stay Alive High Power Capacitor
David’s question:
“Has anyone installed one of these DCC capacitors to a stock standard ‘out of the box’ Athearn Genesis locomotive? Is it an easy installation or do I have to dismantle the loco and (I dread this) solder wires to a pcb?”
Train Bench Top Materials
Jim who models HO asks:
“Has anyone ever used Plexiglas as a top for their bench? It won’t dry out or warp causing track problems later. And what about peg board?”
Beginners guide to HO scale and OO gauge trains with 18 “space saving” track plans – details here.
What Causes Scale Model Trains To Derail
Bill sent in these thoughts to share:
I find that derailments can happen if cars are not properly weighted to NMRA standards. For example, if you have an underweight car between properly or overweight cars on either side and a dirty section of track causes the pulling and or pushing locomotive to stop and lunge and thus the varying momentum of rolling stock, caused by this weight issue, can result in derailment.
Long standard gauge coaches running on a layout built for mountain climbing tight radius “Mine” trains with relatively short rolling stock can cause derailments.
 Improper truck adjustment. From my experiences both trucks should swivel with one having less play than the other. Failure to maintain these and you are inviting problems.
Proper height adjustment of couplers. Again I am reminded of problems I have had with coupler “pins” catching on turnout points, resulting in….derailments.
The reason I know about all these issues is because I have at one time or another, ran into these issues. So I mention them from first hand experience and am still learning from my mistakes.
I have also found that even after all my learning mistakes, I am still not done.
I am reminded now about several Labelle boxcars (which are constructed of basswood without any weight to them), that I had built to NMRA standards, gluing weights from end to end and right down the center of the wood floors. Initially they all ran great and then I started having derailment problems. After several attempts of trying to duplicate the issue, it came down to one particular car. Intermittently the weights were sliding off to one side around certain curved track sections causing the car to lean to one side, pulling the trucks and couplers up and down causing an imbalance and derailments. Point being, unless I wanted to park this guy at the end of the line forever, I would have to “Open a door” and carefully try and re-glue the weight in proper position. (not a lot of fun for those of us that tediously build these cars!)
Maintenance, maintenance, seasonal or periodic maintenance of locomotives, rolling stock, track and all other components of a layout including sight check of trees (growing) to the point that they can derail locos and or rolling stock, and testing of all electronics, DC or DCC is a never ending must!
I am sure I am missing other potential derailment causes…would enjoy others’ thoughts on the subject!
Rolling Stock on Fleischmann Track
Adrian who models with HO trains asks readers:
“First of all thank you for adding me to the group. I am very much a Newbie and have purchased a Fleischmann DCC starter set which I have extended. I have a number of Fleischmann wagons and some Bachmann and Athern wagons which I purchased off ebay. I have a problem with the Bachmann and Athern wagons derailing on the points, The Fleischmann rolls through nicely. After comparing what maybe different I found the wheel diameter to be smaller and flange to be less on the Bachmann and Athern wagons. I think this may be the root cause? Any suggestions would be greatly appreciated.”
If you want your question published, use one of the ASK A QUESTION links on this blog.
Using WD40 on Model Railroads – Right or Wrong?
 Benjamin W sent in this question:
“I’d like to know if WD-40 is suitable for lubricating the engine gears? Also is WD-40 ok for oiling trucks on the freight cars and track? I’ve had a go and it appears to be working ok for the moving parts and smoother runs on my track, but am I really using the right product and going about it the right way?”
Add your comments below.
Solving The Problem of Dim Lights in Passenger Cars
Club member Michael M asks readers:
“I want to improve the lighting in my passenger cars? The lights are very dim and not easily noticeable unless the room is completely dark. I seem to recall reading somewhere that capacitors store DC current, so presume they will provide a constant voltage to the lighting? It is all a bit confusing. Can anyone help.”
If you would like to have your question on this blog (10,000 readers weekly), use the ‘Ask A Question’ link below each posting.
Connecting Wagon to Loco Without a Coupler
This question is from Dave:
“I want to put wagons in front of a Arnold br44 engine or run a second engine together. Any suggestions on how to do this without front couplers, or is there a product out there? Any help would be grateful.”
Superelevations Techniques
Here’s a question from Online Train Club Member Tyrone:
“I am just beginning to lay track on my latest HO layout. I am using flextrack because I find it easy. My question is whether or not it is necessary for me to super-elevate my curves? If the answer is yes, then how should I do it? Also, would I use easements into my curves? This is my second layout and I never did any of the above with my previous layout, and didn’t have any major problems.”
The ASK A QUESTION link is under every post if you have a question you would like published.
How to Add the Effect of Real Grouting to Brickwork Models
Wayne models OO gauge and asks readers:
“I am constructing a plastic model of a building and would like to detail it giving the effect of grouting otherwise it will look fake. How can I paint brickwork to have the effect of grout between the bricks.”
Submit your question for publication to the Blog Moderator by using the ASK A QUESTION link just below this posting.
Track Radius Question
Allan has an HO scale question for readers:
“I am finally going to make a start on layout, but my question is how much base board is required for a 22 inch radius track? I have to hang the base on a garage wall with a hinge system. My new home is limited in space so height of layout is limited to 160mm or 6 inch for rises and tunnels. I hope it works.”
To post a question please use one of the ASK A QUESTION links on this blog where you will find the submission form and the editorial guidelines.
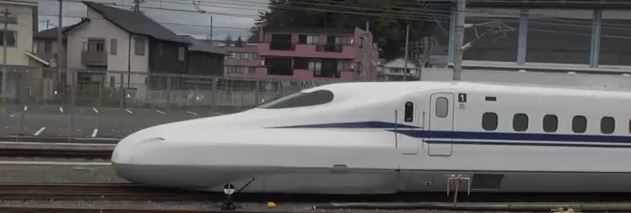
Japan’s Tech-Friendly Next Generation of Bullet Trains
Central Japan Railway has revealed a prototype of the N700S, a “Supreme” bullet train that has been designed to be kinder to both the passengers and the environment. It’s claimed to 20 percent lighter, consumes at least 7 percent less energy and has a ‘boxier’ nose to cut back on the sonic boom-like effect when the bullet train rushes through tunnels at up to 300KPH (186MPH).
Shorting Out on Peco Code 100 Turnout
Brian has OO gauge and has this question for knowledgeable readers:
“When joining turnouts running with 12v DC together in a string the locos frequently short out the supply to the track. It would appear to be at the point where one or the other of the loco pick ups crosses a certain part of the turnout. Is this something that can be cured by wiring adjustments?
Add your answer using the COMMENTS link below.
Spot The Difference with these Scale Models
See if you can spot the 9 differences in these two pictures of scale model people and houses. Add your answers using the COMMENTS link directly below this posing.
Have Fun!
Plans for the scale model houses are available here.
Stationary Decoder
John has this question for readers:
“I have a Digitrax Zepher control unit. My DCC railroad will have scheduled routes, but I also want to have manual operation with a diagram panel having turnout LED’S and switch buttons. I will have DCC programmed routes but also want to have diagram panel using manual switches with directional LED’s. I researched stationary decoders and feel that DCC Concepts Colbalt DCD-ADS-8SX probably unit best fits my needs. I realize the manufacturer is located in Australia and see only one USA distributor so am a bit concerned before purchasing. I found limited critique of this unit. Any input to product’s reliability/quality would be greatly appreciated. Thanks.”
MRC Sound Decoders
David has HO scale and asks:
“I have an MRC HO 1730 16 bit universal EMD 567 sound decoder. I’m using the 8 pin plug, but there is a black plug that I need to cut off. Can I cut it off without hurting the decoder?”
If you have a question you would like published on this blog, simply use one of the ASK A QUESTION links under any posting to submit your question for consideration.


