Trackage
Everything on model trains, model railroads, model railways, locomotives, model train layouts, scenery, wiring, DCC and more. Enjoy the world's best hobby... model railroading!

Ryan has put together this helpful tutorial for avoiding derailments on a model train layout. The video includes some excellent layout scenes. Feel free to pass it on to friends. Enjoy!
A reader asks others for advice:
“I have just switched over to FasTrack. So if it’s possible could you someone give me some ideas for FastTrack. I am limited to a 4×8 board at this time. Thank you.”
Joe has kindly sent in an idea to share with others in the hobby.
I found a way to get ballast for 0 and 027 track. First of all I have been purchasing old track at train swap meets. Track and switches are there for a minimal cost. When doing different jobs in my garage, I was using play sand from The Home Depot for cleaning metal parts. The bigger grit of the sand sped up the sand blasting process. However some of the sand stones were too big for the nozzle forcing me to sift them out. Unbelievably, the pebbles that were sifted out from a normal aluminum screen turned out to be a great ballast size for my train layout.

Track ballast on Joe’s model railway layout.
With the three rail system, the space between the rails had to be spread out in order for the train wheels not to touch. (causing a derailment). After the ballast was in place, I used clear lacquer spray paint over the stone and saturated it. Once the lacquer dries, everything stays in place. The clear lacquer paint comes in spray cans at Lowe’s or The Home Depot, in their spray paint departments. You can guard for over-spray with news papers. Make sure you quickly remove the newspaper before the lacquer sets. The final step is to wipe the track with lacquer thinner on a rag to remove the lacquer and allow electrical contact with the trains. Most important is to allow adequate time for the paint and thinner to cure. ANY FUME CAN BE IGNITED FOR AN ELECTRICAL SPARK.
Richard wants advice from others in the hobby and asks:
“What is the spacing of tracks where two run side by side? What is the spacing on curves? Previous answers have referred to NMRA standards but that means nothing to me. If I want to design my own layout how do I space?”
Please add your suggestions to help Richard below.
Malcolm has a question for experienced model railroaders:
“I am a senior beginner to trainsets. I am building 3 tracks on a board 6 x 6 and hopefully bigger in future. But am having problems making the train go from track to track – it cuts out. What am I doing wrong?”
Add your answer below.
Model railroaders might want to try the “Odegard Squint,” named after famous model railroader Gordon Odegard (might be Odegaard). Just stand at one end of the layout and look at the track is at eye-level. Squint your eyes, and make sure all the track looks straight and there are no kinks or foreign objects on or near the track. Works every time!
Sandy has sent in this idea to share:
“Cutting track can be problematic and a poor job can result in a bad fit and inevitable derailments — no fun! One thing to watch out for is fine metal shavings that could find their way into moving parts on an engine — even more of a problem!! There are difficulties with using an ordinary hacksaw as this definitely spreads metal dust which is difficult to clean up. You can use a Razor Saw but the cutting pressure can put the rails out of gauge.
My solution is to use a pair of side cutters with a flat edge on one side. They cut straight instead of cutting to a tapered point. The side cutters need to be sharp and there is the possibility of breaking them under pressure. However, they work well and are a versatile tool to have in the kit. You can buy side cutters from an electronic store, or have a look at the Xuron site online.”
Thanks Sandy.
It is really handy to be able to easily move your layout (or sections of it) if required. Most people discover this when they move house. Moving the furniture is easy, but moving a layout can be problematic.

This informative manual describes how to build a mobile model train layout, so you don’t have to begin again when you move house. You can read how a modular train layout can save you money as well as taking up less space.
You’ll really enjoy this! It includes photos, tips and a layout plan included. Get it now for free when you join my online Model Train Club.
John sent in these words of wisdom:
My tip is the “Odegard Squint,” named after famous model railroader Gordon Odegard (might be Odegaard). Just stand at one end of the layout and look at the track is at eye-level. Squint your eyes, and make sure all the track looks straight and there are no kinks or foreign objects on or near the track. Works every time!
David wants advice from readers on ballasting:
“I am attempting to use percolated coffee grounds as ballast in my large main switch yard. The color is perfect for a heavily oiled track-bed. The problem I encounter is that, since there are oils in the coffee grounds, the regular ballasting methods of applying alchohol followed by a diluted glue solution will not keep all the grounds together. After drying, when I use a vacuum to suck up the excess, some large pieces of ballast are removed. Obviously the oil effect of the coffee grounds doesn’t allow for good adhesion. What can I do to remove the oil from the grounds prior to ballasting?”
Add your comments below.
Adrian from New Zealand asks readers for help:
“I have just started my layout and am using Peco track sl 100 streamline. I also received code75 sl110 rail joiners, but I can not get them on the track (too tight) can someone help me?”
Peter is hoping someone will be able to guide him and asks:
“Will O Scale Engines and rolling stock with an O-72 turning radius run thru Lionel Super-O Switch-tracks without derailing? If not, is the above track level side mounted switch mechanism housing (simulated switch motor) the problem?”
If you can help Peter, please use the Comments link below to add your thoughts.
Bill has a question and is hoping someone can help him:
"I have set up my track and hooked up coupler from power pack. All the track is clean and non mixed and is tight. When train goes to far side of track away from coupler to track, train slows. If I need another coupler on far side of track away from power pack how do I install it?"
Comment below.
Anirban is from Kolkata (formally known as Calcutta) India, and like Subhash (a regular contributor to this blog), he is making his own trains and track from scratch. This is amazing as most of us enjoy the luxury of buying read-made trains and track from shops and shows. But, as Subhash explained once before, they don't have the selection in India and also things a very expensive, so they have to be inventive to be involved in the hobby.
Anyway, Anirban is hoping someone will be able to offer him some advice:
"I am from Kolkata and scratch building a G scale model. I am facing problems with building the locomotive and the tracks. Making sleepers for the track is a real challenge. Also, I am unable to have the wheels conduct electricity from the track. The wheels do not conduct properly and hence the test model has jerky motions. Please do help!"
Maybe Anirban could send in a photo of his loco to show everyone.
If you are able to help, or offer some encouragement, please use the comments link below.
Steve asks others in the hobby for help:
“I have constructed a near-ceiling shelf quad-circular track and have come up short in various locations. Since Bachmann only makes a limited selection of G track, what is the best method to alter both straight and curved track? If anyone has been successful doing this, please respond with a step-by-step procedure that you’ve found successful. I have already tried using a fine-blade hacksaw and a Dremel cutting wheel but have run into difficulties maintaining and straight and clean cut. Many thanks in advance!”
If you can help Steve, then please use the comments link to add your suggestion.
Dan asks readers for advice:
“I am going to build a shelf around a room for a train. I am not sure yet what scale I am going to use (N or HO). My question is; how tight of a curve can I make without making the train derail?”
Add your comment below.
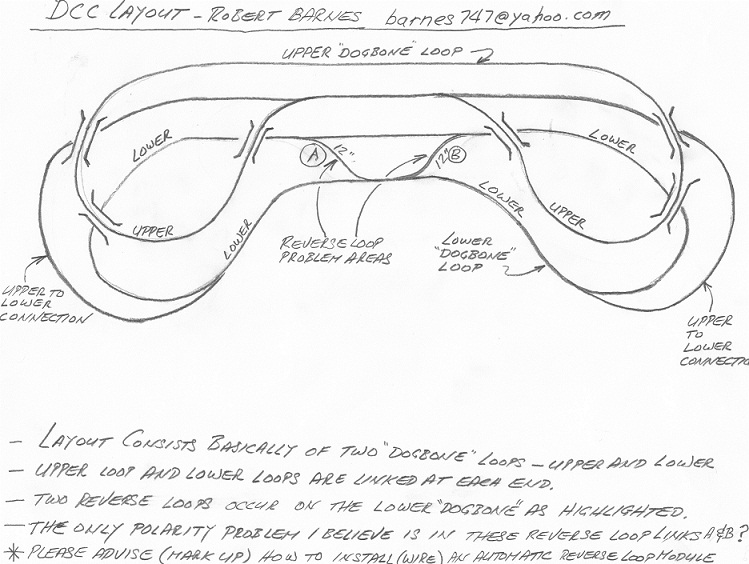
RB has a question for those with knowledge of reverse loops and asks:
“I have already decided on a layout which includes a reverse loop (2) and I have attached a sketch of it.
Steve asks others in the hobby for help:
“I have chosen G scale for a large inside near-ceiling shelf run and have a need to shorten both straight and curved Bachmann track. No matter how carefully I make the attempt (either using a Dremel cutting wheel or a hobbiest razor saw), I fail to make a perfect vertical cut needed for perfect track mating. Does anyone have experience doing this and if so can you guide step-by-step through your procedure? Many thanks in advance!”
Add your suggestions below.


