
Everything on model trains, model railroads, model railways, locomotives, model train layouts, scenery, wiring, DCC and more. Enjoy the world's best hobby... model railroading!
Bob asks readers:
“I have reached the point on my layout where I have to install trestles. I need to construct a jig in order to build the bends, this appears to be an overwhelming task. If the luck I’ve had so far is any indicator. ;o) Any help appreciated.”
Add your suggestions or ideas below.
Ken asks readers for suggestions:
“I am moving and just sold my old layout. I am trying to decide what my next layout should look like. It will be a 4×8+2×6. I have a turntable I want to put it and a few station barns. I would like a main line with hills and a mountain for a tunnel. Does anyone have some suggestions please?”
Comment below.
Here’s another 3 tips from inside the member’s area of the online Model Train Club:
When you paint on the base-color of your concrete dust it lightly with a little baking soda applied directly on the wet paint. Test a sample patch first, but it should give the surface a bit of a textured look. And, when you come to weathering it you will find it has more depth.
Quick Box Car Weathering Tip:
You can use some Floquil’s Antique White and add a drop or maybe two of Box-Car Red for the base. Then dry brush rust streaks as required. Earth colors look good at the ground level and then add some grimy streaks, and some white color where calcium might have leached from any cracks.
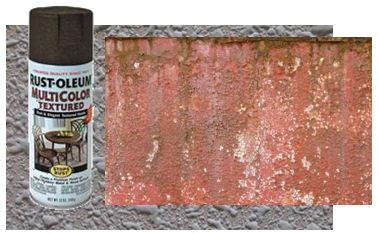
Quick Wall Surface Tip:
I spray on texture paint to paper/card. This makes some great looking walls if you are making your own scratch built buildings. You glue the textured paper on to the cardboard, or balsa wood, that you are building with.
Here is a tip from a member of the online Model Train Club (see right column):
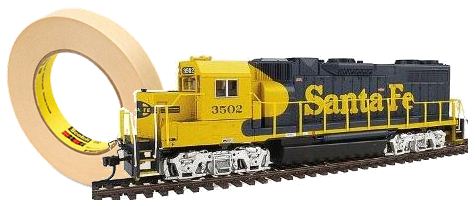
Painting several colors on some rolling stock or a locomotive can be problematic especially when the paint colors butt against each other, or where a straight line is required. Applying masking tape can definitely help when painting straight lines, however there are times when the lines appear jagged or rough.
To end up with a clean result it is usually best to allow 12 to 24 hours before attempting to apply another color. The first coat needs adequate time to dry and harden properly. It is a good idea to apply some masking tape to achieve a straight line. Try spraying some Dullcoat to the area you are planning to paint at the edge of the masking tape. This is to seal the tape.
Then, leave the new coat to dry for a minimum of 30 minutes. This step is important because there is no point is applying a second coat if the first coat is not completely dry or if it is still a bit sticky or soft. When it is dry it is time to paint on the second color. All going well you should be left with a clean sharp paint line without showing any signs of the paint bleeding.
Another way of doing it…
The other option is to mask the area you painted first and then spray the remainder of the loco the original color again. Spraying with the original color will help fill those little gaps where the second color might have over-run. You can then leave the loco to dry again prior to respraying it with a second color. You are unlikely to see any over run this time around.
Here’s another tip from a member of the online Model Train Club (see right column):
Painting several colors on some rolling stock or a locomotive can be problematic especially when the paint colors butt against each other, or where a straight line is required. Applying masking tape can definitely help when painting straight lines, however there are times when the lines appear jagged or rough.
To end up with a clean result it is usually best to allow 12 to 24 hours before attempting to apply another color. The first coat needs adequate time to dry and harden properly. It is a good idea to apply some masking tape to achieve a straight line. Try spraying some Dullcoat to the area you are planning to paint at the edge of the masking tape. This is to seal the tape.
Then, leave the new coat to dry for a minimum of 30 minutes. This step is important because there is no point is applying a second coat if the first coat is not completely dry or if it is still a bit sticky or soft. When it is dry it is time to paint on the second color. All going well you should be left with a clean sharp paint line without showing any signs of the paint bleeding.
Another way of doing it…
The other option is to mask the area you painted first and then spray the remainder of the loco the original color again. Spraying with the original color will help fill those little gaps where the second color might have over-run. You can then leave the loco to dry again prior to respraying it with a second color. You are unlikely to see any over run this time around.

The great thing about the online Model Train Club is that all new club members start at level 1 and progress monthly to level 2, 3, 4 etc. and they can unlock access to new resources each month.
Some lucky members have already progressed to level 7 membership (the club only started early 2011), and they are now accessing some amazing resources.
Level 7 members are discovering are now unlocking lots of ideas on a wide range of topics from track maintenance, LED lighting, switches/points… to making signals, a scenic water tutorial, expert interviews, and much more.
To see what new members get access to in levels 1, 2 and 3 – all the details are listed at http://www.modeltrainclub.org/club.html
John from Texas asks readers:
“I have a stripped screw hole (is that a real term??) on the transmission of my HO Heisler. I cannot tighten the screw to hold the casing down. Is there a fix for stripped holes (the screw is fine)?”
Background info: The Heisler consisted of two steam cylinders positioned in a V under the boiler approx 3/4th the way back from the front. The piston rods came out of the cylinders and attached to a crank shaft located under the center of the boiler. Attached to either end of the crank shaft were the drive shafts. The drive shafts were located below the center line of the engine.
Add your comments below.
Clyde has a question for Lionel O Scale enthusiasts who will know about the K-Line Remote Controller to activate all Standard O dump cars – operating boxcars and milk cars on a layout:
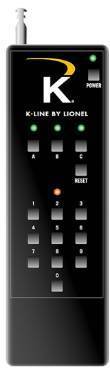
“I am in the process of purchasing and building a Lionel Fast Track layout with complete Legacy Command control. Will I need to purchase a K-Line Remote Controller to operate the newly purchased K-Line operating cars (e.g., Milk Box Car with Platform, Box Car with fruit boxes, etc.) or can they be programmed to be operated remotely with the Lionel Legacy Command CAB-2?”
Add your suggestions below.

The HO scale Rivarossi Breuer shunting tractor in BP livery. Both axles driven, original loco was used for shunting services in a fuel depot. (HO scale 2-rail DC) Diesel tractor with BP oil tank wagon, DC. Epoch IV Length: 131mm. Features a fully operational mechanism including an 8 pin DCC decoder socket. 4 wheel drive with operating directional lights fitted. A great slow speed performer through insulated and live frog pointwork. Suitably geared for 15mph maximum speed of the prototype.
The prototype Breuer tractors were originally built at the Antonio Badoni Lecco factory (Italy) under a licence from the German factory Breuer. They were built between 1931 and 1952 and were used right up until 1984.
Breuer tractors were used in Germany, Switzerland, Finland, Austria, and Denmark. They were found to be particularly useful where space was limited in yards and where individual cars needed to be moved. The petrol and diesel variations produced 10 – 80 horsepower and they could move 80 – 500 ton loads. They had small wheels and reached top speeds of 30 to 40 km/h.
During WWII they were used by the Italian Royal Army in North Africa where they were nicknamed ‘Sardine Cans’ (just look at the shape).
The type V Breuer tractors were introduced in 1952 and used in marshaling yards and warehouses. They had a diesel engine and gearbox as opposed to the Type 111 which featured a petrol engine. The 6 cyclinder MAN engine featured 6 cyclinders and was coupled to a 4 speed gear box. Electric lighting as well as sanders were also fitted in the type V.
Readers can comment below.
Edward is into G scale and asks readers for advice:
“I have two engines. One is a 0-4-0 that is a BACHMANN. The second is a Lionel 2-6-0. Both have stripped gears that are driven by the motors worm gear. I could repair them my self if I could get the needed gear. I have not been able to find a replacment gear after two months of searching the net. Can anyone please advise?”
Add your suggestions to help Edward below.
David has a question for keen HO model railroaders and asks:
“I have 35 sets of points on my layout, all have through board underneath motors. I need to wire them back to a control board so am looking for a supplier you can supply control boards. Can some suggest a source?”
Add your suggestions below.
Tim has a question for readers on train wheels:
“You state that metal wheels are better and the price has come down. Where do people get them from? I run Lionel almost exclusively.”
Add your suggestions below.
If you can help Donn, please comment below.
Adolphus asks readers:
"Does anyone know of a source for purchasing replacement HO drive systems for the rubber band drives Athearn once used for their RDC's? I have two of these rubber band driven RDCs and would like to replace with a more modern drive system."
Terry has a question for readers:
“I have a Bachmann LMS B1 loco. This is in perfect order except that due to clumsy handling the plastic axles have split. They are white plastic (nylon) with a square recess each end into which the drive wheels plug. I tried getting it fixed at my favourate train shop, but was told that the axles are not available. Can anyone help with a source of supply of these? It would help me resurrect a perfectly good model.”
To assist Terry you can reply below.
Here is another of the many tips in the online model train club members area:
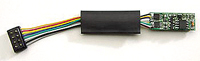
When purchasing a locomotive with a decoder installed, look for the wording “DCC equipped”, or “Factory installed decoder”, or “W/DCC”, or wording like that. Be careful though, because the words “DCC Ready” usually means that the locomotive is capable of having a decoder installed and that one is NOT already installed. I repeat, “DCC ready” usually means there is NO decoder fitted, but the wiring inside the locomotive is terminated with a socket, ready for addition of a “Plug and Play” decoder. This is an easy installation, no soldering.
If you are still unsure whether or not a locomotive has DCC status, you can try this test. Place the locomotive on the program track of a DCC system. See if the command station can read CVs… and if it can’t… then no decoder is fitted. Also, without a decoder fitted, the loco would “hum” with the throttle set at “0″. If the locomotive responds to the throttle on a DC system, then either there is NO decoder, or the locomotive may have a decoder that has analog operation enabled. If in doubt, it is always best to get clarification from the hobby store staff, or from the manufacturer or person supplying the locomotive.


