
Everything on model trains, model railroads, model railways, locomotives, model train layouts, scenery, wiring, DCC and more. Enjoy the world's best hobby... model railroading!
Chris T asks several questions:
“My mind has been working overtime so I jotted down a few questions re lubes. Apart from which oil(s) are the best to use, can I stick with just plastic compatible oil for everything? I have a new bottle of 3in1 oil which the bottle states can be used on plastic and metal. Is this stuff good enough? I have some LaBelle oil that has been in the shed for probably 20 years. Should I use this or is it too old? It looks ok.
Am I right in thinking the wheels need light oil and open gears will need something heavier? I picked up a couple of old locos still in their boxes. I don’t even think they have ever been run. Will they need lubing before I put them on the track?
A million questions I know and I haven’t even asked about dismantling locos, getting the shells off, and removing screws to get access. I told you my mind was racing. Ha! Ha! I was going to just dive in and do things but as usual, I overthink things and thought it better to ask first.”
Shane posted this question:
“I purchased a whole lot of old Athearn Blue Box kits off eBay. Got a bargain so can’t complain. Included were some 40 ft grain load door boxcars with the door molded on the body. There are hatches near the top of the side doors with no markings. I would like to know when cars of this type where most common – the decade? The railroads where they operated? If I know that I might be able to locate some decal sets?”
Damien posted this question:
“I am planning to solder my track in sections and am aware how a drop in voltage can cause issues. What size wire should I solder to the rails going back to the area power busses? I presume I should run the maximum wire size my DCC controller will allow to my power busses? Advice on wire size and methods would be good.”
Post your question using one of the ASK A QUESTION links under any post on this blog.
Daniel asks:
“I’m sure this has been covered before, but probably missed it. Can someone tutor me in wiring the 450 signal bridge using an insulated track section. Thanks for any guidance.”
Reece needs guidance if you can help:
“I use Atlas track on my HO layout but have a derailment problem with my new turnout. The cars are in gauge, I checked each one that has derailed. I read to file the ends of the points so the wheels won’t catch, but am unsure about filing the closure and stock rails so they will perhaps fit better. Any tips towards solving this problem and the right way to do it welcomed.”
Free service – You can have your question published for free on the Model Train Help Blog (see the links on this page).
Stuart posted this question:
“When laying my track I incorporated 2 re-railers (Atlas), which also serve as grade crossings. I model the transition era from steam to diesel which gives me the chance to operate both types of trains. I am wondering whether to remove them or weather then so they appear more authentic?”
Send in your question(s) for publication. This is a free service for the model railroading community.
Doug H writes:
“Has anyone had success with painting their track to remove the unreal looking shine and black ties? To me black is not the right color as many ties were creosoted and darkish brown not shiny back. Real rails to me look rusty except on the top surface where the trains run. Feedback would be good please.”
Purchasing scale model silo kits can be costly before you price in the cost and work involved required to paint and weather the kitsets. If you choose plastic models you’ll probably need proficiency with an airbrush to create an authentic representation of the real structure. The easier, and far less expensive option is to download plans to build your own silos avoiding the need for painting and airbrushing. That’s not to say that plastic models when constructed and finished carefully won’t look really impressive – they will. But so too will models built from downloaded plans. It basically comes down to the extent of your budget, how skilled you are with airbrushing and weathering, and which style you prefer. Both can look incredibly good and can be made really sturdy and durable. This quick clip shows some silos you can construct from downloaded plans.
Sav asks:
“I purchased anHO Log Dump Car with 3 logs. The logs are made of plastic and have a shine to them. I was wondering if somebody could give some advice on how to weather these logs.”
Mark posted this question:
“It’s been 30+years and I’m getting back into ‘it’. I’m dealing with O gauge and want to build a multi-level, multi-train layout in a barbell design with one side of the bar smaller than the other and used only for the trains turning around. All of my hobby stores are closed because of the virus and I have a simple question about the regular lt/rt switches and/or wye switch. I want to return some of the trains down their same track after the loop to save space – can the switches be set to automatically change? Or do I have to buy additional hardware/sensors? I am thinking about FastTrack but haven’t bought anything yet.”
Mark hopefully your local hobby stores will reopen. Unfortunately a lot of small businesses both online and off line are finding survival a struggle at the moment. The big manufacturers and magazines will most likely make it through, but they too will no doubt be feeling the pinch. I want to stay positive, but I fear that the industry will come out the other side of the Covid 19 pandemic in a modified form. Time will tell.
Aaron J asks:
“I don’t have enough space on my HO layout for mountains or hills but would still like the mystery of a tunnel. Would it make sense to have half a tunnel disappearing into my background wall? I have about 6 inches at the back and thought about building up the scenery to form the shape of a mountain against the background with a tunnel portal as a key element. I know I can’t run trains into the tunnel as they will hit a solid wall. Ouch! Has anyone done this?”
Devon G posted this question in the hope someone can assist:
“I want to put some signals on my track to make operations look more real, but I am a bit unsure where to place them so that they appear to serve a purpose rather than just look good. I’ve never bothered with signals before, stupid me, and I’m not even sure where they are supposed to go in relation to real life operations. I guess I am asking about the placement, purpose and uses of signals in real life operations. Sorry, I enjoy focusing on the visual aspects of the hobby building scenery and stuff, and my technical skills and appreciation of real railroad operations are not so great. It’s a weakness that has resulted in stupid mistakes I’ve already made on my layout, so I better get this one right. I know signals are important for train separation, and for various forward/reverse movements, but that’s about the extent of my knowledge. Can someone explain in simple words how various signals should be positioned and why? It would be a big help thx.”
Add your comments below.
Jason from Port Elizabeth in South Africa expressed interest in taking another look at the models Rich constructed. A friend sent him a link to a small pic, so I have republished the photos to make them larger. He’s done a great job!


Rich added these comments – “I still have some more details to do, but thought you might like to see these. Yes, I cut the windows out and used non glare tape inside the houses. Because of space I had to hang a few near the edge of cliff and so with the texture sheet I made the decking, and cut wood to make the railings. Thanks again.”
Here are the plans he used.

If you have photos you would like to have published, please make contact using the ASK A QUESTION link below.
Daniel models in O scale and asks:
“In hooking up power to accessories, I was advised to setup four power lines, plus a ground. Make the lines 8,10,12 & 14. Then apply to them per each accessory. Problem is anything I reference gives a wide variance, like 9-14 , 10-12, etc. pretty confusing. Any advice is appreciated.”
Larry asks:
“I have just acquired a track with 3 rails on it. I know this is a dumb question but can someone tell me what scale this train track is? I am very new at this and have only had N scale up till now. Thanks for your time and help.”
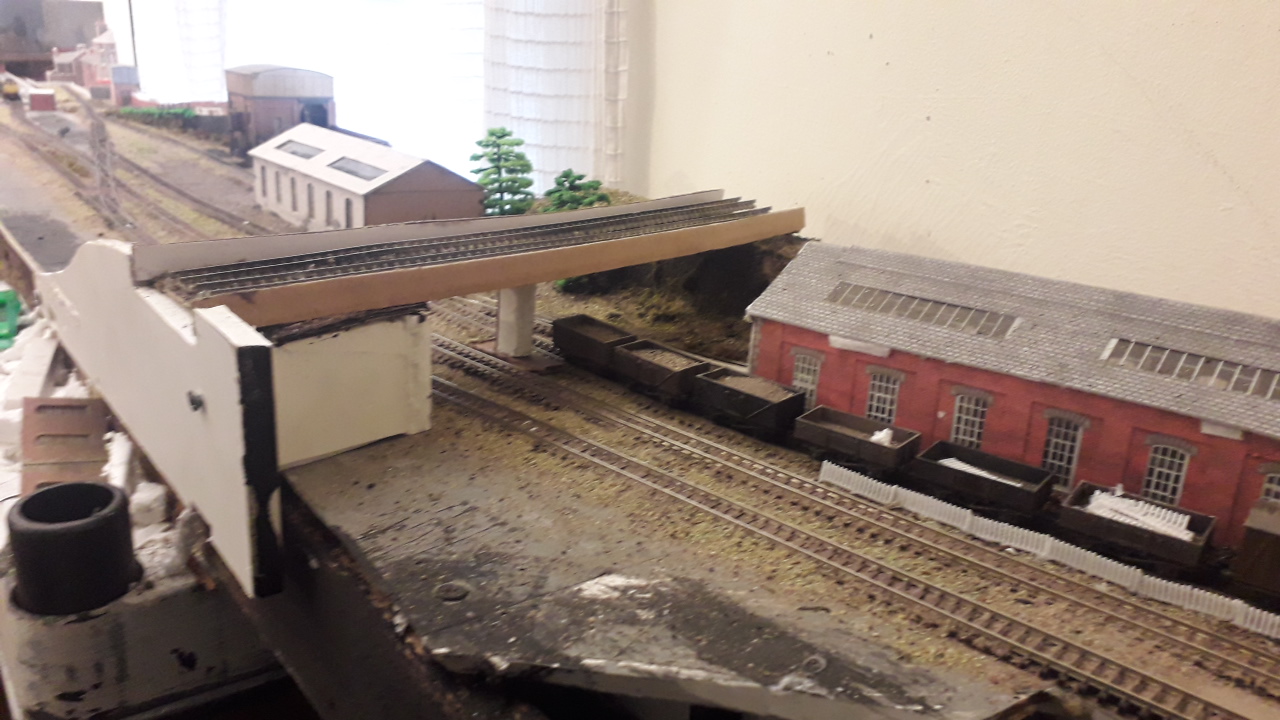
Chey sent in these photos and description of his layout to share:
“Hi, here are some photos of the progress on my British 1950’s/60’s inspired model railway and also a short story behind the layout and locations it’s based on.
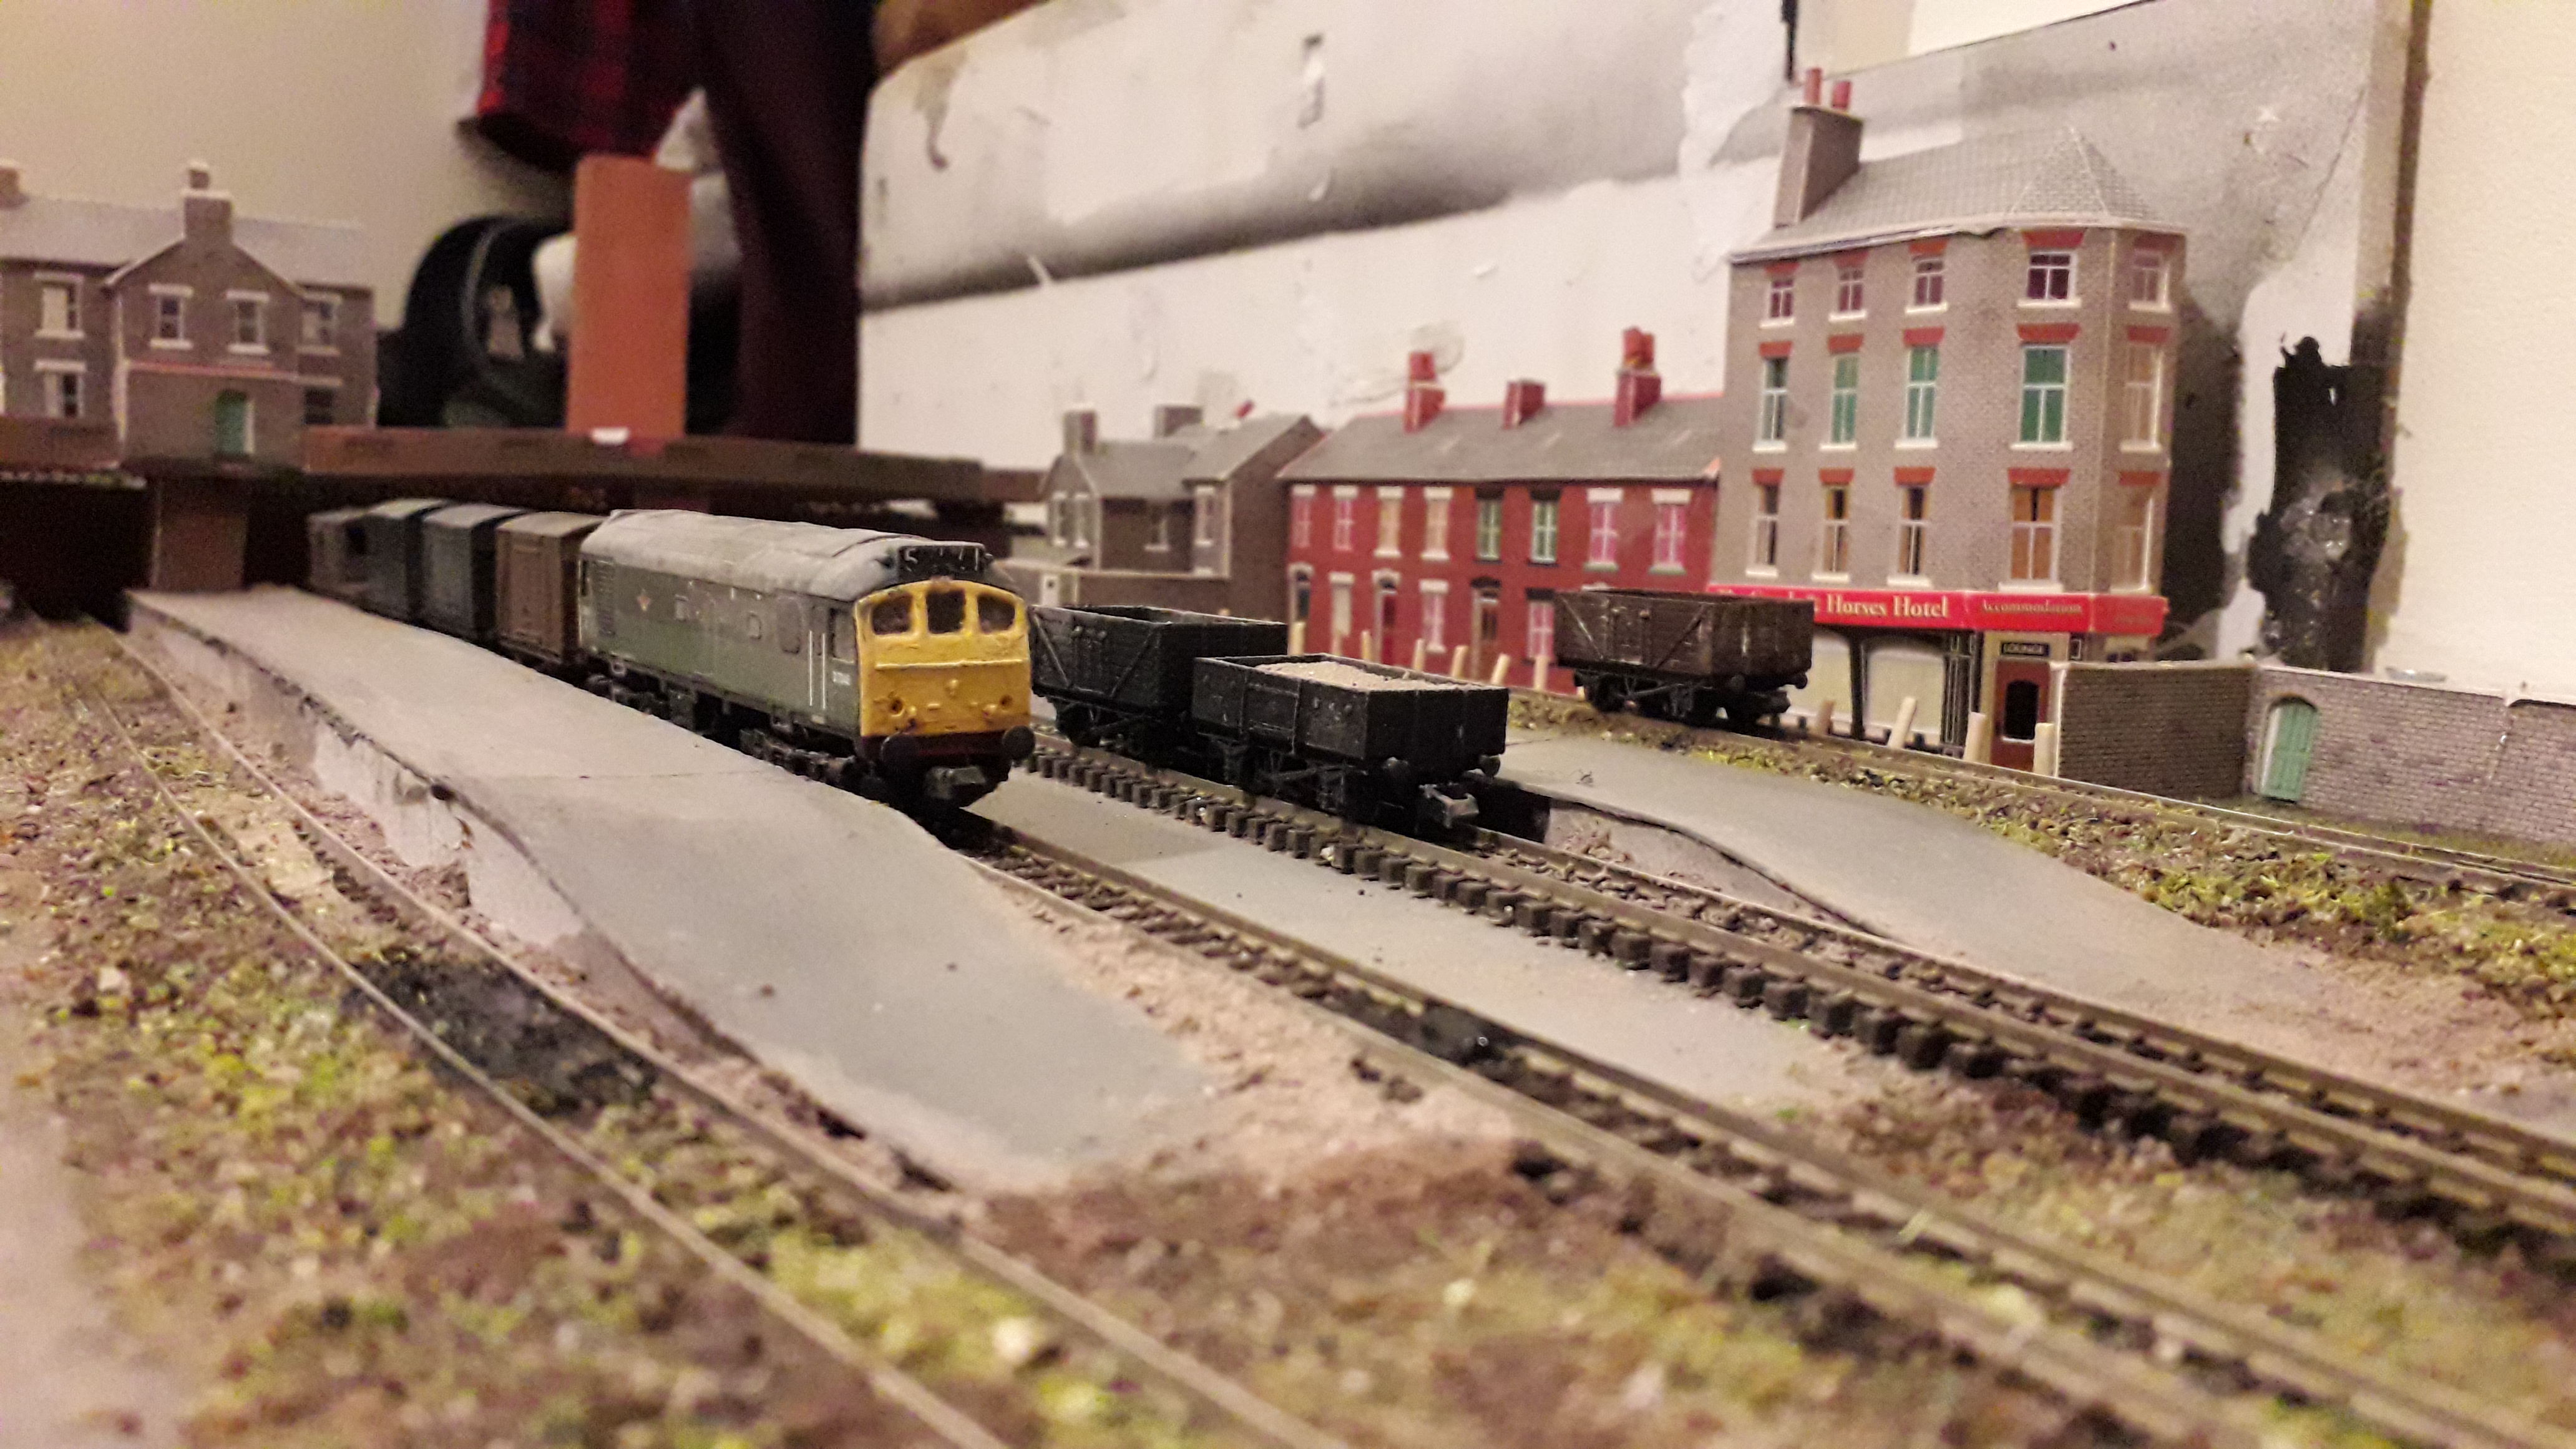
The story of this layout is a ‘what if’ the Great Central Railway extended to Gloucester in the 1930’s and remained there with a terminus in the 1950’s/1960’s until closure in 1965, the station is in a run down state with just a small booking office at the top of the stairs leading to the platform also the diesels now have a shed on side next to the coaling stage and only a handful of steam locomotives (to be acquired for the layout) are based there now including a 9f, and a Britannia or 2 plus a selection of BR(W), BR(E) and BR(M) motive power.
The station on this layout is called Gloucester General and is based on most Great Central Railway style stations, the depot is based loosely on 85B which was the Western Regions shed on Horton Road in Gloucester.
It’s British outline N gauge. All track and points are Peco, and the scenics are sourced from my back garden such as the ballast which is made using ash from the fire pit, the bushes are moss from the patio and walls.
The boards are actually 15mm compressed foam board attached to two beams running the length underneath, the layout is currently DC however it is being wired for DCC as we speak. I hope this makes for some interesting thoughts/ comments and hope you enjoy it too.”
Kim sent in these photos and comments to share:
 “Here are some if the things I have been working on lately. I am putting a green color over the pink, even though I am going to use some grass and other green turf and trees. I will be using some fine ballast in places as the affect of gravel. I think of stuff as I go along.”


