Everything on model trains, model railroads, model railways, locomotives, model train layouts, scenery, wiring, DCC and more. Enjoy the world's best hobby... model railroading!
This 2 minute video shows some of the MOW equipment on display at the Beijing Railway Museum near Tiananmen Square in Beijing China. The museum tracks 130 years of Chinese railways right up to high speed bullet train roll-out with the network now the most extensive in the world. This clip shows closeups of the ballastless track used for the high speed trains. I’m sure you’ll find the technology interesting!
William asks readers:
“I want to start in model railroad with my two grandsons. Which is the best way to start; buying a ready built set or buy individual pieces? I will start small and gradually build to a larger layout. Any suggestions please.”
Ernest models HO and asks readers:
“I have started scratch building model buildings and I was wondering if anyone knows a good way to make HO windows? I know that I can order them from Grant Line, but the postal costs are so high that I would have to order them in bulk. Is there a way to build them myself? Keep up the good work.”
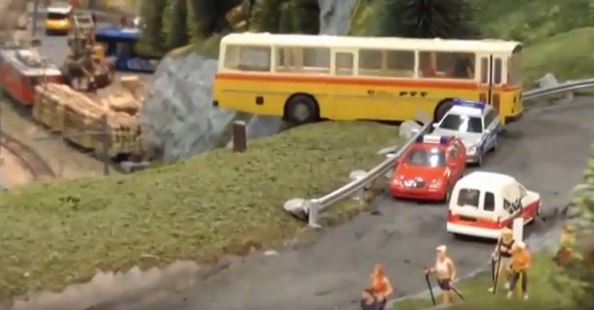
 Here’s a mix of old and new spotted on Ian Williamson’s N scale “Midway” layout. The scene is no location in particular, just a smallish city with a CBD. As can be seen this city is well serviced by public transport including trams that run frequently. Most of the buildings are by Tomy and Tomix, the trams come from the same manufacturers. The movements are controlled by an automatic train reverser with diodes in a block system.
Troy asks readers:
“I’m changing my N scale layout to DCC and have heard good things about MRC control systems. I’m not sure exactly what I should be looking for in a system, and wondered if there is anything better? How easy is it to set up and operate? Will it give me enough different functions in the future? Haven’t thought much about what switches or signals I’ll need yet, so perhaps I should do that first?”
Nigel asks readers:
“I plan to build a train set up in half my double garage. Although I have quite a bit of space… enough for an HO set I think… I somehow prefer the look of smaller N scale trains. With this amount of space is N scale too small given that the cost longer term might be greater for me to fill this space with enough of the smaller track and trains, or should I just add more extensive (hopefully not too expensive) scenery like rolling hills etc?”
 Ben writes:
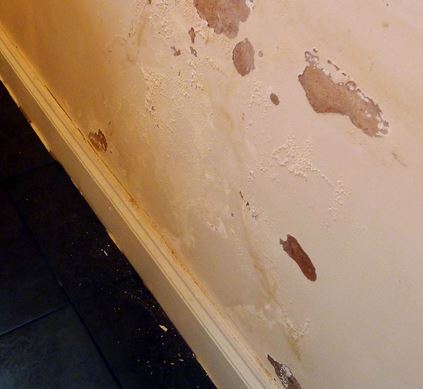
I see Dale posted a question a week or so ago relating track rust and mentioned the effects of humidity, so I thought I’d write a few words on setting up the right conditions for a layout.
One of the first things is to get the room prepared before constructing any benchwork for the layout. I know it is hard to resist just jumping in and getting started with a hammer and saw, but there are several important things to consider first apart from planning the size, shape, track configuration, scale etc.
The first job is to make the room dry. Dale mentioned his layout was in the garage and that’s a common location, as is a basement. Unfortunately basements and garages can get damp. If the space is not dry there will always be the risk of the benchwork not being stable, because humidity could cause the timber to swell. When the humidity drops the timber could dry out causing further changes or movement. This can impact on track levels and effect the sub-roadbed.
A couple of coats of waterproofing paint on the concrete block walls will help keep dampness at bay. In a lot of situations, a dehumidifier might be required to control room temperature and humidity levels. Adding insulation in the ceiling and walls will further help to keep the room dry. A drop ceiling can help with insulation and prevent dust from dropping onto the layout when someone walks across the floor on the upper level.
If the basement walls are not already insulated, start by putting up furring strips (a strip of wood tapering to nothing used in construction work) and styrofoam. Although there might only be ¾” of insulation, it will be better than having none. These furring strips can be attached to the basement walls using Tap-Con masonry screws. This will also be a help if your plan is to make your layout multi-level and intend to fix the upper layout level(s) to the wall. Using building adhesive and/or cement nails can fail over time so be careful with the weight loading. Having half your layout crash off the wall or rip wall panels loose can be disastrous. I would rather do a job once and do it right than to have to repair things after they have gone wrong.
If you have basement/garage windows you’ll need to decide whether or not to cover them with drywall or keep them accessible. Doing so would keep direct sunlight off the layout and probably mean you could include a realistic uninterrupted backdrop.
You’ll still need good lighting even if you don’t cover the windows. However, this raises another issue; the placement of the lights to be accessible and so the operators can see what they are doing. One option is to have lighting circuits finish in outlet boxes. Doing this will provide some flexibility as your layout takes shape. The lights can then be placed anywhere on the ceiling and be easily plugged in. The ceiling boxes won’t then need to be located exactly.
Whist on the subject of power circuits, it is a good idea having them along the walls usually under the layout, because running lots of extension cords is a problem waiting to happen. Being able to turn everything off at once when finishing for the day (or night) also makes sense. Having to turnoff several switches is frustrating and could result in something (like a heater or soldering iron) being accidentally left running.