Planning
Everything on model trains, model railroads, model railways, locomotives, model train layouts, scenery, wiring, DCC and more. Enjoy the world's best hobby... model railroading!

Frank asks readers:
“I have a grandson 5 year of age and I want to start him out in model trains. What gauge should I buy
him and all things to start him out?”
Sherri is planning a helix and has a question for readers relating to online helix calculators and uses the example of the free helix calculator at http://www.modelbuildings.org/free-calculator-tools.html to explain her problem:
“On the Helix Calculator “Item D” you can choose a ring width as small as 1″. This number is used to reflect how many sheets or fraction of sheets of plywood you will need as shown in “Item M”.
In “Item F” the formula adds 4″ to whatever radius size you choose in “Item A”. Therefore, I believe the minimum ring width would be 2″ plus one half the width of the gauge track you are using. At that calculation the inside edge of the track would be right at the inside edge of the ring. If you center the track in the ring, then I believe the minimum width of the ring would have to be 4″ instead of the minimum 1″ as shown in “Item D”. Am I correct, or am I missing something?”
This quick tip will be particularly helpful for beginners who don’t yet have a layout.
 Marcel is just starting in the hobby and seeks advice from readers:
“Although slowly moving along, below is a picture of my “To be” Train table. It is a Ping Pong table with 3” high foam board. Also, I have a mountain kit. What I would like to ask is what should my next step be? I have a Bachmann Acela Speed Train that if possible will run the perimeter of the lay-out. Since the mountain has only one tunnel opening, I guess the Acela will utilize it. Do you know of any good ‘somewhat beginner’ resources? Any advice you can provide?”
Andy asks readers:
“I am a 74 year old neophyte planning to build either an HO or N scale layout. My platform is 15 feet by 6 feet. It was suggested to me that working in N scale was too difficult for someone my age because of the difficulty dealing with small details. Any suggestions would be appreciated.”
Constructing your model railroad layout in modules (sections) will have several advantages over a layout that is built in one large piece. The benefits might not become obvious until you come to move house…which many people do every 7 to 10 years.
A modular railroad has other benefits over a fixed layout. Being modular it will be easier to dismantle for shipping and relocation to train shows, shopping malls or hobby conventions. Exhibiting the layout in public is probably the only way for people, out side your close circle of family and friends, to see your model trains running. Most of the fixed layouts are only ever seen by a few specially invited guests, who are lucky enough to visit your home.
The other thing to remember is this; even though the baseboard might be constructed in modules, the scenery (mountains, buildings, bridges etc.) will also need to designing for easy dismantling. That is if you really do want a modular layout that is easy to dismantle.
If you would like to share a photo of part of your modular layout, then add a photo in the comments section.
Babs asks readers:
“I am enclosing part of our basement for my train room. What color would be best for the walls. Layout is an island that will probably be expanded down the road. Thanks for your suggestions.”
 Richard sent in this photo of his Richville & New River railroad to share. The mining company can be seen on the right.
Anna asks readers:
“Hi! I am making my first N scale layout from a drawing that I found in an old train magazine. There is only a picture with a graph. The layout is 2’x2.5′ and I was thinking about adding more to make it 3×3. How do I make a shopping list for the tracks and such from just the picture?
Robert comments: Anna, The N Scale Track plans ebook includes 69 plans COMPLETE with parts list. The HO/OO scale ebook has another 18 plans COMPLETE with parts list.
With prudent use of available space, a model railroader can sometimes find room to add more track.
The solution can be as simple as replacing large foreground buildings with ‘low relief’ buildings positioned along the background. So, instead of the buildings being somewhere between 4 to 8 inches in depth, the background buildings need only be 1 to 2 inches thick. They will still look like real full-depth buildings, especially with the careful placement of support scenery props like trees, weeds, background sky and hills.
Done well, the scene can give the illusion it stretches far off into the distance, making the layout appear to be considerable larger than it actually is in reality.
Jim asks readers:
“I am looking for fiddle yards (staging yards) that use cassettes for storage of rolling stock instead of loops, traverser’s and sector plates. Can any one help telling me where to get drawings/plans or the like?”
Ed wants to hear the personal preferences and opinions from readers relating to model railroad software and asks:
“What do readers think is a good layout design software. I’ve been trying to download xtartk cad .I just can’t figure out why it will not download right.”
Last week I gave you the link to use a free grade calculator. This week a helix calculator has been added… and it’s 100% free to use and share with your model railroading friends.
Here’s a direct link to use the Free Helix Calculator. Please tell your friends about it too.
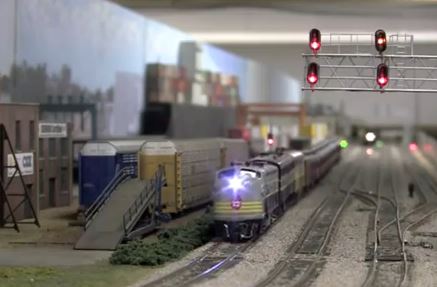 It is easy to get bored with a basic oval track layout with train movements being so limited. However, this doesn’t need to be the case if more track is added. With a more interesting track configuration it is possible to simulate the day-to-day activities of a real railroad. And, that’s where the stimulation, action, and challenges can really come into play.
I said “challenges”, because the job on any railroad (real or scale model), is to operate the railroad as efficiently and effectively as possible. After all, without efficiency, a real railroad would not only lose customers, but potentially become unprofitable.
Every aspect of a railroad needs to operate efficiently including:
— Picking up freight
— Moving passengers
— Assembling trains
— Car delivery to consignees
— Sorting freight cars on arrival based on planned destinations
— Returning empty cars

So for realistic railroad operations, trains are scheduled with the purpose to make profit for the railroad. Without profit the railroad wouldn’t exist. So, cars on spurs need to be efficiently organized and accessible (too many cars on a spur can cause operational issues and delays).
The pickups and drop offs can be controlled on a model railroad with the aid of car cards. The trains would go from one destination to another picking up and dropping off passengers or freight. This all needs to happen to a schedule so as not to delay passengers, or delaying freight from getting delivered, or delaying other trains.
Too many cars waiting around doing nothing could send the railroad broke. However, not everything on a railroad moves all the time. Even though trains are generally on their way to somewhere, cars typically:
— Wait near an industry for loading/unloading
— Wait to be picked up at an interchange
— Wait for the next train in a classification yard
— Wait on empty car tracks
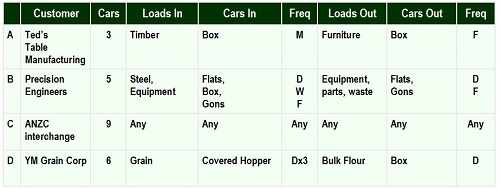
As with any business, a railroad needs to be customer focused:
— The railroad must understand and meet the needs of customers
— The track capacity needs to be clearly understood
— The inputs and outputs by commodity and car type need to be known
— The railroad should know the frequency (and quality) of customer needs to calculate the required frequency, number, and train type
— To maximize efficiency, the locations and industries will need names.
The loads and traffic needs of a small switching layout might look something like this –
For more information and ideas on train operations; login to the Online Model Train Club and there’s a special Category called “Operation”, with plenty of ideas for interchanging cars, switching a siding, run-around operation, factors determining the operational capacity of a railroad, and various other operation related topics.
You won’t necessarily require a large layout for realistic railroad operations:
— With a switching layout, the cars move on to (or off) the layout
— All traffic will be yard to staging or staging to yard
— Traffic needs to be logically arranged in context
— An Interchange track will add operational variety and complexity
Ways to Represent Car Movements
Here are some options:
— Waybills and car cards (single and multiple destination)
— Color-Coded Tacks
— Switch Lists (Computerized)
— “Car-for-Car” Replacement
— Prototype paper work
It is over to you what system you opt for. Stick with one system or use a mix to add interest and variety to your operations.
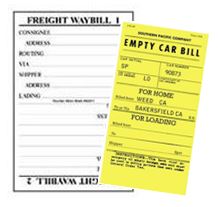 Waybills typically use one card for each car on the layout to determine the destination and movement of each car.
You can set the perimeters such as whether the engineer or brakeman has the responsibility for updating the train’s documentation. Decide whether you’ll use card cards, waybills, or a combination system. Decide if there are any special instructions to go with the car.
This is where model railroad operation can really become interesting, because each train or car can function like pieces (or tokens) on a giant playing board (your layout). Waybills can be shuffled (like cards) to control the game (destinations, loads etc).
All going well; each car will arrive at the correct destination on, or about, the scheduled time. If not, the whole railroad could suffer delays. Too many delays and this will affect the railroads profitability.
The key to all this is to have fun, regardless of whether you want to take operations seriously, or just watch your trains go around the track. A little complexity can give a model railroad purpose, but too much complexity can lead to frustration. If nothing else; hopefully this article has stressed the importance for a railroad to have a purpose, and the reasons and logic why trains and individual cars are moving around the track, or perhaps why they are sitting on a siding.

Alan’s shelf layout. What a wonderful layout!!
Space limitations are a problem almost every model railroader faces when constructing or expanding their layout. For some the solution is to stick with smaller trains such as n scale or z scale. They obviously require less space to operate, and the landscape also takes up less space when compared to bigger scales such as HO, OO, and of course the very large O scale.
However, another option worthy of consideration is to include a shelf layout as part of the design. This could be as a standalone track or be incorporated as part of an existing oval, loop, or continuous-run layout.
In most situations a shelf layout will typically take up less space; however being narrower in design, they can present some limitations. Unless the shelf runs a full 360 degrees around the room, continuous running might not be possible without more hands-on operation.
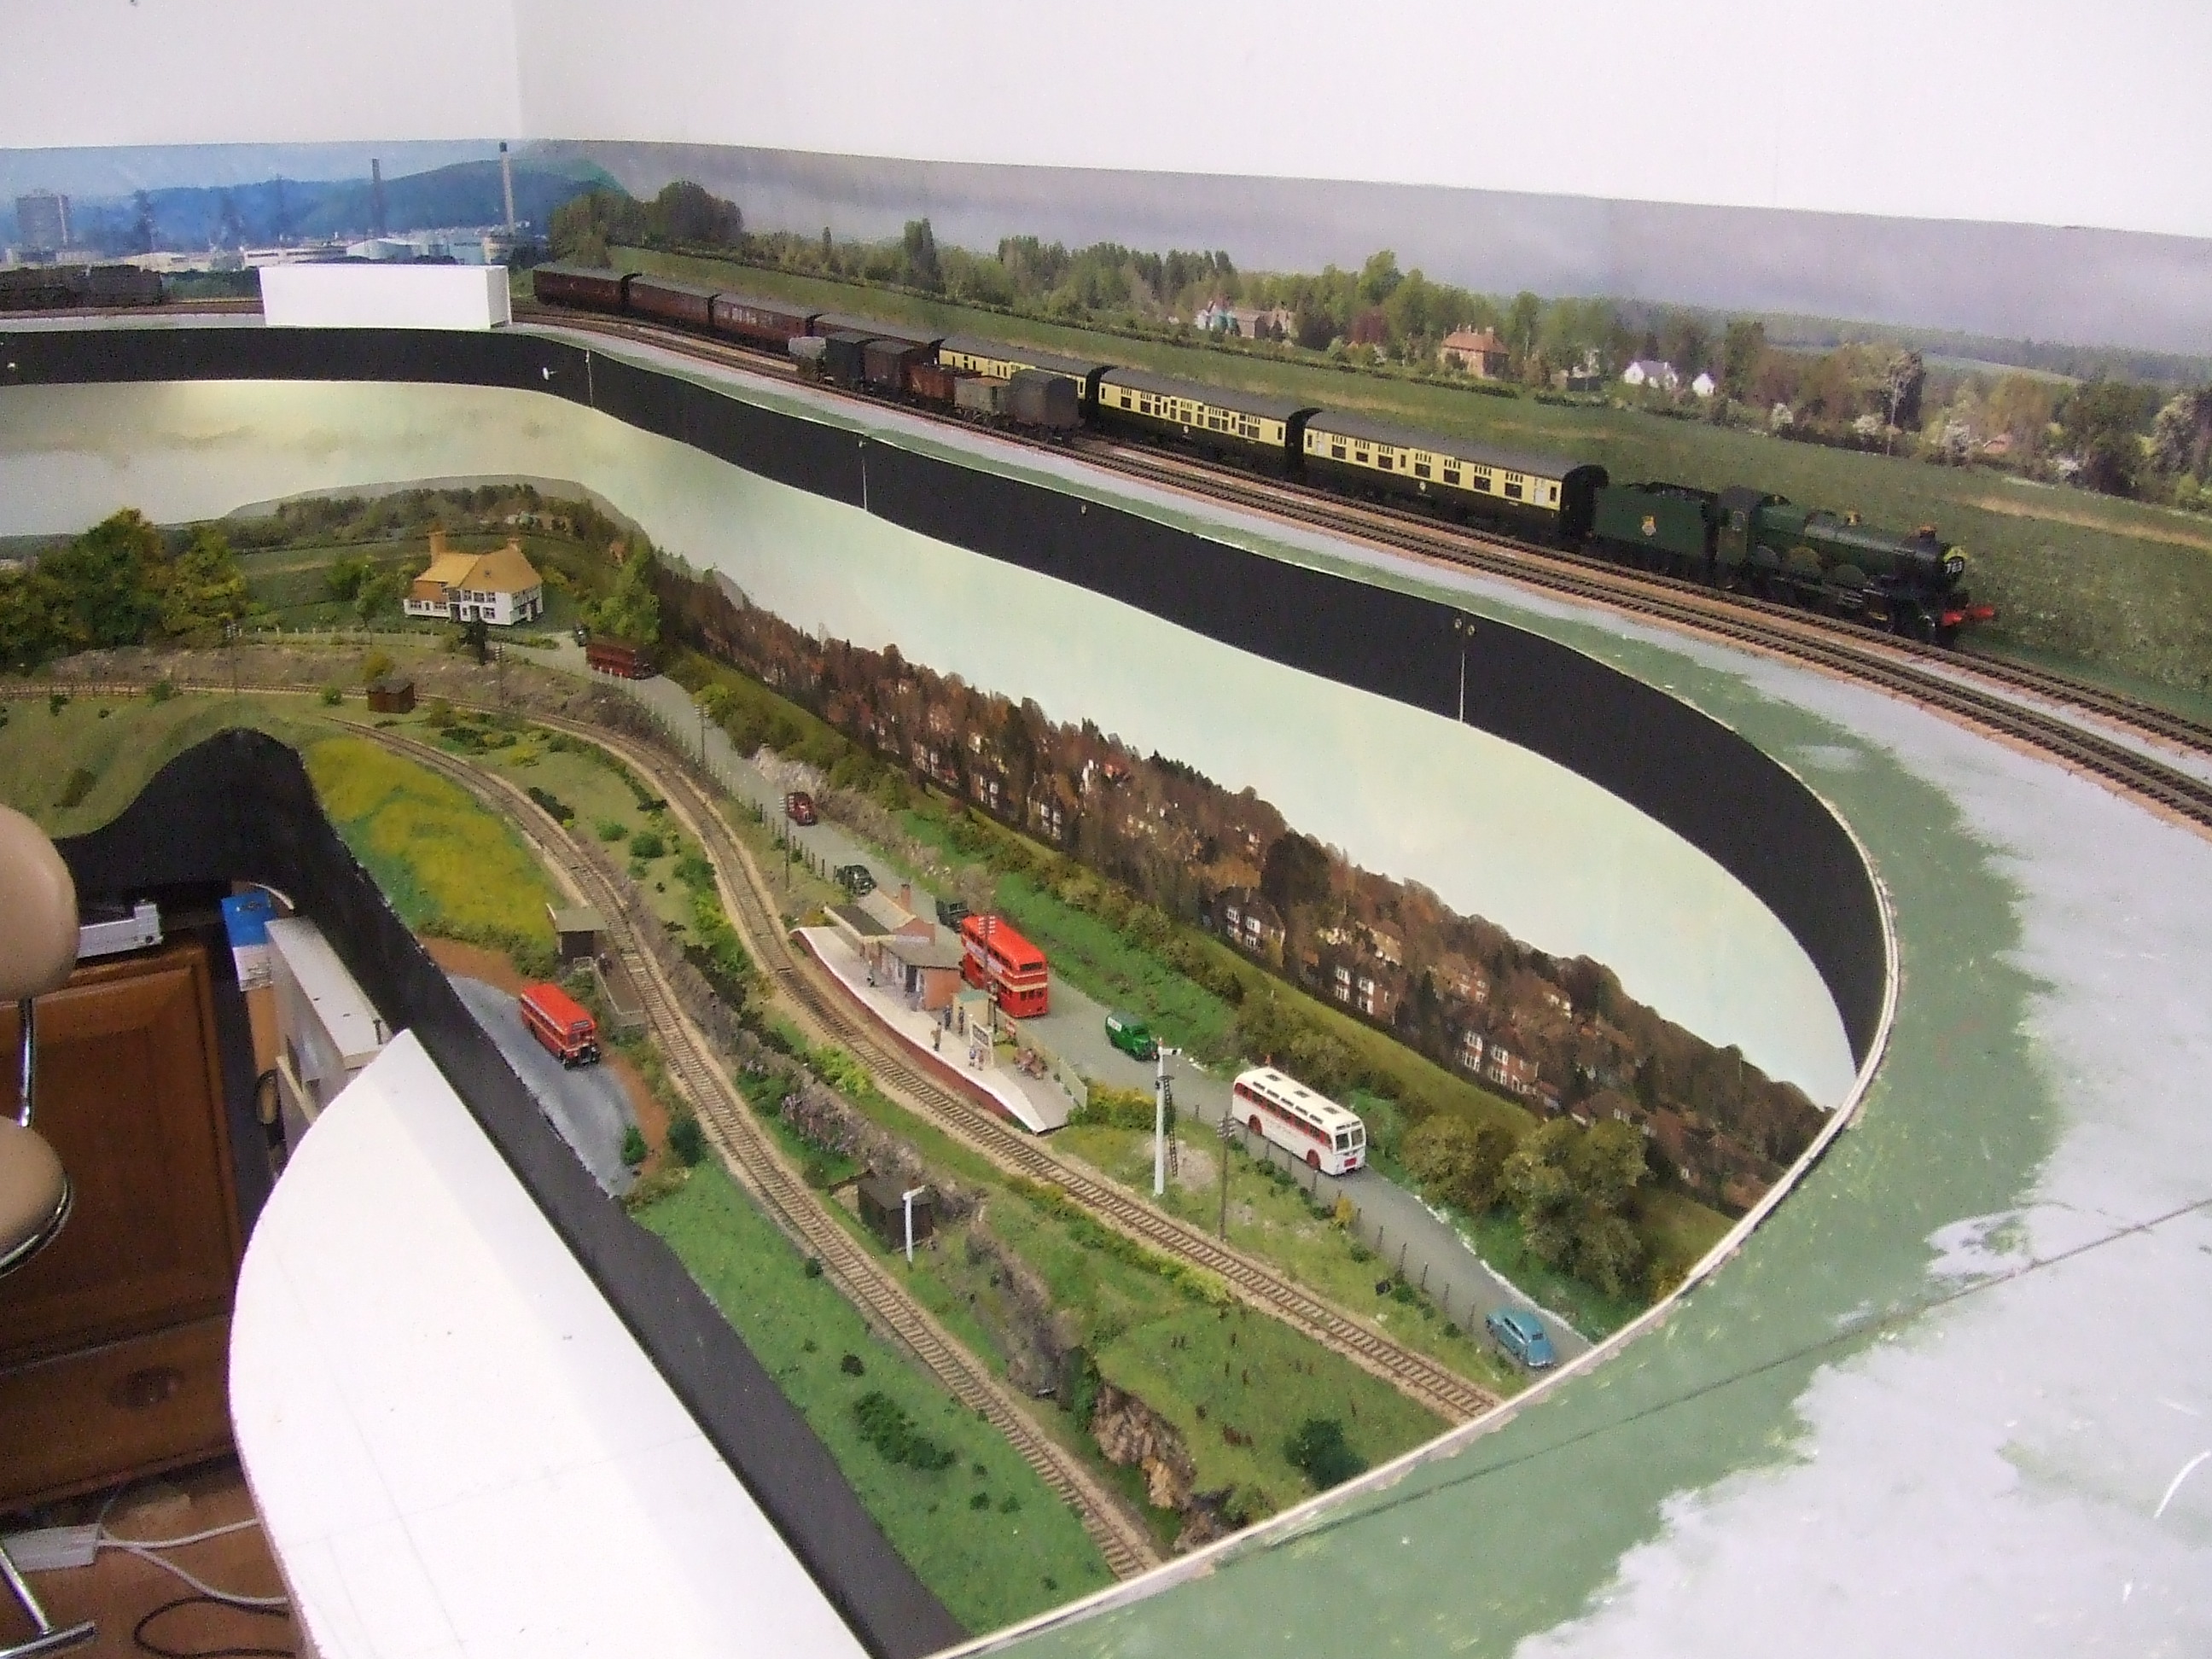
Alan from the UK kindly sent in these photos of his layout which incorporates a very long shelf.
This could be viewed as an advantage or disadvantage, depending on whether you like to just sit back and watch your trains go around, or whether you prefer to take control of your trains by switching them onto different tracks. If the length of the shelf is reasonably short, then the train movements can be over in a matter of moments if the train simply has to get from one end of the shelf to the other.
Adding yard operations to a shelf layout can certainly increase the operational possibilities and make the train movements more complex than the operation of a basic ‘loop’ layout.
Steve contributed this article:
Thank you for all of this continual brilliant information. I purchased my trains at the age of 19 and am now fifty. I built a very accurate and good quality loft room in my father’s house in England ready for a railway like Talented Dave’s set up but left and went to live in Australia. Many years later my father visited and brought over my trains. I finished renovating my unit if that is possible. I have built a new desk 2200mm x 1600mm x 750mm high. To hide my train set so my friends when they visit will not know its there and won’t know I am an Anorack as they call it in England.
 I purchased 15mm thick Cedar marine plywood as it is my favorite plywood. Too good for the job but it doesn’t splinter easily. I was going to build my board at Christmas but we had a Creative Arts & Technology night coming up at the school where I am the Design and Technology teacher. Three of my students had finished their robotic project so I quickly designed the board and started them off building it. So I didn’t embezzle the company I donated six deep fat fryers for their time. My board is going to have two layers and at least six trains running at a time.
 The bottom board is constructed from four pieces that bolt together with four bolts for each section. Each section has lifting holes, bus holes and hole for point motor wires and LEDS. I am going to wire for DCC. In places I have had to join the plywood because I didn’t want to waste any expensive pieces not by choice. Apart from a few glue marks the board is excellent.
The students also made me some adjustable legs out of steel which were welded and cleaned up and powder coated. I’ll improve on the up and down motion later.
 These are a few more pictures of my track set out template (Not totally convinced yet). Adjustable legs made from 40mm and 35mm Galvanised box section. A picture of some of my trains. I Like a lot of Australian trains and rolling stock detail is very good.

I have just started a sloping girder bridge to take you from the top layer a round the curve. I have two Faller Systems including the level crossing which I would like to factor in. I actually like goods yards and an industrial look. I won’t be using the Hornby station or buildings shown in the photograph. I really do like Australian landscape and gum trees and grain storage systems but I only have about 380mm to fit under the hide away desk.
 Thanks to Steve for sending in the information and photos. He has an exciting project ahead of him, and if the baseboard modules are anything to go by, the standard of his completed layout will be extremely high.
If other readers or Club members would like to send in details about the progress on their layout, simply use the “Submit Your Question” link in the right column to make initial contact with the Blog Moderator. Please carefully edit any information before submitting it for possible publication.
Club member Franky asks:
“I’m bored with just running my trains around and around my layout. Part of it is my own fault, because the track config is just a main line with a couple of sidings. I have space to include a branch line, so I know when I add that, it will provide more variety. What I need is more purpose for my system. I know a little about the basics of how waybills work, but I need more input. What do others use to operate and justify their railroad layouts?”
George has a question that most beginners in the hobby ask:
“What Scale do I pick …there are so many scales of model railroads that it is difficult to select which one? I favor the Old West …what is the best Scale for it?
You can add your comments to assist George with getting started.


