Technical
Everything on model trains, model railroads, model railways, locomotives, model train layouts, scenery, wiring, DCC and more. Enjoy the world's best hobby... model railroading!

Patrick models N scale and asks readers:
“How many terminal unijoiners should I use on a double crossover?”
Kerry asks readers:
“Should I solder my wires in the track, or would I be better to install joiners with leads?”
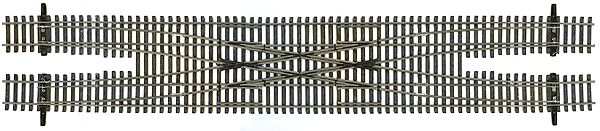
Gavin asks readers:
“I have a Walters shinohara no. 6 double crossover (HO/OO). I can make the frog live, but I have no idea how to wire it up? Any suggestions please?”
Oscar asks readers:
“I have a Loco Bachmann H0 GP30 Diesel Loco DCC with a Digitrax DCS 50 Zephir. My question is: the lights, forward and reverse, are in a low intensity. How can I do to put both in high intensity?”
Denis asks readers:
“Hi. I model British N gauge. In recent years there have been a number of tiny Integrated Circuit (IC) Transceiver/MCUs developed. With these small ICs circuit boards could be developed to fit N Gauge or smaller.
Has anyone tried this? Is there plans or software for sale”
Travis asks readers:
“Can someone explain about a CV value and how do I go about altering it?”
Anthony G asks readers:
“I am confused with what wire to use for wiring my track… I will run DCC. Should I use a different gauge for switches, signals, inside structures? What about color coding? I read something about telephone wire – that confused me more. Do I need a different gauge for 12 volt power supply and a different gauge to the track? Any safety issues to watch out for? Can people help coz it’s hard for me to get my head around all this stuff? A lot for me to learn.”
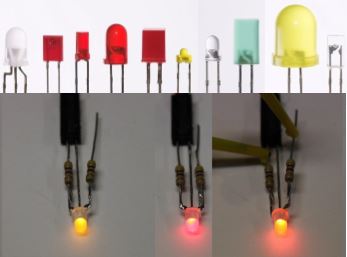
LEDs have numerous applications in model railroading including:
• Locomotive headlights and internal passenger car lighting
• Warning lights for the rear end of trains (cabooses, passenger cars etc)
• Structure illumination
• Signage illumination
• Railroad signals
• Panel indicators
LEDs also have many advantages over traditional incandescent lights including:
• The cost: It is hard to put an exact figure on it, but LEDs typically are around 20 to 40% of the cost of traditional incandescent light bulbs (depending on the project).
• Long life: Again depending on the usage, LEDs will typically last tens of thousands of hours. They will well and truly outlast traditional incandescent bulbs which almost eliminates the need to replace bulbs.
• Heat: LED bulbs give off virtually no heat so are a lot safer inside plastic structures or enclosures.
• Current: LEDs will typically draw just 10-30 milliamperes (0.010 – 0.030 amperes), which is much less than an incandescent bulb, so on larger projects you might get by with a smaller power supply.
• Color and consistency: You might have noticed how the color of incandescent bulbs becomes whiter when the brilliance increases. This is because they predominantly glow at red wavelengths. When the brightness increases so does their heat output. This also reduces the life expectancy of incandescent bulbs. By comparison Red, blue, yellow and green LEDs are monochrome so their color remains constant regardless of their brilliance.
Oscar asks readers:
“I have a Loco Bachmann H0 GP30 Diesel DCC with a Digitrax DCS 50 Zephir. My question is – the lights, forward and reverse, are in a low intensity, how can I do to put both in high intensity ? Thanks.”
Joseph is into O scale and asks:
“I’m just starting out. I bought a proto 3 diesel and a tiu so everything I’ve read in the tiu manual says proto 2. Is this generic for proto 2 and proto3?”
Kevin seeks advice from readers:
“Does anyone have any tips or suggestions for soldering wires on to my rails as power feeds? I am a bit heavy nanded with solder and never seem to get it perfect.”
Ethan asks readers for advice:
“Hey guys. I have been thinking about starting up my own model railroad in either HO or N scale and including a switching yard and a few sidings. I got to looking into the wiring for switch machines and decided that I want to use toggle switches with indicating lights. However, I noticed that most toggle switches will constantly power the switch to whichever line it is switched to. Will this not burn up the motor by constantly feeding it power trying to get it to move even after it has switched the turn out?”
Aaron asks readers for advice:
“I have heard so many good things about LEDs, so am thinking about upgrading my N scale DCC diesel loco headlights, and maybe using them for ditch lights and markers. Does anyone have any tips for powering them independently, what type to use for each function, how to get a constant intensity from each light, other uses for LEDs etc. And any other tips appreciated. Thanks.”
Club member Ashley sent in this tip to share:
If you spot your train slowing down or stopping only in some places the problem may be caused by voltage drop. It could be that the distance to the nearest power source is too far or that perhaps the quality of the joints between track sections has weakened the flow of power.
Begin by tightening any loose joiners and if required, add a second set of wires from your power supply to the track in the problem area. Take care to connect each wire to the correct rail.
On larger layouts, especially with DCC setups, it is suggested a bus wire (with feeders) to multiple track sections be used. Keep in min d that using a heavier wire is more reliable than using the rails themselves. You can attach smaller feeder wires between the rail and the bus as often as required. Generally, feeder wires are attached every 6 to 12 feet or so.
Another option is to solder the rail joiners themselves. Doing this should minimize any voltage drop, as well as help get rid of any kinks that could potentially cause a derailment. Also consider leaving some joiners open to compensate for contraction or expansion over time.
Reg asks readers:
“In reading all the info on DCC I keep reading of the necessity to keep the motor isolated from the chassis. They go into quite a bit of detail about cementing the motor in being one way of insulating it from the chassis, or using black plastic electrician tape or other methods. I’m questioning this.
Surely if your motor windings are isolated from the chassis it won’t short out the decoder no matter if the chassis and motor casing is connected to one side of the track. Surely all you need is to ensure the motor windings are isolated?
The windings connect to one side of the decoder and the other side is connected to each side of the track no matter how its picked up. What does it matter if the motor case, and the entire chassis of the locomotive connected to one set of wheels acting as pickup for one side and is electrically isolated from the set of wheels connected to the copper pickup(s), you still have 2 separate pickups. Neither is connected directly to the motor winding. “
Alister asks readers:
“I saw a demonstration of joining a drop wire to a buss. The buss was blue and appeared to be insulated. The guy had a plastic joiner which clamped the drop wire to the buss without removing the insulation on the buss line ( no soldering was needed). How does this work? I was told the buss wires for the different rails were best to be different colors so that there was no confusion when joining drop wires. For the buss lines to be different colors they will be insulated. How can contact be made through the insulation? Thank you.”
Johan sent in this question for readers:
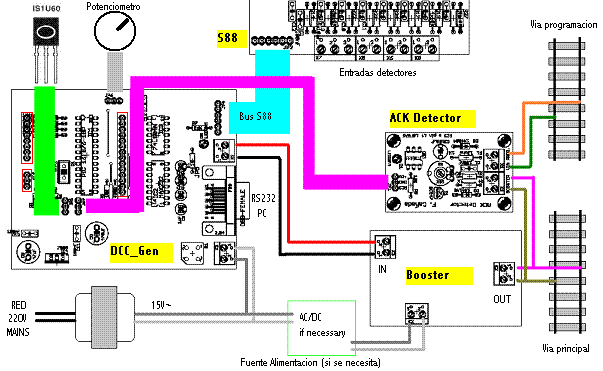
“Thanks for your model train newsletters. I love to read them. One big question, I have my own DIY dcc command station (DCC _Gen v 2c ) with ACK Detector, Booster R-CDE and a Feedback module S88. What kind of DCC hand held controller do I need. I bought my first model train in 1974 the Lima type.”
Dave asks readers:
“I understand a main wire runs under track and every 3 to 5 a jumper wire is attached to the on the inside rail. But is this just the + wire? or both the + wire to the inside rail and – to the outside rail? Any help would be greatly appreciated. Dave”


