Tips & Resources
Everything on model trains, model railroads, model railways, locomotives, model train layouts, scenery, wiring, DCC and more. Enjoy the world's best hobby... model railroading!

Gary has a question for readers:
“I am re-entering the model railroad hobby after decades. What is best approach for setting up a layout? A solid table (4×8) or grid type? What are the advantages / disadvantages of each? Thanks for any suggestions.”
Alan from the UK sent in this idea to share:
One of the readers said he was bored just running trains and wanted some suggestions how to improve matters.
Here’s my idea…

Alan sent in this example. Also see his wonderful layout featured below.
Give each wagon a card with it’s description at the top. Then write the days of the week in a column on the left, and opposite each day write where the wagon is supposed to go (see photo) I have the following destinations on my layout:- Brewery, Creamery, yard, goods shed, station goods shed, goods store, tail traffic (at the rear of passenger train), storage siding, canal wharf, coal merchants, and loco coal stage.
My layout is terminus to fiddle yard which is a 7 road turntable type. Its length restricts the No. of 10ft wheelbase wagons to 8 or less. I converted a dice so that it is numbered 2 to 8. After shuffling all the cards, I throw the dice. Say I get a 6, then I take the top 6 cards and make the train up in the order that the cards were dealt. The train leaves the FY and when it reaches the station / goods yard, the wagons are shunted into their allotted places.
You can also do the same the other way of course, shuffle the cards and shunt the wagons in order to make up a train.
When you look below you’ll see Alan also has a high level shelf track as part of his layout. Alan says “this is for running in locos plus I can run longer trains at speed.”
Although it is almost impossible to avoid all derailments, there are ways to limit the likelihood of them happening. This video has makes some excellent points.
The resource mentioned in the video
Model trains will usually operate faster on long straight flat stretches of track, but that can be boring after a while, not to mention the amount of space required to run a long mainline. There’s nothing wrong with having flat level areas of track, but changing the elevations by including gradients (slope of railroad track) can add considerable interest to a layout. Adding grades to a model railroad can increase the option of including tunnels, bridges etc as the trains meander through the countryside or mountain ranges.
However, railroad grades need careful consideration if you are to avoid operational problems such as derailments or stalling locomotives. It’s not just the loco that will need to safely navigate up or down the raised track, it is also the fully laden cars carrying coal, timber, metal, refrigerated foods, fuels, vehicles, livestock, or even people (well, plastic models of people). A long train can be very heavy and this needs to be taken into consideration when going up or down a gradient of a real railroad, or on a scaled down model railroad.
Let’s look at a real life example: A loaded train might have 135 coal wagons, with each one weighing 22 tons (empty) or 143 tons (loaded with coal). 135 cars x 143 tons equates to 19305 tons with the 3 locomotives moving the train (approx. 630 tons). Add that up and the weight could be up to 20,000 tons (40 million pounds).
Those are staggering figures, and the same rules of physics apply on a model layout.
A model train locomotive will need enough power to safely pull its cars up (or down) a grade without slowing to a stop or a derailment happening. A “gutless” engine won’t haul many cars up a steep grade, so if you want steep grades, you’ll require strong locomotives.
In general, more weight means greater wheel traction. A heavier loco might be able to climb a steep grade, whereas the wheels on a lighter weight loco might slip. Following this logic; a larger scale loco might cope better on steeper grades than would a smaller scale loco.
These days it’s often more cost efficient for a railroad to operate longer trains with multiple locomotives. With more pulling (or pushing) power a train can climb a steeper grade and/or have more cars attached. It is not uncommon to see multiple locos on smaller N scale layouts. They are typically at the front of the train, but sometimes there’s a loco positioned in the middle to add more pulling/pushing power.
Using extra locomotives is nothing new. In the days of steam engines the railroads often had “helper” engines standing by to help haul trains up the steeper gradients.
Another method is to use a ‘ghost car’ (sometimes called a cheater car) on your model railroad. This is basically a motorized boxcar or freight car that can be positioned somewhere towards the center of a long train. If the model train is really long, then more than one ‘ghost car’ can be used. They just need to be evenly spaced along the train.
A track gradient is measured as a percentage of rise over the length of the track. So if the model train track stretches for 100 inches, and over that distance the train climbs by one inch, then the gradient would be 1%. That’s a comfortable gradient for most model trains to navigate. Compare that to a short 25 inches of model train track with the same 1 inch rise – that would be really steep and equate to a 4% rise. A steep 4 percent rise could be problematic and likely cause a lot of frustration.
Track grades on real railroads fall into there categories; light grade is 0.8% – 1%, heavy grade 1% – 1.8%, and above 1.8% is classified as mountain grade. Real railroads need to make money, so having trains stall or derail can prove costly.
Broken down trains can block the line (upsetting schedules), derailed trains can be expensive to get back on the tracks, damaged goods (or passengers) is bad for business, and damaged trains or track can run into big money to replace or repair. That’s why real railroads choose to minimize operating costs and minimize risks, by avoiding overly steep gradients. They avoid anything that could have an adverse effect on operations.
The same goes for model railroads; keeping track gradients 2% or below is a good rule of thumb. It can also look more realistic (as long as you have the space) than a really steep grade. As I mentioned earlier, a 1 percent grade poses few problems on most layouts.
As with life-size railroads, the grades on a model railroad will be determined by the weight and length of trains. Other factors will be the number (and type) of locos being operated and the track speed limit. That’s not to say model trains can’t or don’t operate on grades of 4%, 5%, or even 6% – they do. But the steeper grades are more likely to operate short trains, geared locos, and at slow speeds. A good example might be a train hauling logs or coal from a mountain region. So, grades of 4% or higher are manageable on some layouts.
Helper locos are often used when trains need to haul heavy loads especially above grades of 1.5%. Mainline grades are generally below 2%.
The thing to remember is that on real railroads the trains gain considerable momentum on long straight level sections of track. If the track runs level for several miles and then has a small ½ mile run of steeper 2 percent grade, then the power of the train will take it up the grade without too much effort. So, from a railroad management view point, the 2% grade is unlikely to disrupt schedules or add greatly to the running costs. The same can’t be said for a 1.5% to 2% grade that stretches several miles. A lot more pulling power would be required to haul the same train.
More info on model train grades, realistic scale speeds
Curves and bends also influence operations on level ground as well as on gradients. An easement for a curve needs to be gradual, as does the transition into a gradient. A sudden change to track slope or angle is a recipe for disaster, posing a higher risk of unplanned uncoupling or even derailments. Special care needs to be taken when constructing curves within a gradient. This is because curves increase the wheel and rail friction making it more difficult to haul a train up a curving gradient, and less troublesome taking it down.
However, a including curves on grades can give a longer run where space is limited on a model railroad. This can reduce the grade percentage needed. Gradients can add considerable interest to a scale railroad, especially where one track passes over another on trestles or bridges. However height is needed for an over/under configuration, so there needs to be sufficient space for the train to climb and turn.
Including grades is good; including curves is good; but the mix of curves and grades needs to right. Too many, or overly tight, curves can cause problems. The same goes for ‘S’ curves – care needs to be taken when planning the configuration. As long as there are no track or wheel faults, a train will generally run along a straight section of track without difficulties. Add a tight curve, an ‘S’ bend, or steep gradient, and train speed and operation changes.
To achieve continuous running, a layout will need 180 degree curves so the train can turn around without stopping. Due to space limitations, this is not possible on every layout, especially on narrow railroads. The minimum radius of curves will also vary depending on the scale.
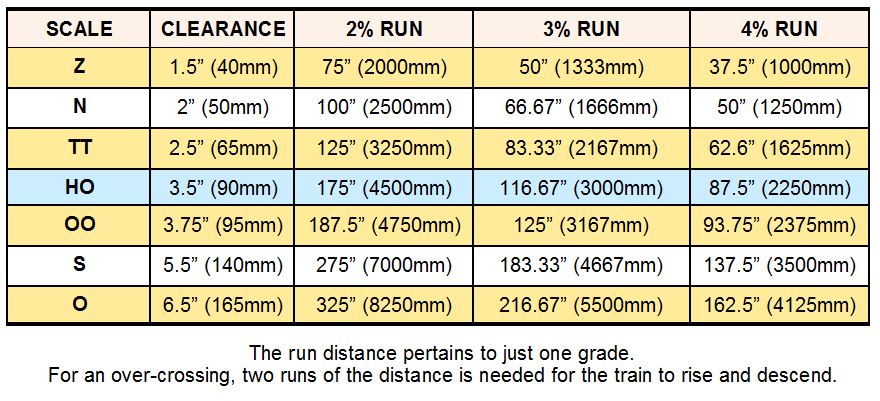
The above chart shows various scale clearances needed when planning tunnels and bridges. Remember that when a track rises it generally needs to come back down again, so the length of the grade will need to be doubled to allow for both the rise and descent.
When constructing a layout it is always best to try and avoid potential problems, rather than try to fix problems after they have happened. Simply things can save a lot of frustration, like testing the trains on your layout BEFORE gluing down the track and grade foam. The trains need to comfortably navigate the track without mishaps. They need to be able to take the curves without derailing and climb the grades without coming to a standstill. Obviously you will need to decide how many cars each train is likely to have to conclude whether the track configuration is adequate for your needs. There’s no point in having a fancy layout that isn’t practical to operate.
A lot of locomotive problems are caused by too much oil and grease.
Instead of using an oil can, or even an oil pen, put a single drop on a plastic cap and use a pointed, round toothpick to dip in the drop of oil and carry the oil to the bearing. As the motor, gears, and wheels turn it will distribute the oil. If you have the instruction that came with your locomotive it will show the areas to lube and what lube to use. If you don’t have the instructions look to see where parts may rub together during use.
Add your comment.
 Blog reader Robert sent in this tip to share:
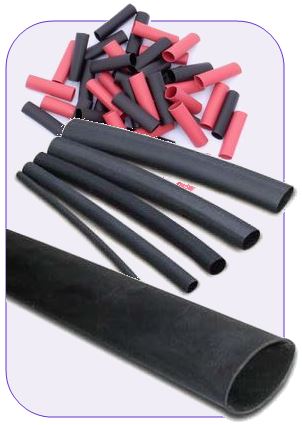
“I have found that heat shrink tubing cut with a very sharp craft knife makes a good substitute for worn traction tires especially if they are not readily available or you are $ wise.”
Comment added by Moderator: Yes I have heard of electrical heat-shrink tubing working too. Apparently you need to get the soft type and not the hard plastic stuff that Radio Shack sells.
Some RC hobby shops sell the assorted tubing (Team Novak Product #5852) for around $5. It may require two layers in instances where the groove is particularly deep in the tire. Choose a size a little smaller than what comfortably slips on, then stretch it a little before applying really low heat for it to shrink in place.
Add your comment.
The answer basically depends on how realistic you want your train operations to be. Obviously faster trains will have more chance of derailing especially around tight bends than slower trains; however speed is not the only reason why trains derail… but that’s another topic.
Most keen modelers will strive for realistic train speeds to better represent the true prototype operations you would see on a real life-size railroad. It’s only when we get a bit over enthusiastic (or maybe when we are still learning) that we operate our trains at unrealistic speeds.
For anyone new to operating model trains the first piece of advice would usually be to SLOW DOWN. To look real, model trains need to operate at scale speeds, not like performance racing cars.
 In HO scale (1:87) a 40ft boxcar is typically about 5.75 inches long.
Positioning a YARD RULER alongside a straight stretch of mainline track is a good way to practice running trains at various scale speeds. Practice accelerating as well as braking at scale speeds that resemble prototypical stops and starts.
Below is a table that shows prototype speeds and the required seconds needed for your model train to move from the start point of the yard ruler to the end point.
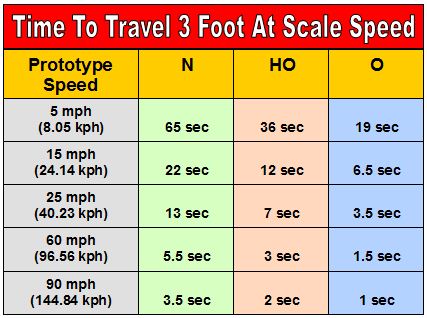
So based on prototype speeds in HO scale it would take a model train 3 seconds to run 3ft if it was operating at 60mph. In N scale the train would take 5.5 seconds to cover the same distance.
If you are performing switching operations then 5 mph is a typical speed to aim for. Yard movements are below 15 mph whereas mainline running could be anywhere between 25mph to 60 mph depending on the track condition and train type.
More info about scale speeds inside the Online Model Train Club.
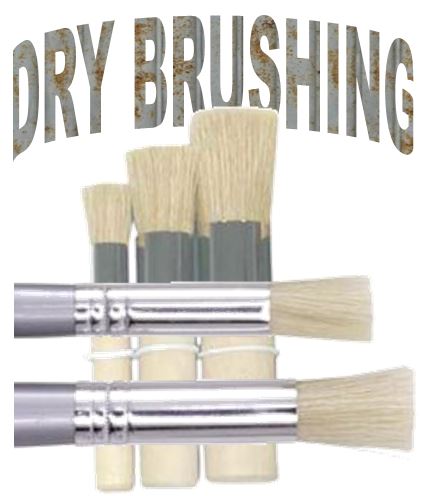 The dry brushing technique is used widely on model railroads to improve realism and provide extra dimension to a surface. It can also be used to highlight raised surfaces and small details that might otherwise be lost. Modelers often use dry brushing to give train models a rusted appearance to achieve a more realistic weathered look. Use an old brush (preferably one that has short stiff bristles) or buy a cheap one from stores for this technique.
1. Dip the brush in paint.
2. Wipe all extra paint onto a paper or towel. The dry should have some paint on it but not appear to be wet (hence the term “dry brush”).
3. Drag the paint brush across the model to despoit small amounts of color pigment. You might need to have several goes until you master the technique of applying the right amount of paint to just highlight chosen details.
4. The process can be repeated after each layer is dry to build up layers using color variations to add dimension.
Dry brushing is used to paint rust marks, oil stains and smoke marks. It can also be used to add details to landscapes.
Add your comment
 Ben sent in this idea to share:
I have used several inexpensive techniques for keeping wiring together. The wires still need to be easily accessed if you need to add or remove a wire. This photo shows some of the methods I have used. I only add a plastic cable tie when I’m finished wiring the cable. If you are using metal screw eyes it is worth opening the neck slightly so you can remove, add, or simply move a wire.
Add your comment.
From Michael W:
Sticking wiring through 2″ thick styrofoam can be testing for any of us. However there are a couple of easy methods. Use a knitting needle and thread the end of the stripped 22-gauge wire through the eye. Then push the needle through the top of the foam and pull it out from underneath with the wire attached. A sailmaker’s needle will work just as well if the wife doesn’t like you borrowing her knitting needles. Coating the knitting needle with some rubbing alcohol will help it slide through easier.
Add your comment.
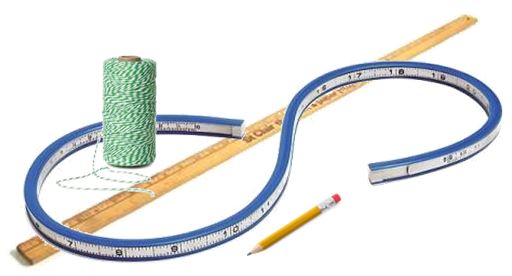 Most model railroads have curves, so it is important to know what radius is needed for smooth running and to avoid derailments. The next thing is to work out whether the curve will fit where you want it to go, and then to draw it to see how it looks. There are various ways to do this including using a flexible curve ruler (pictured) to form the required curve. Securing one end of some twine to a nail and the other end to a pencil is another way to draw a neat curve. I made a radius tool from a wooden yard ruler. I inserted a nail at the 1″ mark and drilled several holes at various intervals along the ruler. I then poke a pencil into a hole to scribe a curve. For example, if I want a 22″ radius, I drill the hole at 23″ (22″ from the nail). As any carpenter will tell you “measure twice, cut once.” It is simple advice, but well worth remembering.
More quick tips from Club members to share:
–>> India Ink is a good all-round weathering agent when thinned with water. It is really good for simulated weather- beaten unpainted wood. Just mix 2 drops of India Ink with 1 cup of water.
–>> When running wires down from a light pole, sometimes it is easier to simply drape them down and across to a nearby structure. The structure will hide the wires with the connection still looking authentic.
If you have a clever tip to share with others, please use the “Submit Your Question”, or the “Submit Your Article” link in the right hand column.

Click here for Model Train Help by Robert Anderson
Click here for Scenery & Layout Construction Ideas by Robert Anderson
Click here for Space Saving N Scale Track Plans by Tony Neilson
Click here for Getting Started In N Scale Model Railroading by Tony Neilson
Click here for DCC Model Trains Handbook by Tony Richardson
Click here for OO/HO Trains by Tom Hobson
Click here for Scenery Construction Techniques by Brian Miller
The Beginners Guide To HO/OO Trains by Tom Hobson has just been released. It is an ebook that can be downloaded to your computer, burnt onto a disk, or printed out for handy reference. It will benefit many in the hobby and focuses on OO gauge and HO scale.
 Model railroaders choose the scale they want to model for different reasons. Some prefer bigger trains; some like lots of scenery and track so opt for a medium scale size such as HO or OO, whilst others are more limited for space and choose N scale or even smaller scales.
There is no right or wrong scale… it really comes down to personal preference and/or space and budgetary considerations.
That said; the biggest selling model train scale worldwide is HO scale (1:87), with the UK equivalent OO gauge (1:76) being the number one size in that part of the world.
If you are interested in building an HO scale or OO gauge layout then this ebook is a good starting point. After all, the more you know, the less mistake you’ll make.
Regular contributor John Mc Cabe kindly sent in this short article for publication:
Engines are an integral part of any layout, and should be checked out when you first bring it home from the hobby shop or get it in the mail from an online dealer. It’s real easy to do and it doesn’t take much time, but checking the engine, besides eye-balling it, is imperative, especially a new one.
What you are looking for is slow, continual running without stops and stutters. You can use the layout you already have, or set up a length of track, making sure it’s straight and on a level surface. Use your DCC or hook a power pack to the end of the track, make sure the wheels of the engine are on the track, and the engine is pointed front-to-back. Turn the power on slow, and watch that the movement runs slowly and smoothly in both directions. Do this also after the engine is picked up and turned around to run from back-to-front. This test can also be tried on curved track.
Awhile back, I was in a hobby shop that had long, straight test tracks for HO and N-Scale. The owner of the shop took a brand new Atlas N-Scale diesel engine out of the box, put it on the test track, and ran it slowly back and forth. He then stopped the engine completely, put a ruler next to the track, and turned up the power about two clicks, just so the engine was on slightly. In a half-hour time, the engine moved forward three-quarters of an inch! I would have bought it immediately if it wasn’t already spoken for, and if I had the money.
Add your comment.
Soldering is something most in the hobby will need to master. If the solder will not take it is an indication the surfaces are not clean enough, or soldering iron is still not hot enough. The solution is to ensure BOTH surfaces are clean and shiny. Also make sure you have applied a thin coat of flux. The soldering iron needs to be hot enough for the flux to sizzle and boil just prior to applying the solder.
Add your comment or suggestion.
 Some quick tips submitted by Andy:
A staging yard is a hidden place that is used for storing unscheduled trains. It can also be used for rearranging trains between or during scheduled times. A classic and fiddle staging yard consist of parallel tracks on plain ground and a pivot respectively.
Advantages:
Disadvantages:
Click this link for some excellent model railroad scenery ideas.
 Ed sent in this short tutorial to share:
“Spurs are short-length rail road tracks used for train storage, customer/station services and loading/unloading operations.
Spurs are of two main types; single ended and double ended. A single ended spur has only one terminal connected to the main line. It can be leading or trailing. A leading point spur branches off in the forward direction and a trailing point spur branches off in the reverse direction. The latter is a better choice because it simplifies operations. A double ended spur has both ends connected to the main track.”


