Tips & Resources
Everything on model trains, model railroads, model railways, locomotives, model train layouts, scenery, wiring, DCC and more. Enjoy the world's best hobby... model railroading!

 Shopping for model train storage boxes is not a very difficult job because most companies that focus on this sector have high quality foam used in the inside of these boxes to protect your cars from damage. However, a few things that are not taken into consideration while buying model train storage boxes can result in forever disappointment. To begin with, it is important to buy a storage box that stores your cars in the STANDING POSITION! This prevents leaked oil spoiling the paint job and costly decals.
If you are on a budget, you can you can use those inexpensive plastic containers you’ll see in most discount stores and line them with foam. Another option is to construct some shelves and store your trains behind glass to keep them away from the dust.

Some toggle switches have a spring loaded return to center switch, which can make them suitable for operating point motors. You simply pull back for a moment to operate the points in one direction, and forward for the other.
Choosing model train electronics components must be done with caution because wrong decision-making not only cost you money, but chances are that you will end up with a substandard railroad that needs constant maintenance.
Make sure that your model train electronic components are the correct ones to do the job.
Repairing faulty electronic component is a bigger pain than installing a new one and this must be kept in mind.
Model Train Wheels needs regular inspection to ensure its functionality because a faulty wheel can sometimes cause your coaches to overturn, drawing further damage and such problems can be expensive and sometimes irreplaceable if your engine is a custom-made one. There are different types of wheel diameters available in stores, the larger ones being popular with older models. Your focus should be on getting metal wheels over plastic because metal wheels are less prone to accumulate dust and do not produce as much friction as a plastic wheel. If you are looking for a significant wheel overhaul, always consider replacing the entire train’s wheels to metal from plastic or start with one or two coaches.
Ryan has put together this helpful tutorial for avoiding derailments on a model train layout. The video includes some excellent layout scenes. Feel free to pass it on to friends. Enjoy!
This is the first video tutorial Colin has ever made, and he admits he was a bit nervous putting it together. Personally I think hes done a fantastic job, and it really shows how much he knows about model railroading. That’s not surprising, after all Colin has been a model railroaders for some 32 years.
In this video Colin shares some of his ideas for adding an industry or two to a layout. I’m sure you’ll enjoy this video and want to share it with friends. Thanks Colin for putting in the time to share your ideas.
If you have a question to ask others in the hobby, or if you want to answer or comment on a question, or if you want to publish a photo/description of your layout… then this is the place to do it. This popular Model Train Help Blog has already had nearly 400,000 visitors!

To submit a question simply use the “Submit Your Question” link in the right hand column.
To answer a question click on the title of the posting and you’ll be redirected to a page where you can add your comment or answer. You can also see what others have to say.
To add a photo/description of your layout, or add a tip for others, use the “Want To Help” link in the right hand column.
PLEASE NOTE: All questions and comments get submitted to the Blog Moderator for approval prior to publication. Please spell check and proof read what you write before submission, as only the best comments, questions and answers will be published. Sorry to be fussy, but we get a lot of comments that don’t make sense, and we want to maintain a high standard for everyone reading this blog.
The results of the recent poll revealed 51% of the 1047 model railroaders surveyed operate DCC. I actually thought the figure might have been a little higher than that (38% operate DC and 9% didn’t have a layout yet).
There are definite advantages for both systems, and I would never try and push anyone into DCC if they are already comfortable with DC and don’t want to change. That said; I would recommend DCC operation for anyone starting off in the hobby as the system is very versatile and fast becoming the norm. Whichever system you operate, always remember the whole idea is to have fun and enjoy what you are doing!
Richard has a question for others in the hobby:
“I know about HO turn tables, wyes and reversing loops at the end of a line. Are there any other ways to turn a train, or even just a locomotive around to head back the other way? I’m thinking mostly of passenger trains, with all the seats facing forward and I don’t want them to have to ride backward, or to manually reverse each car.”
Comment below.
Frank wants advice from experienced model railroaders on how to keep his track, cars and locos clean. If you can offer a suggestion, then please add your comment below:
“I clean my tracks, rolling stock and engines with goo gon. I was informed that this leaves an oily residue. Is this so? Tracks I clean with a clean white rag. I use white paper toweling socked with goo-gon layed over a section of track and roll my rollig stock over it. I then roll it over a dry paper towel until clean. Engines I do in the same manner except I use the power to spin the engine wheels. After a short period of time; less then a week the tracks are back to being dirty again. Another point: someone told me they use moleskin pads on a cheap track cleaning car and run it around the tracks. Again the tracks get dirty within a week or so. Any Suggestions.”
For those who don't know, a catenary is part of the overhead wiring on railroads, which hangs in between the supporting masts, and from where the dropper wires are hung.
Guillermo, from the Patagonia Argentina asks readers:
"I am looking for to make an HO non operating catenary system for part of my layout. Do you have idea where could I find information for about it."
Add your answer below.
It is really handy to be able to easily move your layout (or sections of it) if required. Most people discover this when they move house. Moving the furniture is easy, but moving a layout can be problematic.

This informative manual describes how to build a mobile model train layout, so you don’t have to begin again when you move house. You can read how a modular train layout can save you money as well as taking up less space.
You’ll really enjoy this! It includes photos, tips and a layout plan included. Get it now for free when you join my online Model Train Club.
Here are a three tips sent in by members of my online Model Train Club:
Bernard says:
“My tip is about planning a layout. We spend hundreds (probably thousands) of hours at our layouts so we need to be comfortable. I mean the right height off the floor, easy to reach access to all sections of the layout. I have a high bar stool handy to sit on and I’ve added foam padding to make it more comfortable. Also my power pack is close to the electrical wall socket so I don’t need to run miles of cords (or try and hide them).”
Daniel says:
“I think it’s best to start with a 4 × 8 foot bench. You can always add another 4 × 8 foot bench at the end to form an L shape, or add another at the other end to form a U shape. I use screws and glue (not nails), as nails tend to work loose with vibrations from trains. Brace the legs for extra strength (your layout will get heavy with mountains, buildings etc) and stability.”
Robert adds:
Sometimes it is better to build a layout in modules, or work on just half of the layout to start with. A half-sized layout is not only quicker to build, it will provide you with a good guide to the costs and time involved.
More tips are available inside the members area of the Online Model Train Club.
Bruce says:
“Because I have a bad back I made my bench 42 inches off the floor… no bending. The only problem is I find it difficult to reach the rear of my layout as I can’t stretch my hand as far at that height. My advice is around 3 foot off the floor for most people. Put a piece of plywood at that height and test out reach-ability (if there’s such a word) before screwing your bench together. My trains look good higher up, but little kids can’t see (or touch!).”
Comment below.
Here are 5 of the hundreds of useful model train tips available to members inside the Online Model Train Club. If you join before Christmas you will qualify for the extra bonus Christmas gift, but time is fast running out. Read about the other bonuses here.
Rob’s ideas: I mix window cleaner (Windex) to thin my acrylic paints when using an airbrush. It dries quickly, but be careful the window cleaner brand doesn’t contain harmful chemicals like ammonia as they might damage some plastics.

Pat’s idea: I haven’t got an airbrush so I uses brushes to apply paint, but they can leave brush strokes. To get a really smooth surface I apply several coats and use fine wet/dry sandpaper between coats. I also thin the paint slightly between each coat and use a finer grade of sandpaper as I come to the end of the process. I also use rubbing compounds on some jobs.
Cedric’s idea: I use white spirit instead for those expensive thinners from art shops. Each time when washing brushes I keep the dirty old used thinner and pour it in an old jar. After a while the paint sinks to the bottom of the jar and the thinner is relatively clear again. I reuse it.
Noel another keen member of the online Model Train Club suggests…
From my days in the retail trade we like to add movement to our window displays to attract interest. A local retired electrician use to wire up little electric motors to make things move. I have used the same idea on my railroad. I have a little figurine of a man with a chain saw cutting through a log and a boat in the water rocking gently. It only takes a little electric or battery motor mounted under the benchwork with the shaft of the motor attached to the the object that needs to move. You need to be a little ingenious, but the effect can be very interesting.
There are hundreds more great ideas inside the online Model Train Club like this one…
Peter’s idea: A road disappearing into the distance can look impressive when done well. It can also look strange if it hits a wall and stops abruptly. To overcome this I bend the end of the roadway material up and twist it towards a point to the side. I then add some greenery on either side to hide it a little and give the appearance of the road weaving off into the distance.

You could use a copper-tone stripe to represent the rusty band on a tank. There are lots of uses on a model railway for pin stripes. Another is for bands around wine barrels if you have a winery on your layout. You can paint the pin stripes if the color you want is not available, which is still easier than trying to paint a straight line…believe me.
Here are a couple of useful tips from members of my Online Model Train Club. I’m sure you’ll find them helpful:
Club Member Penn gave this tip for Humps On Layout Joins
Sometimes the diluted glue/detergent mix used to ballast the trackwork can seep into the MDF (chipboard) joins where trackwork crosses over those joins. If the glue mix soaks in it can cause the join to swell at that point. This can create a pronounced hump and cause the track to lift. I’m sure you can imagine the problems that could cause and the problem could be tricky to fix.
So, it is better to avoid it happening in the first place. The trick is to seal the edges of the MDF board with undiluted PVA at the point where a track could cross. Before putting the track down I would paint all the track bed area with undiluted PVA. I would also use undiluted PVA to paint any areas that will be ballasted. To be on the safe side Iould extending the painting an inch or two beyound the area to be ballasted. I would thoroughly seal the MDF joins, screw holes, and any area where the diluted glue mix might penetrate. To be on the safe side I would give it another coat when dry. I would also seal any extra holes I might drill (such as point motor and wiring holes) before ballasting. I’ve had an expansion hump in a join under my track and I know how annoying it can be, so I’m now super careful.
Another member of my Online Train Club (Pete575) gave this tip for Easier Drilling
Drilling small holes into harder materials, can sometimes have its problems when the drillbit wanders as it attempts to gain bite. An example would be holes for grab irons. One solution is to imprint a small dimple in the hole location before drilling begins. You simply use a small awl., or a hard sharp pin and firmly press it in the base material to make a small pit. After doing that you place the tip of your drill bit in the pit and drill the way you normally would. Doing it this way can be much less frustrating.
You’ll get lots more tips, tutorials, and clever ideas each and every month inside my Online Model Train Club including ideas on:
Join today!
Here’s another 3 tips from inside the member’s area of the online Model Train Club:
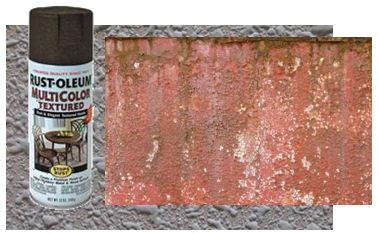
When you paint on the base-color of your concrete dust it lightly with a little baking soda applied directly on the wet paint. Test a sample patch first, but it should give the surface a bit of a textured look. And, when you come to weathering it you will find it has more depth.
Quick Box Car Weathering Tip:
You can use some Floquil’s Antique White and add a drop or maybe two of Box-Car Red for the base. Then dry brush rust streaks as required. Earth colors look good at the ground level and then add some grimy streaks, and some white color where calcium might have leached from any cracks.
Quick Wall Surface Tip:
I spray on texture paint to paper/card. This makes some great looking walls if you are making your own scratch built buildings. You glue the textured paper on to the cardboard, or balsa wood, that you are building with.
Here’s another tip from a member of the online Model Train Club (see right column):
Painting several colors on some rolling stock or a locomotive can be problematic especially when the paint colors butt against each other, or where a straight line is required. Applying masking tape can definitely help when painting straight lines, however there are times when the lines appear jagged or rough.
To end up with a clean result it is usually best to allow 12 to 24 hours before attempting to apply another color. The first coat needs adequate time to dry and harden properly. It is a good idea to apply some masking tape to achieve a straight line. Try spraying some Dullcoat to the area you are planning to paint at the edge of the masking tape. This is to seal the tape.
Then, leave the new coat to dry for a minimum of 30 minutes. This step is important because there is no point is applying a second coat if the first coat is not completely dry or if it is still a bit sticky or soft. When it is dry it is time to paint on the second color. All going well you should be left with a clean sharp paint line without showing any signs of the paint bleeding.
Another way of doing it…
The other option is to mask the area you painted first and then spray the remainder of the loco the original color again. Spraying with the original color will help fill those little gaps where the second color might have over-run. You can then leave the loco to dry again prior to respraying it with a second color. You are unlikely to see any over run this time around.


