
Everything on model trains, model railroads, model railways, locomotives, model train layouts, scenery, wiring, DCC and more. Enjoy the world's best hobby... model railroading!
Many readers of this blog are also loyal members of the Online Model Train Club, so will be familiar with what club membership can offer. This video gives a look at some the resources they accessing…
Click here to watch the 3 videos mentioned above.

Alan’s shelf layout. What a wonderful layout!!
Space limitations are a problem almost every model railroader faces when constructing or expanding their layout. For some the solution is to stick with smaller trains such as n scale or z scale. They obviously require less space to operate, and the landscape also takes up less space when compared to bigger scales such as HO, OO, and of course the very large O scale.
However, another option worthy of consideration is to include a shelf layout as part of the design. This could be as a standalone track or be incorporated as part of an existing oval, loop, or continuous-run layout.
In most situations a shelf layout will typically take up less space; however being narrower in design, they can present some limitations. Unless the shelf runs a full 360 degrees around the room, continuous running might not be possible without more hands-on operation.
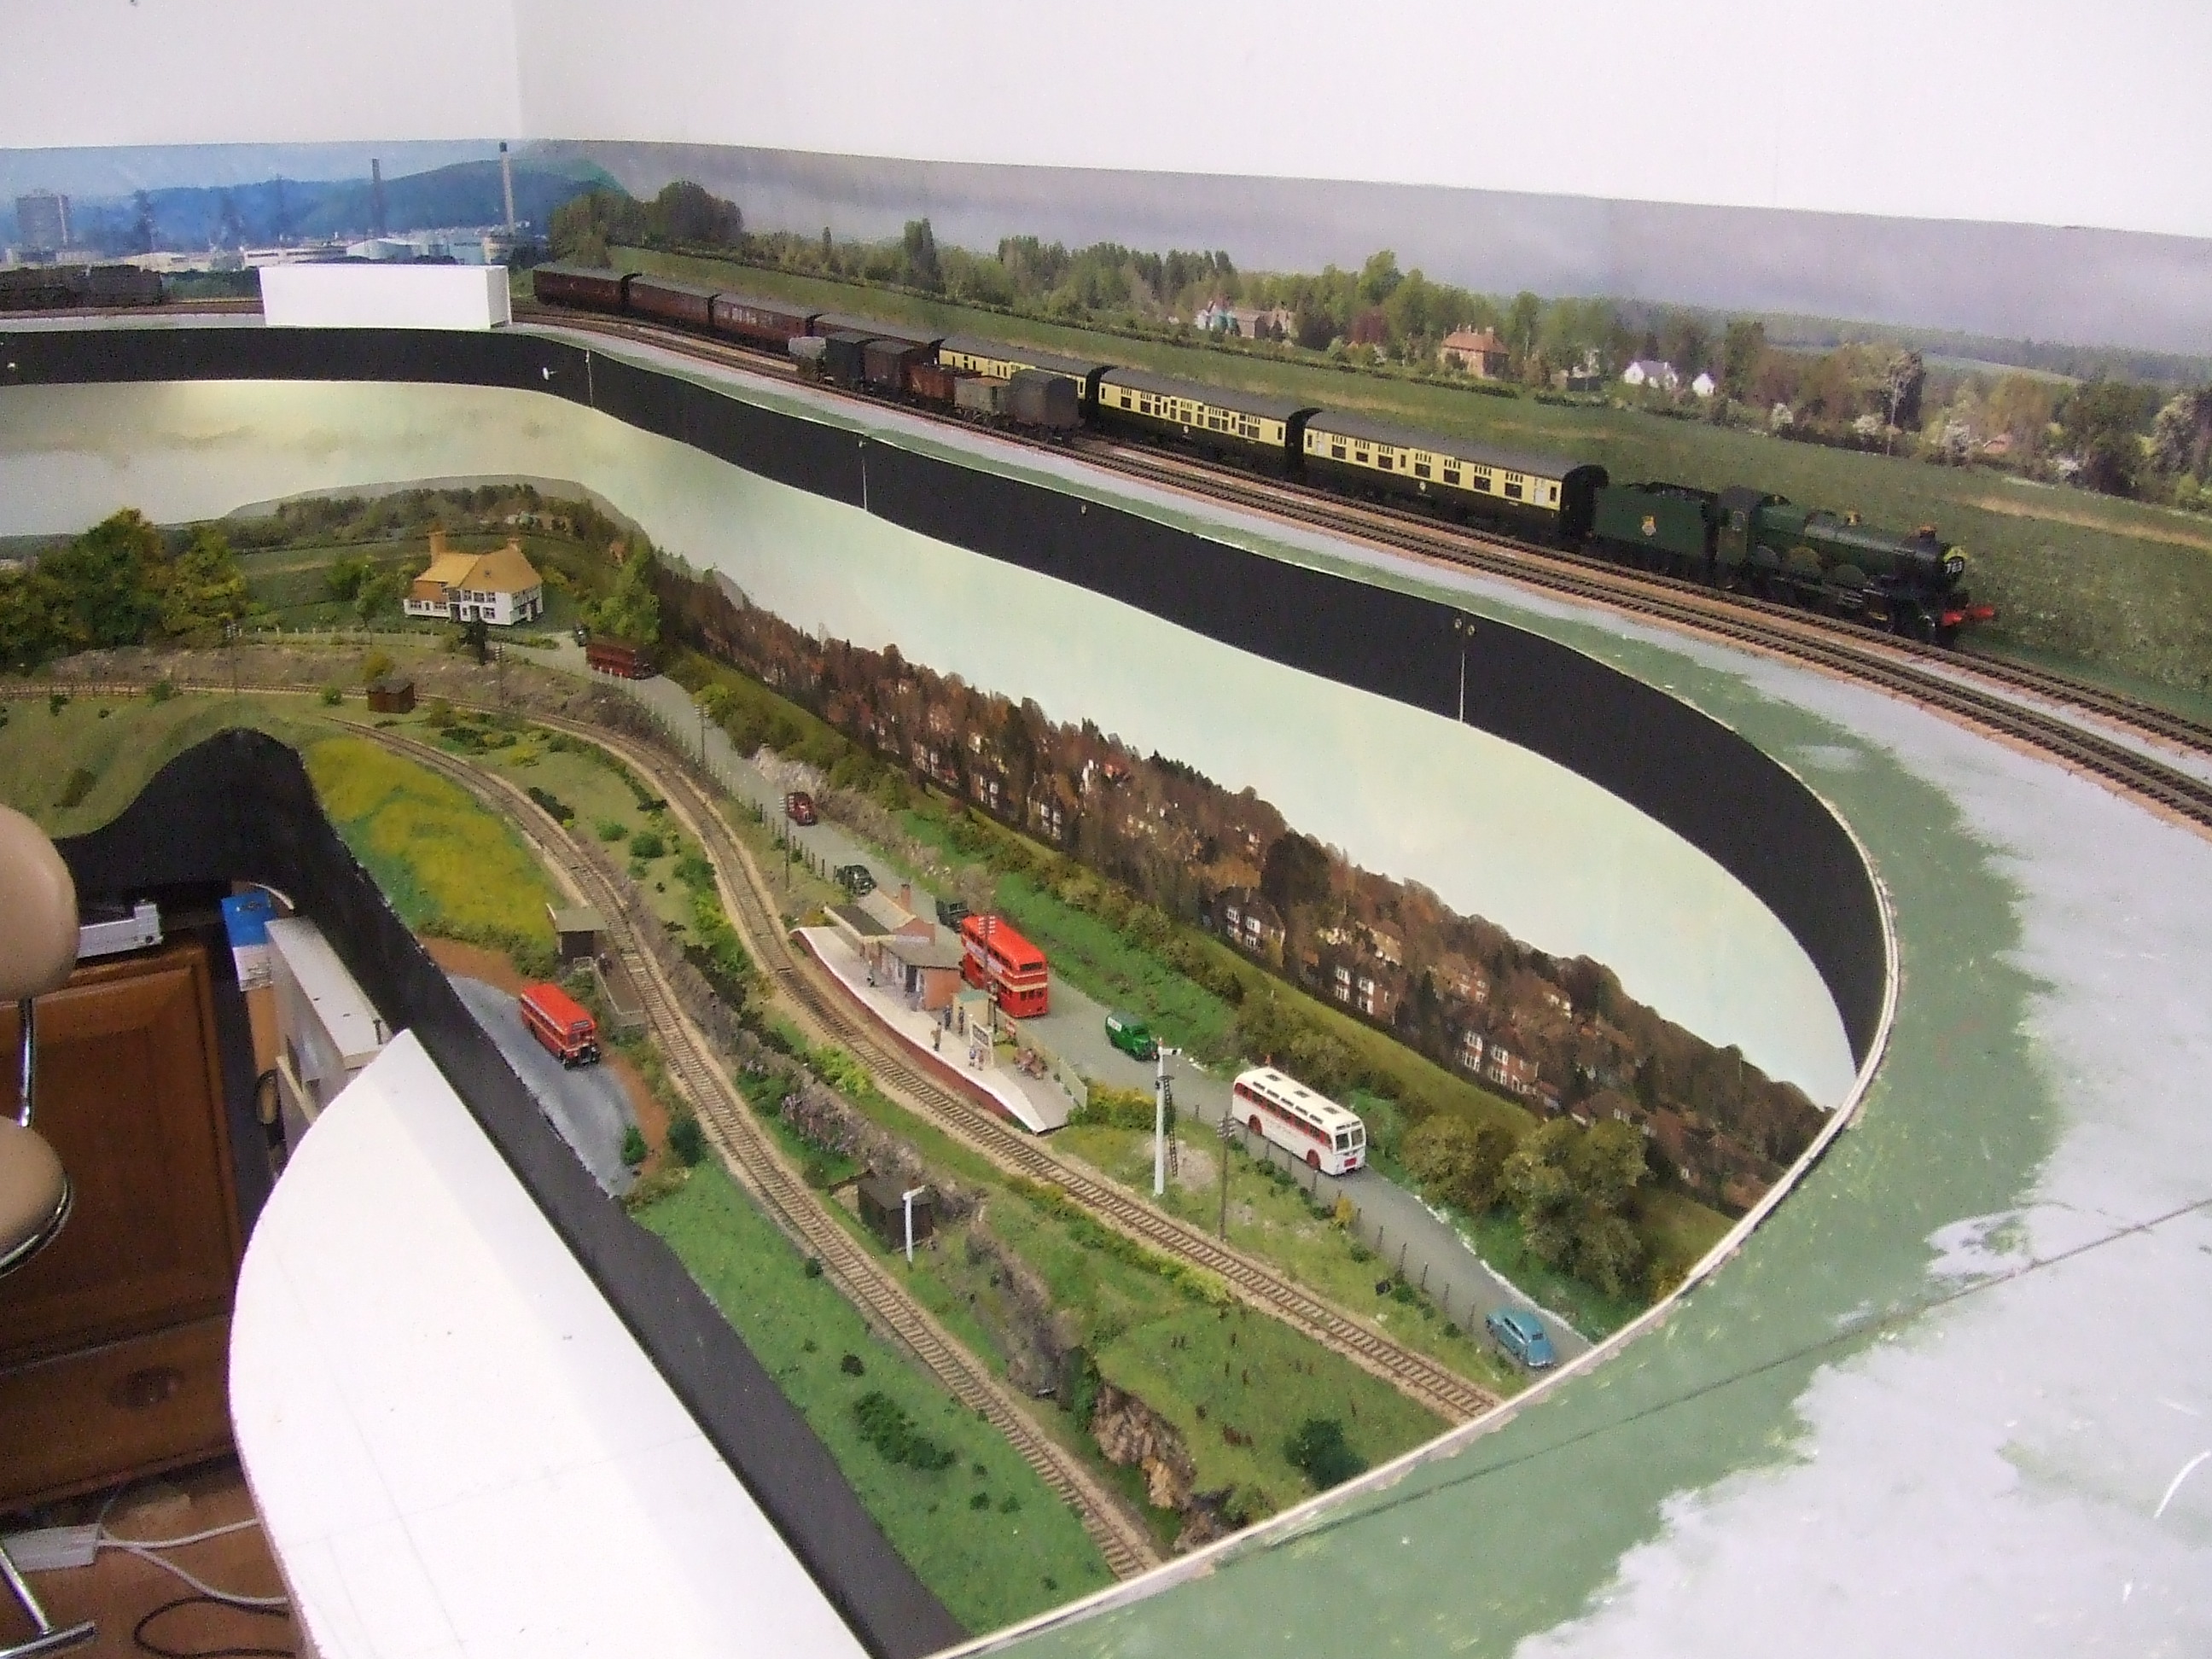
Alan from the UK kindly sent in these photos of his layout which incorporates a very long shelf.
This could be viewed as an advantage or disadvantage, depending on whether you like to just sit back and watch your trains go around, or whether you prefer to take control of your trains by switching them onto different tracks. If the length of the shelf is reasonably short, then the train movements can be over in a matter of moments if the train simply has to get from one end of the shelf to the other.
Adding yard operations to a shelf layout can certainly increase the operational possibilities and make the train movements more complex than the operation of a basic ‘loop’ layout.
Steve contributed this article:
Thank you for all of this continual brilliant information. I purchased my trains at the age of 19 and am now fifty. I built a very accurate and good quality loft room in my father’s house in England ready for a railway like Talented Dave’s set up but left and went to live in Australia. Many years later my father visited and brought over my trains. I finished renovating my unit if that is possible. I have built a new desk 2200mm x 1600mm x 750mm high. To hide my train set so my friends when they visit will not know its there and won’t know I am an Anorack as they call it in England.
 I purchased 15mm thick Cedar marine plywood as it is my favorite plywood. Too good for the job but it doesn’t splinter easily. I was going to build my board at Christmas but we had a Creative Arts & Technology night coming up at the school where I am the Design and Technology teacher. Three of my students had finished their robotic project so I quickly designed the board and started them off building it. So I didn’t embezzle the company I donated six deep fat fryers for their time. My board is going to have two layers and at least six trains running at a time.
 The bottom board is constructed from four pieces that bolt together with four bolts for each section. Each section has lifting holes, bus holes and hole for point motor wires and LEDS. I am going to wire for DCC. In places I have had to join the plywood because I didn’t want to waste any expensive pieces not by choice. Apart from a few glue marks the board is excellent.
The students also made me some adjustable legs out of steel which were welded and cleaned up and powder coated. I’ll improve on the up and down motion later.
 These are a few more pictures of my track set out template (Not totally convinced yet). Adjustable legs made from 40mm and 35mm Galvanised box section. A picture of some of my trains. I Like a lot of Australian trains and rolling stock detail is very good.

I have just started a sloping girder bridge to take you from the top layer a round the curve. I have two Faller Systems including the level crossing which I would like to factor in. I actually like goods yards and an industrial look. I won’t be using the Hornby station or buildings shown in the photograph. I really do like Australian landscape and gum trees and grain storage systems but I only have about 380mm to fit under the hide away desk.
 Thanks to Steve for sending in the information and photos. He has an exciting project ahead of him, and if the baseboard modules are anything to go by, the standard of his completed layout will be extremely high.
If other readers or Club members would like to send in details about the progress on their layout, simply use the “Submit Your Question” link in the right column to make initial contact with the Blog Moderator. Please carefully edit any information before submitting it for possible publication.
Club member Franky asks:
“I’m bored with just running my trains around and around my layout. Part of it is my own fault, because the track config is just a main line with a couple of sidings. I have space to include a branch line, so I know when I add that, it will provide more variety. What I need is more purpose for my system. I know a little about the basics of how waybills work, but I need more input. What do others use to operate and justify their railroad layouts?”
Mining settlements with operating mines exist throughout the world and most rely on a railroad to move the coal or mineral deposits for processing or export. However, over time, many mines either run out of the resource they are extracting from the ground, or the minable quantities become unprofitable. So the mines close and the people move away leaving a ghost town behind. Whatever scenario, there are possibilities for the model railroader to build a scene depicting activities at the time.
In the United States pioneering communities were often established as a result of a “gold strike.” Other communities grew around coal mining towns, cow and farming towns, gold prospecting terrain, and some towns just became railroad towns due to their proximity to other towns or resources.
Settlements often began with just a few farmers or miners living in tents, or self built cabins, or shacks. As the settlement grew, other buildings and services developed. Depending on the size or scale of mineral find or farming activities, a small town would get established complete with streets (or art least a main street), a general store, saloon, maybe a jail or sheriffs office, a schoolhouse, church, and blacksmiths. The arrival of the railroads really opened up some of these small towns and many eventually grew into some of the large cities we know today.
Go here for more information on how to build a model railroad mining town scene compete with mining chute, miners shacks, mine site office, small school house, mine managers house, and workers accommodation.
Go here for building an old Wild West town complete with sheriffs office, saloon, blacksmiths workshop, general store, gunsmiths, and Bank.
Other towns however, never really grew. The valuable mineral deposits ran out when there were no more precious minerals to dig, no ore smelter or mine chute was built, no railroad arrived, and the few structures left were often abandoned. Even a scene like that (although somewhat sad), can develop into a mysterious and fascination landscape on a model railroad. The hobbyist can add broken down wagons, and maybe even some tumbleweed to complete the realism of the diorama.
For those who are interested; some of the historic mining communities throughout North America include: Glace Bay (Nova Scotia) and Dawson City (Yukon) in Canada; Skagway and Juneau in Alaska; Tombstone, Bisbee and Klondyke in Arizona; Calico and Columbia in California; Denver and Idaho Springs in Colorado; Custer in Idaho; Seymour, Coalville, and Muchakinock in Iowa, Bessemer in Michigan; Marble, Chisholm, Mountain Iron in Minnesota; Butte and Virginia City in Montana; Goldfield in Nevada, Pinos Altos and Silver City in New Mexico; Deadwood in South Dakota; Eureka, Silver Reef and Spring Canyon in Utah; and Hurley in Wisconsin. This list is by no means complete, but serves to show how wide spread and important mining is or was in the USA and Canada.
This article has mainly focused on mining in North America, but that’s not to say mining in other countries has been or still is very important. South Africa is known for its precious metals like diamonds, Australia has many resources including iron ore, coal, gold, copper, silver, uranium, opals, bauxite, nickel, diamonds, zinc, oil shale, petroleum, and natural gas. Other countries throughout the world also operate big mining operations of one kind or another.
So it doesn’t matter where you live, or what era or area you as basing your model railroad around; it is usually possible to incorporate mining activities of some kind. And, most mines need good rail access to transport the precious resources to a refinery, or to a port for export. The ideal situation for any model railroader!
Sean asks readers:
“I have an HO DCC layout, but my train will run then stop then power back up… then run… then stop… and power up again. Very annoying. What is the problem please?
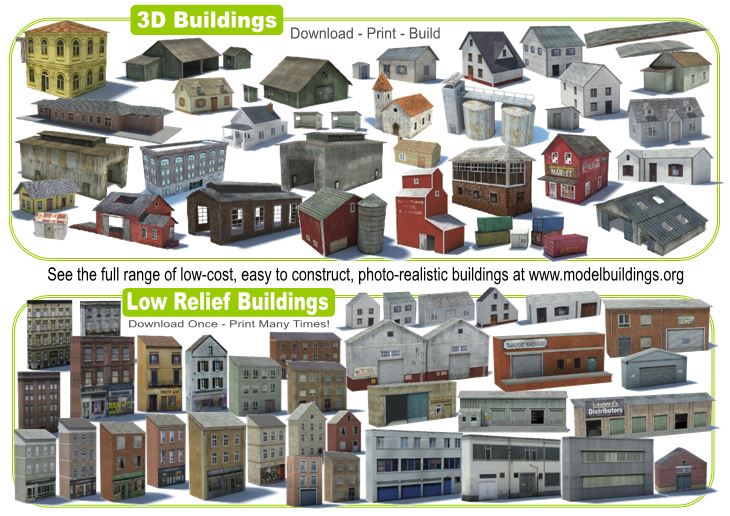 The bulk packs of downloadable buildings are proving popular with model railroaders and those interested in making dioramas. Many of the buildings can be purchased separately, but most are also available in bulk packs of 6 or more assorted buildings. Here are some of the most popular bulk packs:
Big Bundle Pack #1 (SAVE 67% of individual prices)
Big Bundle Pack #2 (SAVE 66% of individual prices)
Background Buildings Bulk Packs (Some up to HALF PRICE off individual buildings)
Multi Pack Buys (Saving between 35% to 68% off individual prices)
The buildings are fun and easy to build using card, corflute, or foam. The downloadable plans are already weathered & detailed so no paints are required (unless you want to add further detailing). Apart from being very realistic in appearance, they are also very sturdy after construction, although you can add extra internal supports if you choose. You only need to download the plans once, and you can then build several from the same download if you choose. The plans can be made to OO scale, HO, or N scale.
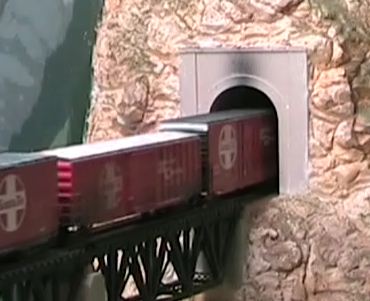 Model train tunnels are generally a necessity on mountainous layouts, but they can also add greatly to the realism of a scene.
A tunnel is an excellent device for making a model railroad seem to be much bigger than it actually is. A tunnel will hide the train for part of its journey, leaving the viewer to imagine it has departed the area for a distant destination. When the train mysteriously reappears out the other end of the tunnel, it is easy to imagine it’s a completely different train coming from somewhere else. When model trains are constantly in view, realism can suffer.
Here are 5 quick tips for better tunnels:
1. Blacken the insides of your tunnels. A flat black acrylic paint can be used for the interior roof, walls, and floor. An unpainted “plywood-colored” tunnel interior will look unnatural, and lack the dark and mysterious appearance of a real tunnel.
2. Place ballast on both sides of the track inside your tunnel portal. Continue the ballast for as far as the eye can see.
3. If you are not experienced with making your own tunnel portals, they are reasonably inexpensive to buy. Ready-made tunnel portals sometimes are pre-weathered, but you can add your own weathering effects with gray wash, chalk etc. to add more realism. Smoke and exhaust smudges look good towards the top of the portal. Ready-made portals are certainly more realistic at the entrance to a tunnel than is a roughly cut hole.
4. Allow plenty of clearance inside the tunnel for your longest and tallest trains to navigate safely. There also needs to be adequate clearance for track and trains to the left and right of tunnel entrances. Although this won’t necessarily stop all derailments, it will ensure your trains don’t come to a sudden stop each time they try to enter the tunnel. Also, you’ll want enough space to put your fingers, or a tool (pair of long forceps or tweezers) inside the entrance if a train derails.
5. Allow access to the tunnel interior, because you can almost guarantee your trains will want to derail in the most hard to reach location on your layout, especially inside tunnels! Derailed trains can usually be retrieved easily from inside short tunnels, but longer curved tunnels can be problematic. This is why creating another access point is a good idea, either from underneath the track, or through the side of the mountain. Another option is to make your mountain (or tunnel) as a lift off section.
One quick idea is to build an old photo frame into the scenery. Chuck out the glass and use the frame and backing (face down), in the scenery. When a train derails you simply remove the backing sheet of frame to access the inside of your tunnel. You can hide the frame using bushes, trees, fences, or other scenery props.
Eric asks readers for advice:
“I have an old DC layout I built about 25 years ago and I want to drag it into this century technology wise. How much new wiring will I need to do to convert to DCC considering that I currently have various blocks I use to control trains in the different sections of my layout. Will I need to remove all the blocks, and make it one block instead? Also, will I need to buy new DCC equipped locos, or can my old locos be converted?”
Franks has a question for readers:
“I am having a problem with the frogs in the switch derailing my trains (loco or cars). I have examined the tension on the Atlas switch, but don’t know what else to do.”
This short 50 second clip presents some amazing facts about railroads in a fun way. Enjoy!
If you haven’t yet grabbed the free sample building mentioned in the clip, you can download it here.
It’s late November and Winter has already announced its arrival in many countries in the northern hemisphere. This short clip shows a “snow-blower” train in Romania plowing a route through DEEP snow. The train actually derailed a couple of times on this section and needed a huge crane to lift it back on the track.
Meanwhile in the southern hemisphere Summer is on the way, and the iconic Ghan Tourist Train travels every week through central Australia in temperatures around 100F (35C). What a contrast!
Which DCC system is the best?

There are several brands of DCC controllers to choose from.
Most in the hobby have their own personal preference with regards DCC systems. There is a variety of brands (manufacturers) available, and generally most of them are very good. In many situations it just boils down to price, brand preference, and/or individual requirements.
After finally deciding to use DCC on your railroad, and carefully choosing your command station manufacturer, you’re not quite finished with the selection options. It’s now time to decide exactly what train or accessory functions you’ll want to control using your new DCC system. And, that’s one of the big advantages with DCC. With DCC control you will be able to select from a countless range of decoder hardware to meet your requirements regardless of the manufacturer.
Are NMRA standards necessary?
The NMRA standards have established the guideline so virtually any brand of decoder will operate with any compatible command station. Although some manufacturers do supply additional capability that is unique to their products, for the most widely used command station/decoder functions, all decoders have compatibility with all command stations if they are NMRA compliant.
How do decoders work?
Each decoder is like a brain in a DCC system. Decoders interpret each command that goes on the rails, and performs some action such as setting the locomotive direction or speed, or perhaps turning on lights. Decoders are separated into 2 general types; fixed and mobile, or accessory decoders.
The mobile decoders can also be broken into 3 sub-categories: sound, function, and a combination sound/function. Continue reading more on DCC decoders here…
Val asks readers for assistance:
“I am having problems with my OO train engine it keeps stopping on the track for no reason. It will go round without stopping then the next time it stops in different places all round the track. Can you help and tell me why? Thanks.”
George has a question that most beginners in the hobby ask:
“What Scale do I pick …there are so many scales of model railroads that it is difficult to select which one? I favor the Old West …what is the best Scale for it?
You can add your comments to assist George with getting started.
Bernard submits his question for readers:
“I would like to build a hinged section of track to open to allow me to get into the middle section of my O layout where all the controls are. I have an 8 x 12 layout in an upstairs room. Also would like to find a layout program for tracks, curves and switches, etc. Any suggestions please.”
Article kindly supplied by Kevin C:
When I have completed drawing the full-size layout track plans I want to use and before I lay out the track, I will generally decide the signal and switching locations. I’ll mark them on a plan. I’m planning road crossings so I’ll need to have the crossing light switching at the right location. Then, I’ll draw the wiring circuits onto the plan using different colors, as it is not hard to miss a connection or two when laying out the track.
Recently I was kindly given some computer data cable with four pairs in these color… Continue reading article and view full-size diagrams

Joel asks readers for advice:
“I have just fitted a decoder to my locomotive and now the lights won’t work. What do I need to do?”


