
Everything on model trains, model railroads, model railways, locomotives, model train layouts, scenery, wiring, DCC and more. Enjoy the world's best hobby... model railroading!
Charles is into HOn30 and would like advice from others:
“Has anyone had any experience in designing, producing, using 3D Rapid Protyping of Locomotives and rolling stock in HOn30?”
Add your suggestions below.
A readers asks:
“I am having a difficult time finding the proper way to install HO railroad signals. I need to know where, what type and the distance from the point it is controlling? Also the distance from the center of the track to the center of the signal.”
Add your answer below.
Charles would like to hear from experienced hobbyists:
“I need information on installing DCC decoder in Mantua 4-6-2 Steam engine or disassembling the engine.”
Add your suggestion below.
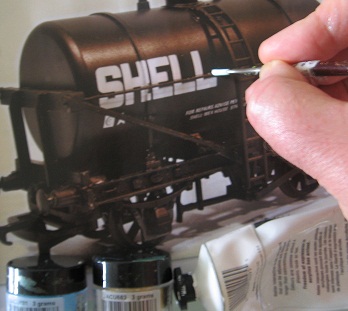
Weathering (showing signs of wear and tear) can add to the realism of any model train set, but it needs to be done carefully. One, often overlooked, important consideration is the age of the individual freight wagon being weathered. Not all wagons on a freight train are necessarily of the same vintage or have experienced the same weathering conditions. A freight train could comprise a mix of fairly new and considerably old wagons.
For example a model train layout depicting a mid 1960′s railroad might comprise mainly of wagons built around 1950. That would make most of the wagons around 15 years old.
Compare this to a freight train on a modern day railroad layout. Today’s freight train might include several brightly colored newish wagons along with a couple of 35-40 year old wagons built around the mid to late 1960′s. Weathering of the older 1960′s wagons would be different to that seen on the newer wagons.
So, always consider that a freight train is made up of several different wagons of different ages and backgrounds rather than all the wagons on a train being constructed at the same time and experiencing the same weathering conditions.
John comments:
“A modeler (like myself) might not think about weathering a wagon (freight car) of the same road name in a different way, due to varying outdoor conditions.
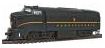
A good example, using a U.S. road, is modeling the early-1960’s Erie-Lackawanna (the hyphen in the name appeared until around 1967). The EL was the result of the 1960 merger of the Erie Railroad and the Delaware Lackawanna & Western, and since the EL kept many of their merged freight cars, it would take a lot of careful and different weathering of cars that haven’t been repainted yet. For the locomotives, the black of the ERIE and the gray and the black of the DL&W should be weathered. The newer EL engines, such as the Geeps and SDs, should appear new or fairly new.”
Larry wants to hear from anyone who models the Civil War era and asks:
“Does any one know a good source for rolling stock that can be kit-bashed to use in the Civil War era? I’m working on my first layout and have chosen my hometown of Tuscumbia, Alabama as the prototype. I will have an out and back between Tuscumbia and Decatur carrying cotton, lumber and goods from the North to Tuscumbia Landing on the Tennessee River for loading onto steamboats. I would love to hear comments from anyone who has modeled this era in the South.”
Add your suggestions below.
Would someone like to help John who asks:
“How do I line up and install Tortoise motors under layout on my own, tracks in place please?”
Comment below.
A reader asks others for advice:
“I have been out of the hobby for many years. I have unpacked several boxes of HO locomotive engines and track and set up some for the kids. The engines are all sluggish and work intermittently. I realize they are most likely dusty and dry. How do I get them performing like they did previously? How do you clean and lubricate old equipment like these engines?”
Add your suggestions below.
Neil would like some help if you have a Flying Scotsman train or understand the workings of running gear:
“My son’s Flying Scotsman lost a hex screw from one side of the running gear recently (it is 3 months old). Returned to the shop for repair under warranty. It runs but seems to me to waddle or fish-tail, especially at slow speeds. It does this forward and reverse. Should it do this? I think the running gear left and right are out of sync with each other. Should they be in sync? Seems to me the wheels on one side have rotated leaving the drive for the left and right sides out of step. I think this could have happened when the hex screw came off while running. Any help appreciated.”
Add your suggestions below.
Kent sent in some details of his project to share with others in the hobby:
“I started this project to complement my home office computer workstation. I originally intended to have just one section, but the project has now grown to twice the original size. My workstation is an L shape. One module will be on the right side of the L, and the other section will be on the opposite side of the L. The two sections will be connected by runners that will have turnouts to park different cars. One turnout will be used for log cars, another for freight and tanker cars, and the last for a set of old time Overton cars. The entire layout is modular, and meant to be taken apart when needed.”
Charles wants to hear from anyone with knowledge of powering turnouts and asks:
“Most of my HO Atlas turnouts are controlled by manual throws. I have a short in both of my districts where these turnouts are and I believe the short is related to the turnouts. I have seen a number of diagrams for wiring DCC Friendly turnouts that switch power on the rail when the switch is thrown to but none with manual controlled turnouts. This is a major stumbling block since I have over two dozen manual turnouts (they’re all in easy reach).”
If you have some suggestions for Charles comment below.
Jeremy (an eight month member of the online model train club) sent in this piece of advice:
Many folk in the hobby don’t particularly like horn-hook couplers and often can’t wait to replace them with knuckle couplers. The view of many is that knuckle couplers are more realistic and they work really well with magnetic uncouplers.
Converting to knuckle couplers takes time and some effort and patience. If you are going to do this it is best to convert your rolling stock one at a time. Some mix them in consists until they are all eventually converted.
Regardless of what train couplers you use, they need to be mounted at the right height for them to work correctly.

If a coupler is sitting too high, then you can lower the coupler by inserting a shim between the bottom (of the car floor) and the coupler pocket. If, on the other hand, the coupler is too low, then you can add a washer (or two) between the truck and the car base.
You might have to replace the truck assembly (or the wheels), if the coupler is mounted on the truck, particularly so when a coupler is too low. My last tip is to buy a coupler height gauge – very handy!
Double heading (two locos pulling a train) was used to provide the power to pull heavy loads, climb gradients or meet a tight schedule. With steam trains, each engine was operated individually by its own crew, which took skill, cooperation and concentration to avoid wheel slipping which could stall a train or cause a derailment.
Double heading with diesels is different because all the locos working in multiple are controlled by the driver in the cab of the leading engine.
Double heading is always fun to watch especially on a model train layout, and especially with smoke unit equipped steam locos from yesteryear (enjoy the video!).
Double heading (two locos pulling a train) was used to provide the power to pull heavy loads, climb gradients or meet a tight schedule. With steam trains, each engine was operated individually by its own crew, which took skill, cooperation and concentration to avoid wheel slipping which could stall a train or cause a derailment.
Double heading with diesels is different because all the locos working in multiple are controlled by the driver in the cab of the leading engine.
Double heading is always fun to watch especially on a model train layout, and especially with smoke unit equipped steam locos.
John is a great contributor to the hobby and likes to share his ideas to help others. Here is John’s latest suggestion:
We accumulate a lot of parts of various items as we build our layouts, and the smaller the part is, the more underfoot it is until it’s needed, then it seems to disappear as if by magic. One way around this is to put all small parts in a box, and the low-cost alternative is to use an empty MILKBONE Brand dog biscuits box, the 10-lb. Value Pack. Like most MILKBONE products, the box is very sturdily built, and measures 11-3/4 inches high, 10-1/2 inches across the top, and 8 inches deep, and can hold a lot of small parts such as track pieces, building air conditioners, terminal joiners, figures, model train wheels, weights for freight cars, detailing items, etc.

At very least, you’ll know where the part is if you put it in the box, though the exact part you absolutely need is probably near the bottom.
But a word of caution – make sure the box is empty before you use it for your small parts, as it contains very precious cargo. Just ask any dog!
If you have experience in the hobby and would like to help or guide others, submit your ideas using the Ask A Question link at the bottom of the page.
There were 1371 votes from 732 respondents in our recent poll which asked, Which decade do you model?
Respondents could select more than one era if required, hence the difference in numbers.
The numbers favored the timeline from 1940 to 1970 with 713 people registering a vote. 1950 to 1960 recorded the highest results (312 people model that decade).
Full details are as follows:
Pre 1900 = 37
1910 -1920 = 36
1920 -1930 = 65
1930 -1940 = 115
1940 -1950 = 224
1950 -1960 = 312
1960 – 1970 = 177
1970 -1980 = 110
1980 – 1990 = 77
1990 – 2000 = 71
2000 -2010 = 76
2010 – Present Day = 71
No particular era = 129
Ted wants advice from others in the hobby and asks:
“I have a few PK2000’s and suffer gear problems like everybody. However a new problem is the front gear box on my GP9 has seazed. The flywheels turn, the rear drivers turn and the front drive shaft turns,but the front drivers gears are locked. I need to remove the motor and gear boxes, but can’t figure out how to do that. Any suggestions? Thanks.”
To assist Ted comment below.
Liter has a question for anyone with Z scale experience:
“My current Z scale engines and rolling stock all have Marklin type couplers. Unless you purchase Marklin equipment, these couplers seem to be unavailable from other suppliers. For example, Micro Trains and AZL seem to have there own types of couplers. My question is: How many kinds of couplers are there and how can I be sure the new pieces of non-Marklin equipment I might buy have compatible couplers?”
Comment below.
Pete would like to hear what others in the hobby think about…
“Can an older HO diesel engine (Bachmann) be converted from dc to dcc? What is necessary to do this.”
Add your thoughts using the comment link below this posting.


