
Everything on model trains, model railroads, model railways, locomotives, model train layouts, scenery, wiring, DCC and more. Enjoy the world's best hobby... model railroading!
Bill models in HO scale and asks readers:
The heat has destroyed my plastic easy track. I have seen metal track. Where can I buy some.
You can comment below.
One of the fastest and most affordable ways to improve the realism of a model railroad is through weathering. Whether you model in HO scale, N scale, or OO gauge, adding realistic signs of age, dirt, rust, and wear can transform a layout from looking like a collection of toys into a miniature world that feels authentic and believable.
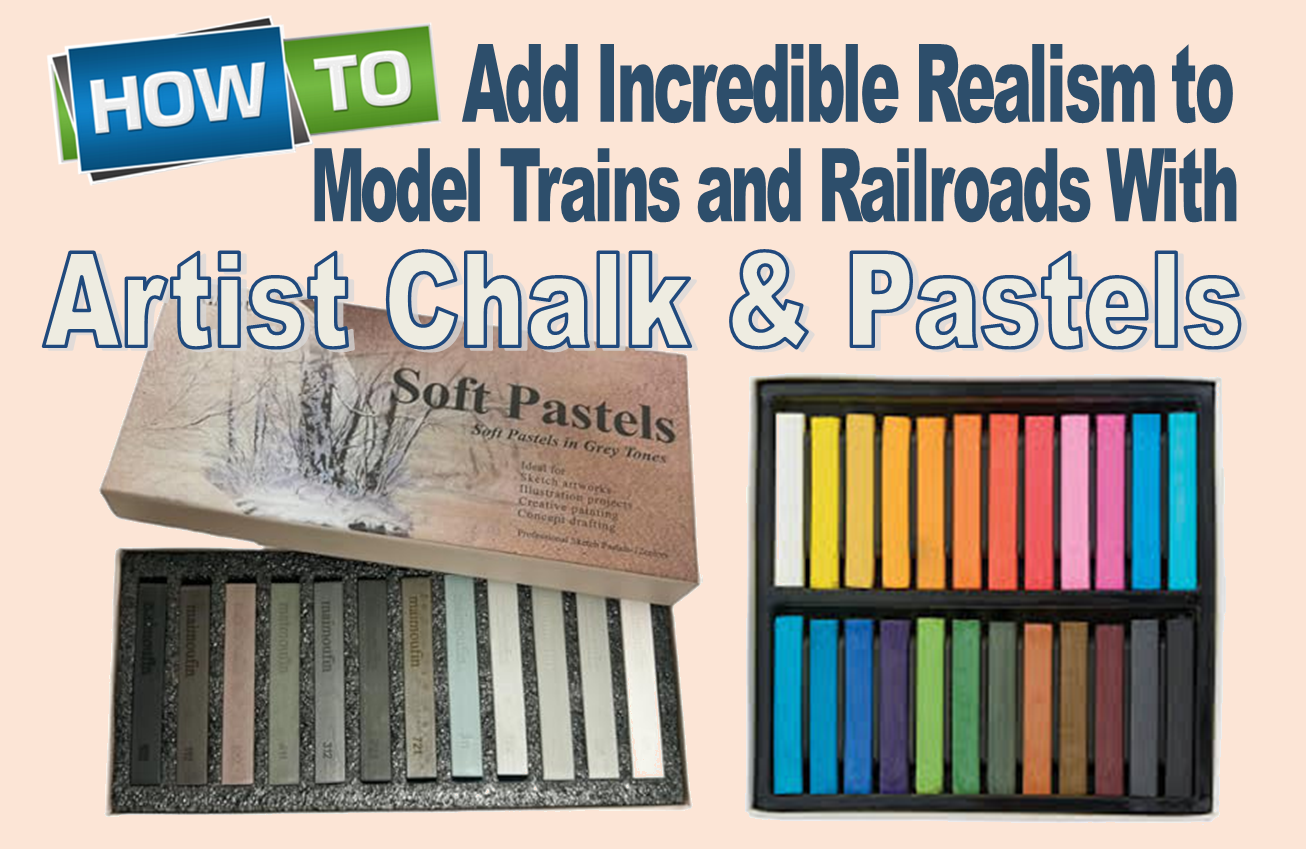
Among the many weathering methods available, artist chalks and weathering powders remain popular because they are easy to use, inexpensive, forgiving, and capable of producing outstanding results.
Take a look around the real world. Very few buildings, vehicles, railroad cars, or industrial structures remain perfectly clean and shiny for long. Sunlight fades paint, rain leaves stains, dust accumulates, and metal surfaces rust.
The same principle applies to model railroads. Brand-new locomotives, freight cars, buildings, and scenery often look unrealistic because they lack the subtle signs of everyday use. Weathering helps capture the character of the real railroad environment.
A lightly weathered freight car, a rusty corrugated roof, or a dirt-stained engine shed instantly adds visual interest and realism to a scene.
Before getting started, it helps to remember two basic weathering principles:
Nature tends to mute and soften colors over time. Most weathering effects involve shades of brown, gray, black, rust, dust, and faded earth tones.
Bright colors can quickly make weathering look unrealistic.
Real railroad equipment is usually dusty, dirty, faded, or weather-beaten. Glossy finishes often create a toy-like appearance. A flat or matte finish generally looks much more convincing.
Artist pastels are available from most craft and art supply stores and come in a wide variety of colors. For model railroad weathering, focus primarily on:
Weathering powders are another excellent option. Unlike traditional chalks, many commercial weathering powders contain ultra-fine particles that closely resemble real rust, dirt, soot, and grime. Many products also include binding agents that help the powder adhere to surfaces more effectively.
Both options can produce excellent results.
Most modelers use artist chalks in powder form rather than applying them directly from the stick.
Creating powder is simple:
Preparing several colors at once allows you to blend different shades and create more natural-looking weathering effects.
Weathering works best when applied gradually. A soft, fine-tipped brush gives excellent control over where the powder goes.
Begin by studying photographs of real trains, railroad buildings, bridges, or structures similar to the model you’re working on.
Notice where dirt naturally collects:
Apply small amounts of powder in these areas first.
The beauty of chalk weathering is that mistakes are easy to correct. If you’re not happy with the result, simply wipe it away and try again.
Different colors create different weathering effects:
Use reddish-brown and dark rust shades around:
Tan, gray, and earth tones work well for:
Black and dark gray powders are ideal for:
Building layers gradually creates a much more convincing finish than applying a single heavy coat.
Weathered buildings add enormous realism to any model railroad scene.
Real structures rarely remain perfectly painted. Roofs fade, walls accumulate grime, and water stains develop around windows and gutters.
Use weathering powders to create:
Even subtle weathering can make a structure appear decades older and much more realistic.
Artist chalks and powders aren’t limited to trains and buildings.
They can also enhance:
Adding subtle color variations helps eliminate the uniform appearance often found on new layouts.
Once you’re satisfied with the results, seal the weathering using a flat clear finish such as Testors Dullcote or a similar matte spray.
This helps:
Some modelers apply multiple light coats during the weathering process, building layers gradually until the desired effect is achieved.
Weathering with artist chalks and weathering powders is one of the easiest and most effective ways to improve the realism of a model railroad. Whether you’re working on HO scale locomotives, N scale freight cars, OO gauge buildings, or entire scenic areas, these simple techniques can dramatically enhance the appearance of your layout.
The best part is that weathering is highly forgiving. Start slowly, study real-world examples, and experiment with different colors and effects. With a little practice, you’ll be amazed at how quickly chalks and powders can transform ordinary models into realistic miniature replicas that bring your railroad scene to life.
Simple Model Railroad Tips to Improve Train Operation, Realism, and Layout Building
Model railroading is one of those hobbies where small improvements can make a huge difference. Whether you’re building your first HO scale layout, experimenting with N scale scenery, or upgrading an OO gauge railroad, a few practical techniques can help your trains run smoother, look more realistic, and save you from frustrating problems later.
The great thing about model trains is that you never stop learning. Even experienced railroaders continue discovering better ways to lay track, wire layouts, improve scenery, and fine-tune rolling stock. The following tips are simple, beginner-friendly, and easy to apply, but they can dramatically improve the way your model railroad performs.
One of the biggest mistakes beginners make is trying to build a huge layout immediately. Large layouts take time, money, and planning. Starting with a smaller railroad allows you to learn valuable skills without becoming overwhelmed.
A compact layout also lets you experiment with scenery, wiring, weathering, and operations before expanding later. Many successful layouts began as simple starter projects that evolved over time.
Good planning prevents expensive mistakes. Before laying a single piece of track, sketch your ideas on graph paper or use model railroad planning software.
Careful planning helps you avoid:
Even a rough plan will improve your layout dramatically and make construction much easier.
Coupler problems are one of the most common causes of derailments and uncoupling issues. Inspect each coupler carefully and make sure they sit at the correct height.
A coupler height gauge can help ensure consistency across your rolling stock. Also check for:
Smooth, correctly aligned couplers help trains operate reliably through curves, turnouts, and grades.

Lightweight rolling stock often wobbles, bounces, or derails easily. Adding extra weight improves tracking and stability.
For best results:
Properly weighted cars run smoother and look more realistic when moving through curves and switches.
It’s tempting to jump straight into scenery work, but complete your electrical wiring first. Test all rail joiners, feeders, and power connections before applying ballast or glue.
Trying to repair electrical faults after scenery is finished can become frustrating and messy. Careful preparation now saves major headaches later.
Fresh track often looks too shiny and toy-like. After ballasting, add weathering effects such as:
A little weathering instantly gives your HO scale, N scale, or OO gauge railroad a far more authentic appearance.
One simple but effective trick is using an old toothbrush to flick muddy paint onto freight cars, trucks, and lower body panels.
This creates realistic dirt splatter and road grime similar to what real trains collect over time. Use brown, dark gray, or earth-colored acrylic paint for best results.
Subtle weathering almost always looks more realistic than heavy over-weathering.
Many beginners rely too heavily on rail joiners for electrical power. Unfortunately, rail joiners can loosen over time and create voltage drops.
Instead, install feeder wires every few feet and connect them to a main power bus beneath the layout. This helps:
Reliable wiring is one of the foundations of a dependable model railroad.
It may not seem exciting, but labeling wires is one of the smartest things you can do.
As layouts grow more complex, identifying wiring later becomes difficult. Small labels or colored wiring systems make troubleshooting far easier and help prevent mistakes during future upgrades.
Dirty rails quickly lead to poor electrical pickup and jerky train operation. Dust, oxidation, and grime build up faster than many hobbyists realize.
Regular cleaning with:
will help maintain smooth and reliable operation.
Clean track equals happier trains.
Never assume newly laid track is perfect. Run locomotives and rolling stock slowly over each section during construction.
Watch carefully for:
Fixing problems immediately is much easier before scenery and ballast are added.
Small screws in couplers, trucks, or motor mounts can gradually work loose from vibration.
A tiny dab of clear nail polish on the threads helps keep screws secure while still allowing removal later if needed. It’s a simple trick, but surprisingly effective.
Perhaps the most important tip of all: don’t rush.
Model railroading is meant to be relaxing, creative, and enjoyable. Every layout improves with time, patience, and experience. Mistakes happen to everyone, even longtime hobbyists.
Take time to experiment, learn new skills, and enjoy the building process. The journey is just as rewarding as the finished railroad.
Whether you model HO scale, N scale, or OO gauge trains, these simple model railroad tips can help improve reliability, realism, and enjoyment. Small upgrades like better wiring, careful planning, realistic weathering, and smoother trackwork can transform an ordinary layout into something truly satisfying to operate.
The best layouts are not always the biggest or most expensive. Often, they’re the ones built carefully, thoughtfully, and with attention to the small details that bring a miniature railroad to life.
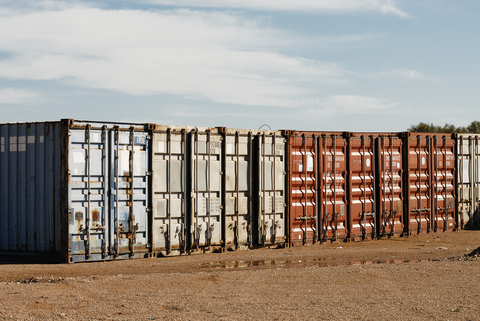
If you’re passionate about model trains, dioramas, or wargaming scenery, adding realistic detail can transform your setup from ordinary to impressive. One of the easiest and most effective upgrades is incorporating model shipping containers. With these DIY printable designs, you can build 10ft, 20ft, and 40ft intermodal shipping containers in HO scale, OO scale, or N scale… right from home.
These printable model shipping containers are designed for hobbyists who want high-quality results without complicated tools or messy processes. All you need to do is download the PDF templates, print them onto paper, glue them onto card (like recycled cereal boxes), then cut and fold. It’s a simple, satisfying project that delivers professional-looking results.
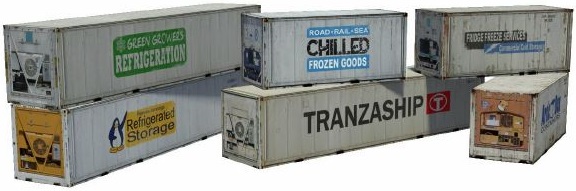
With over 40 downloadable container designs available, you can quickly build a diverse fleet of containers to enhance your railway layout, port scene, or industrial diorama.
What makes these model shipping containers stand out is their realism. Each design is based on actual photographs of real-world intermodal containers, capturing authentic details such as:
These subtle imperfections add depth and realism to your layout, making your scene feel more like a working freight environment. If graffiti isn’t your style, simply print an alternative panel or flip the container around…giving you full creative control.
One of the biggest advantages of these printable model containers is flexibility. Once you download the files, you can print as many containers as you need for your personal projects. Whether you’re building a busy freight yard or stacking containers at a port terminal, there’s no limit to how many you can create.
There are no subscriptions or ongoing costs…just a one-time download. Keep in mind, the files are intended for personal use only and shouldn’t be redistributed, sold, or shared.
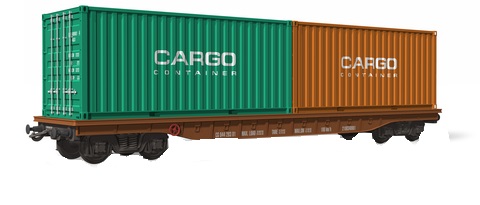
You’ll often hear the terms “shipping containers” and “intermodal containers” used interchangeably. The word “intermodal” refers to how these containers are transported…across multiple modes of transport such as ships, trains, and trucks…without unloading the cargo inside.
This system revolutionized global freight by allowing goods to be packed once, sealed, and transported efficiently across long distances. It reduces handling time, minimizes damage, and improves overall security.
For model railroaders and diorama builders, intermodal containers are essential for creating realistic freight operations and modern logistics scenes.
In real life, most containers are built to strict ISO standards, ensuring they can be stacked, transported, and handled consistently worldwide. The most common sizes include:
These standardized dimensions allow containers to be stacked efficiently—often seen double-stacked on freight trains or piled high in shipping ports.
Adding variety to your layout is key to realism. Here are some common container types you can replicate with printable models:
These are the standard enclosed steel containers with solid walls, floors, and roofs. They’re weatherproof, secure, and used for most freight worldwide.
Designed for oversized or heavy cargo, these containers feature removable covers, allowing loading from above.
These consist of a base platform with end frames but no sides or roof—perfect for transporting large machinery or awkward loads.
Used for transporting perishable goods, reefers maintain controlled temperatures. Some use built-in cooling systems, while others rely on alternative methods like dry ice.
These containers allow airflow to manage humidity and temperature, making them ideal for goods like coffee, produce, or sensitive materials.
Including a mix of these types in your model scene adds operational realism and visual interest.
Shipping containers aren’t just for transport anymore. In the real world, they’ve been repurposed into:
You can bring that same creativity into your model projects. Use containers as makeshift buildings, storage units, or industrial structures within your layout to tell a more engaging story.
If you’re looking for an easy DIY project that delivers big visual impact, printable model shipping containers are hard to beat. They’re affordable, beginner-friendly, and highly customizable—perfect for hobbyists of all skill levels.
Whether you’re building a modern freight yard, a busy port, or a detailed industrial diorama, these HO scale, OO scale, and N scale containers provide the realism and variety needed to bring your scene to life.
Download, print, build…and watch your layout transform with authentic intermodal detail.
Why Weathering Is Essential for Realistic Model Railroad Scenery
If you want your model railroad layout to look realistic, weathering is one of the most powerful techniques you can use. Whether you model in HO scale, N scale, or OO scale, adding signs of age, dirt, and wear instantly transforms your trains and scenery from “toy-like” to believable.
Think about the real world for a moment. A brand-new car doesn’t stay shiny for long. After just a few weeks, dust, rain, and grime begin to dull the finish. The same thing happens to buildings, railcars, and infrastructure. Over time, everything outdoors becomes faded, dirty, and worn.
That’s exactly the effect you want to recreate on your model railroad.
Model train weathering is the process of adding realistic wear and tear to your layout elements. This includes:
The goal is simple: replicate the effects of time, weather, and use.

Without weathering, even the most detailed models can look artificial. But with the right techniques, you can create a layout that feels like a snapshot of the real world.
One of the most common mistakes modelers make is placing perfectly clean trains and buildings on their layout. While they may look impressive straight out of the box, they don’t reflect reality.
In real life:
Railroads are also known for being cost-conscious. Equipment and structures are rarely repainted unless absolutely necessary. This means most real-world rail scenes have a worn, gritty appearance.
By weathering your models, you capture that authentic look.
Weathering your locomotives and rolling stock is one of the best ways to enhance realism.
Common effects to add include:
Even subtle weathering can make a huge difference. A lightly dusted freight car often looks far more convincing than a factory-fresh one.
Weathering isn’t just for trains… it’s equally important for model railroad buildings and structures.
Real buildings rarely look new. Over time, they develop:
By applying these effects to your model buildings, you create a more believable environment. A weathered structure tells a story… it suggests age, use, and history.
For example:

https://www.modelbuildings.org/derelict-railroad-models
When your buildings look realistic, the entire layout benefits.
The good news is that weathering model trains and scenery is easier than you might think. You don’t need expensive tools or advanced skills to get started.
Here are a few simple methods:
These are perfect for beginners. You can apply them with a brush to create dust, dirt, and rust effects. If you’re not happy with the result, they can be wiped off and reapplied.
Lightly brushing a small amount of paint onto raised surfaces highlights detail and creates a worn look.
A thin mix of paint and water can be applied to flow into cracks and crevices, adding depth and shadow.
For more advanced modelers, airbrushing allows for smooth, realistic layers of grime and fading.
Not everything weathers the same way. The level and type of weathering should match your layout’s setting.
For example:

Studying real-life reference photos can help you apply weathering more accurately.
Before weathering an important model, it’s always a good idea to test your techniques first.
Try practicing on:
This allows you to experiment and build confidence without risking your best models.
One key tip: don’t overdo it. Subtle weathering often looks more realistic than heavy, exaggerated effects.
Start light, then gradually build up layers until you achieve the desired look.
Weathering is one of the most effective ways to improve model railroad realism. By adding dirt, fading, rust, and wear to your trains, buildings, and scenery, you create a layout that feels authentic and lived-in.
The best part? It’s affordable, forgiving, and easy to learn.
Take your time, experiment with different techniques, and observe the real world for inspiration. With a little effort, your HO, N, or OO scale layout can go from looking like a collection of models to a believable miniature world full of character and life.
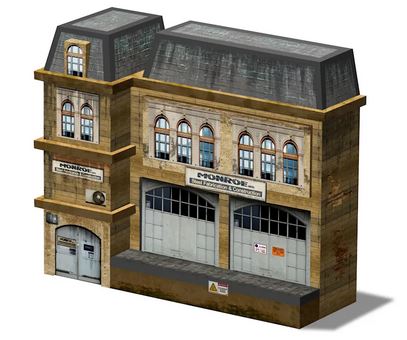
If you want your layout to feel like a real working railroad, adding industries is essential. In Part 1, we covered four powerful industry ideas to get you started. Now, in Part 2, we’ll explore 14 more realistic model railroad industries that will dramatically improve operations, variety, and overall realism.
A well-designed model railroad doesn’t just move trains… it moves freight with purpose. By connecting industries, adding interchange traffic, and simulating real-world logistics, you create a layout that feels alive.
Let’s dive into the next set of model railway industry ideas to inspire your layout.
An auto manufacturing plant is one of the busiest industries you can model. It generates a wide range of rail traffic, including:
This type of industry is perfect for larger layouts and adds continuous, high-volume operations.
A car repair shop is a compact but highly functional industry. It handles maintenance and repairs for freight cars, making it ideal for:
It’s a great way to add operational interest without needing a lot of space.
A car cleaning facility explains why your rolling stock looks well-maintained. It can handle tank cars, hoppers, and boxcars, adding variety to your operations.
This industry works especially well near yards or industrial areas and adds a touch of realism often overlooked on layouts.
For something different, consider a car ferry or float operation. This adds both visual appeal and operational challenges.
Trains must be carefully loaded and unloaded to match ferry schedules, creating engaging switching tasks and time-based operations.
A rip track is used for light railcar repairs. It requires minimal space… just a spur with tools, parts, and a bit of clutter.
Despite its simplicity, it adds daily operational activity and enhances yard realism.
A team track is a public siding used by businesses without their own rail access. It’s one of the most versatile additions you can make.
You can spot almost any type of freight car here, including:
Perfect for small layouts, it keeps operations varied and interesting.
A brewery is a fantastic industry with diverse rail traffic. It can receive:
And ship out beer in reefers or boxcars. Add barrels, tanks, and signage for a visually rich scene.
A bottling plant works well in limited space and pairs nicely with a brewery or food industry.
Tank cars can deliver syrup or liquids, while boxcars handle packaging materials. The main structure can be modeled as a low-relief building to save space.
A steel mill is one of the most impressive industries you can include. It requires significant space but offers unmatched operational complexity.
Inbound loads include coal, iron ore, and limestone, while outbound traffic includes steel products on flatcars and gondolas. Internal movements with slag cars and hot-metal cars add even more realism.
A flour mill is a medium-sized industry that provides steady operations. Grain arrives in hoppers, and finished flour is shipped out in boxcars or specialized hoppers.
It’s a perfect link between agricultural and urban scenes.
A paper mill is a busy and highly believable industry. It handles:
This industry creates constant movement and varied freight operations.
A logging operation and sawmill fits perfectly into mountainous or forested layouts.
Logs arrive via flatcars or skeleton cars, and finished lumber ships out in boxcars or flatcars. It’s a natural fit for scenic railroads.
Your engine facility can function as an industry too. It requires:
This adds another layer of operational realism to your layout.
A generic or “mystery” industry gives you total freedom. Use a simple building labeled with a company name and assign it any freight traffic you like.
You can also create hidden or off-scene industries behind backdrops or trees, allowing trains to “disappear” and reappear with new loads.
The real magic happens when you link industries together. For example:
This creates a logical flow of goods and keeps your trains busy with meaningful tasks.
Adding industries transforms your layout from a simple display into a purpose-driven model railroad. Each train movement becomes part of a bigger story… delivering goods, picking up loads, and connecting businesses.
Start with a few industries that suit your space, then expand over time. Mix large and small operations, include interchange tracks, and create realistic freight flows.
Most importantly, build a layout that you enjoy operating. With the right mix of industries, your model railroad will feel alive, engaging, and endlessly interesting every time you run a train.
If your trains are simply circling the track, it might be time to add something more meaningful to your layout. One of the best ways to improve model railroad realism is by introducing industries that give your trains a clear job to do.
Real railroads exist to move goods between industries… and your layout should reflect that. By adding a mix of industries, sidings, and interchanges, you can transform your setup into a working miniature transportation system. This not only looks more authentic but also creates engaging and varied operating sessions.
Whether you’re building a compact switching layout or a larger model railway, here are four powerful industry ideas to get you started.
An interchange track is one of the simplest yet most effective additions to any model railroad. It represents a connection to another railway, allowing freight cars to enter and leave your layout.
This setup gives you maximum flexibility. You can introduce almost any type of rolling stock… tank cars, boxcars, hoppers… without needing to model every industry they serve. It’s also perfect for smaller layouts, where space is limited but operational variety is still desired.
Interchange tracks add realism by simulating:
With just one or two interchange tracks, your layout can feel much larger and far more dynamic.
A chemical plant is an excellent choice for modelers wanting operational variety in a relatively small space. These facilities can represent anything from plastics manufacturing to pharmaceuticals.
They typically handle multiple types of freight, including:
This variety creates interesting switching challenges, especially when different cars must be spotted at specific locations within the plant.
From a scenic perspective, chemical plants offer great visual appeal. Storage tanks, pipes, safety signage, and industrial structures add depth and realism. You can even model the plant as a low-relief structure along the backdrop to save space while still achieving a convincing look.
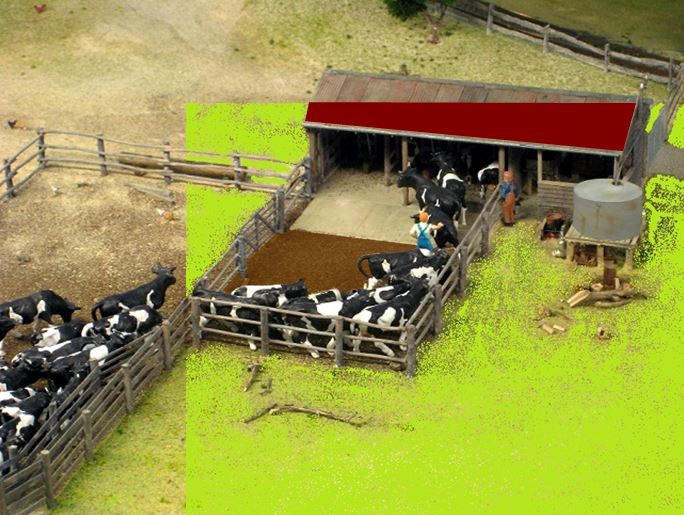
A meat packing plant or cold storage facility is a traditional industry that fits perfectly into transition-era and urban layouts. It brings a strong sense of purpose and historical realism to your railroad.
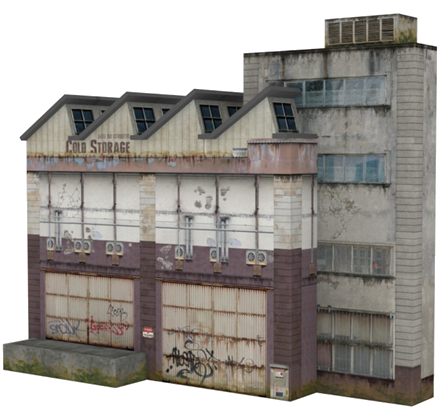
Typical operations include:
These plants often operate on tight schedules, making them ideal for time-based operations on your layout.
From a scenery standpoint, you can include livestock pens, loading ramps, weathered buildings, and piping systems. This industry also pairs well with nearby stockyards or rural branches, allowing you to expand your operations even further.
If your layout features countryside or small-town scenes, a milk processing plant is a fantastic addition. It creates a natural link between rural farms and urban consumers.
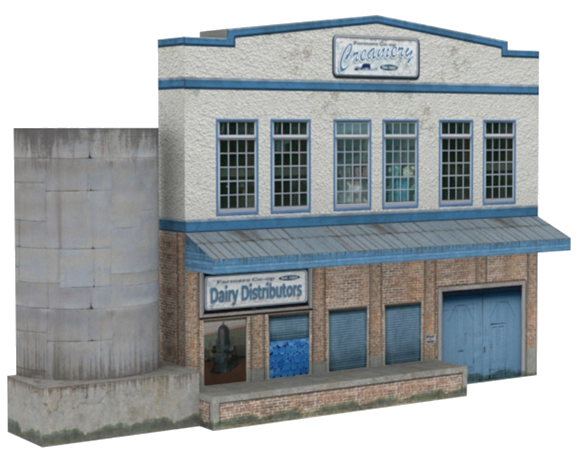
Operations might include:
Milk trains were once a common sight, making this industry ideal for those who enjoy running short, frequent local services.
Despite its relatively small footprint, a milk plant can be rich in detail. Add loading docks, storage tanks, and delivery vehicles to bring the scene to life.
These four industries are just the beginning. There are countless model railroad industry ideas you can incorporate depending on your space and interests.
Some additional possibilities include:
The key to realistic operations is connecting industries together. For example:
This creates a logical flow of freight across your layout, making operations more engaging and believable.
Adding industries also increases switching activity, which is where model railroading becomes truly interactive. Consider:
This approach keeps your trains busy and adds variety to each operating session.
Adding industries is one of the most effective ways to improve model railroad operations and realism. Instead of trains running aimlessly, they now have destinations, schedules, and tasks to complete.
Start small with a few well-chosen industries, then expand as your layout grows. By connecting industries, adding interchanges, and planning your freight flow, you’ll create a model railroad that feels alive and purposeful.
And this is just Part 1… there are many more industry ideas to explore in the next installment!
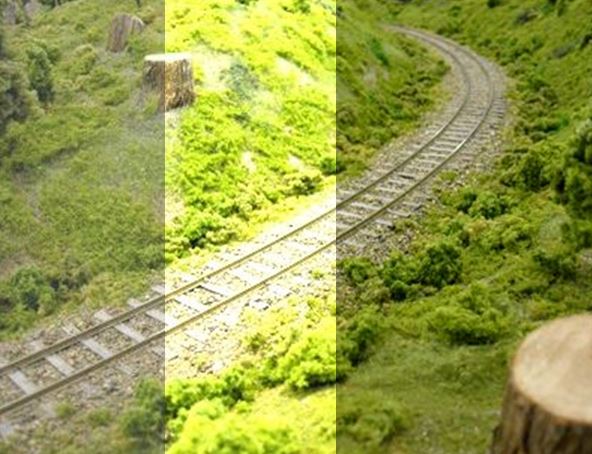
One of the biggest differences between a basic model train layout and a truly impressive one is the use of realistic scenery textures. Texture brings your miniature world to life by adding depth, variety, and a natural appearance to the landscape surrounding your tracks.
When many hobbyists first build a layout, they focus mainly on getting trains running smoothly. Track is often placed on a flat board or benchwork surface to ensure reliable operation. This approach makes sense, because stable, level track helps prevent derailments and reduces maintenance problems.
But once the trains are running well, it’s time to start adding scenery. That’s where textures become essential. By introducing subtle variations in terrain, ground cover, and landscape features, you can transform a flat board into a convincing miniature world.
Let’s explore how to use textures effectively to make your model railroad scenery look more natural and realistic.
Before focusing on scenery textures, it’s important to remember that track reliability always comes first. Real railroads spend significant time and effort creating a stable right-of-way so trains can operate safely and smoothly. Model railroaders should follow the same principle.
Your track should be:
Once your track is installed and tested thoroughly, you can begin shaping the surrounding landscape.
While the track itself should remain stable and even, the land around it rarely is perfectly flat in the real world. Adding gentle terrain variations instantly improves the realism of a layout.
Small hills, shallow dips, and rolling contours create a more believable environment. These subtle changes can be formed using materials such as:
The key is to keep transitions gradual unless you intentionally want dramatic terrain such as cliffs or rocky cuttings. Smooth elevation changes help the scenery blend naturally together.
Many model railroad scenes benefit from rolling hills or raised terrain areas. These features break up the visual flatness of a layout and give trains the appearance of traveling through real countryside.
Hills can be shaped using stacked foam layers or crumpled paper covered with plaster cloth. Once the basic shape is created, you can add textures such as:
These textures add visual variety and make the landscape feel organic.
Mountains are one of the most popular scenery elements in model railroading. The good news is that mountains don’t have to be perfect to look convincing.
Nature itself is irregular, so jagged edges, rocky outcrops, and uneven surfaces actually make mountains look more realistic.
To build mountains, many hobbyists use:
Once shaped, the surface can be enhanced with paint washes, rock textures, and vegetation to create a rugged natural appearance.
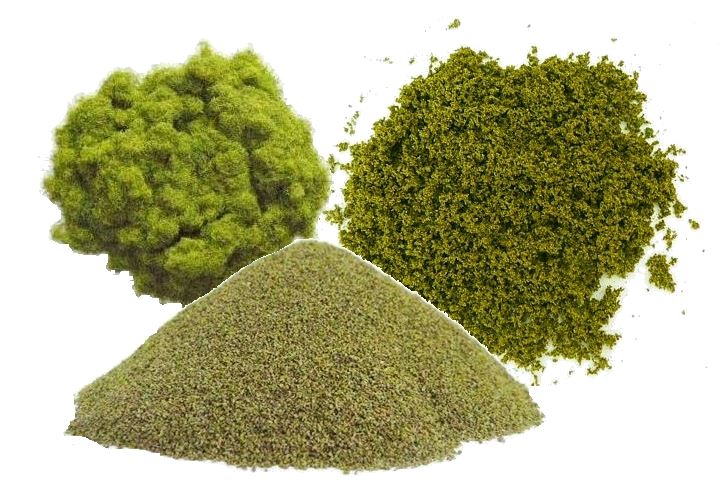
Ground cover is one of the easiest ways to improve scenery realism. Instead of leaving surfaces painted a single color, use multiple textures to simulate natural terrain.
Common ground cover materials include:
Mixing several shades of green, brown, and tan prevents the scenery from looking artificial. Real landscapes rarely contain just one color.
One mistake beginners often make is applying textures in isolated patches. Instead, try layering and blending materials together.
For example:
Blending these layers together produces a far more natural look than using a single scenery material.
Rock and soil features add an important sense of scale and realism to a layout.
You can create convincing rock faces by:
Once dry, paint the rocks with thin washes of gray, brown, and black. This technique highlights natural cracks and crevices.
Adding small amounts of real dirt or fine gravel can also improve the realism of roadsides, riverbanks, and embankments.
Vegetation helps soften the edges of scenery textures and makes landscapes feel alive.

Consider including:
Nature rarely grows evenly, so placing vegetation in irregular clusters helps the layout look more authentic.
Water scenes provide another opportunity to add texture and visual interest.
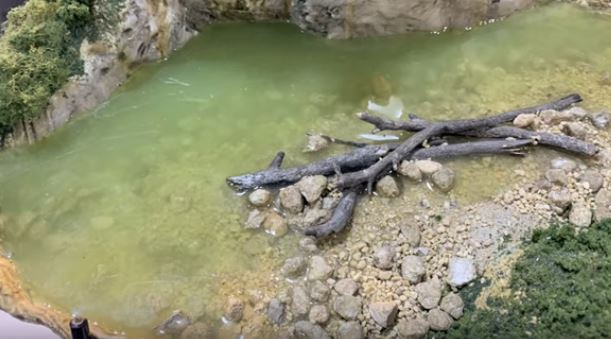
Small creeks, ponds, or rivers can be created using clear resin or water-effect products. Adding textured riverbeds, rocks, and plants along the banks enhances realism.
Even a simple drainage ditch beside the track can add character to a scene.
A model railroad layout becomes truly impressive when it captures the variety and irregular beauty of real landscapes. While reliable trackwork should always remain smooth and level, the surrounding terrain and structures should reflect the natural world.
By adding hills, mountains, ground cover, rocks, vegetation, and layered textures, you can transform a plain board into a living miniature environment.
The best part is that scenery textures are forgiving. Nature is rarely perfect, and a little randomness often makes a layout look even better.
Take your time experimenting with different materials and techniques. With thoughtful use of textures, your model railroad scenery will look far more realistic, immersive, and visually engaging for anyone who watches your trains roll through the landscape.
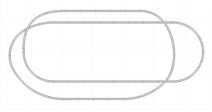
Tired of watching your train run in endless circles? A basic oval track is a fantastic starting point for any model railroad, but it doesn’t have to stay basic. With a few smart track plan tweaks, you can turn a simple loop into a layout that offers realistic operation, visual interest, and hours of engaging run time.
Whether you’re building in HO, OO, or N scale, these creative oval track plan ideas will help you get more enjoyment out of your existing space… without needing a complete rebuild.
Let’s explore how to make a standard oval layout far more fun to operate.
Oval track plans are popular because they’re easy to build and allow continuous running. But after a while, trains circling endlessly can feel repetitive.
By adding variation… such as elevation, branches, sidings, or operational features… you can:
Here are 12 proven ways to upgrade your model train oval layout.
The dog bone layout stretches your oval into a longer mainline with loops at each end. It still allows continuous running, but visually feels more like a railroad traveling between destinations.
The longer straight sections give you space for towns, industries, and scenic features. It’s one of the easiest and most effective oval upgrades.
Take the dog bone concept and fold it over itself. By crossing one side over or under the other, you create elevation and depth.
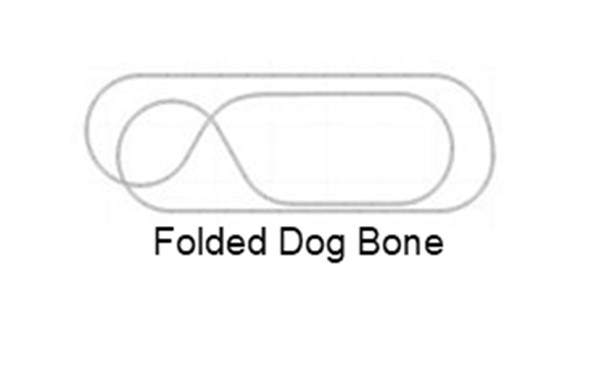
This design adds visual complexity and makes it appear as though trains are traveling much farther than they actually are. Elevation changes also enhance realism and photography.
Adding a figure 8 within your oval introduces directional changes and operational interest. The center crossing becomes a focal point… especially if running two trains.
For smoother operation, consider an overpass rather than a flat crossing (see idea #5).
A twice-around layout allows the train to circle the layout twice at different elevations before reconnecting.
By using a tunnel, bridge, or hidden section, you create the illusion of a long mainline journey in a small footprint. This design dramatically increases run time without expanding your space.
Instead of a flat crossing, build an overpass where one track climbs above the other. This eliminates collision risk and adds scenic interest.
Watching a train pass over itself adds movement and drama to the layout.
Add a branch line that leaves the oval, travels to a destination, loops around, and returns.
This creates a mini “journey” within your layout. You can place an industry, yard, or small town at the turnaround point to give trains a purpose.
Want the realism of point-to-point operation but still enjoy continuous running?
Hide a return loop behind a backdrop or under the layout. Trains disappear at one end and later reappear from the opposite direction, creating the illusion of long-distance travel.
Sometimes the best upgrade isn’t track… it’s scenery.
Install a hill, tree line, or building row down the center of your oval. This visually separates the layout into two scenes, making it feel like trains are traveling between different regions rather than circling one continuous loop.
A reversing loop inside your oval allows trains to change direction. This adds operational flexibility and realism, especially for passenger or commuter services.
If using DC control, proper wiring will be required. DCC makes reverse loops easier to manage.
Even a simple oval becomes engaging when you introduce switching operations.
Add industrial spurs, freight sidings, or a small yard. Now you’re not just watching trains… you’re building consists, spotting cars, and running a working railroad.
Switching adds a whole new layer of operational fun.
Attach a branch line that leads to a specific industry such as:
This gives your layout a story and operational reason for different train types. It also justifies varied rolling stock and locomotive use.
If you want maximum interaction in a small space, consider converting part… or all… of your oval into an end-to-end shunting layout.
Instead of continuous running, trains operate between two terminal points. The focus shifts from watching trains circle to actively managing movements.
You can design one end as a small yard and the other as an industrial district. Add multiple sidings and create switching challenges for yourself.
Even on a compact shelf layout, this approach provides hours of operational enjoyment. Many experienced model railroaders find shunting layouts more rewarding than continuous loops because they simulate real railroad work.
And here’s the best part… you can still incorporate a hidden return loop if you want occasional continuous running.
A simple oval track layout doesn’t have to stay simple. With thoughtful additions like elevation changes, branch lines, reverse loops, scenic dividers, or an end-to-end shunting section, you can transform it into a layout that feels dynamic and purposeful.
You don’t need more space… you just need smarter design.
By upgrading your oval with these creative track ideas, your model railroad will feel larger, more realistic, and far more enjoyable to operate.
If you’re ready to move beyond trains running in circles, start with one of these ideas and build from there. Your layout… and your operating sessions… will never feel the same again.
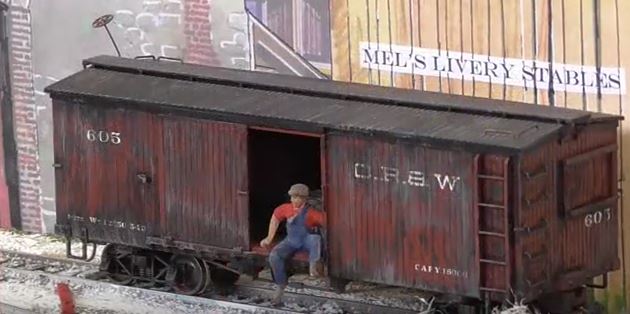
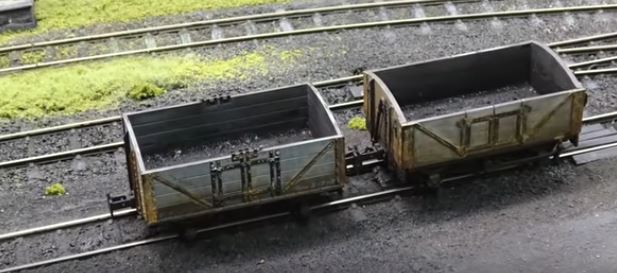
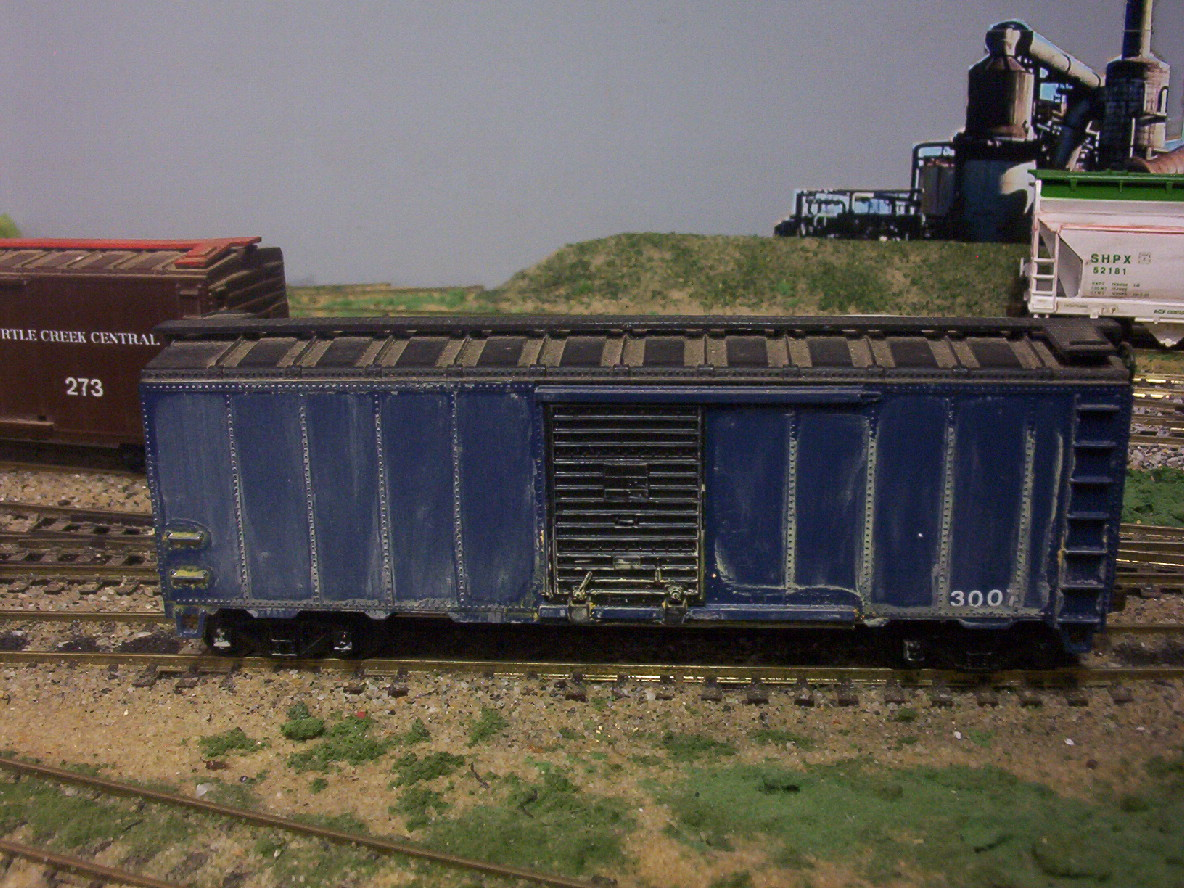
At the Derby Model Railway Exhibition, it’s often the smallest details that leave the biggest impression. Two standout scenes on display proved just how powerful a humble box car can be when it’s used creatively on a model railroad layout.

The first photo captures a beautifully weathered box car, its faded paint and rust streaks telling the story of years in hard service. Sitting casually in the open doorway is a rail worker figure, boots dangling over the edge, as if pausing for a well-earned break. This simple addition transforms the model from static rolling stock into a living moment in time. The subtle weathering… dust on the roof, grime along the planks, and worn lettering… adds layers of authenticity. Combined with the human figure, the box car becomes more than scenery; it becomes storytelling.
Weathering is one of the most effective techniques for improving model railway realism. Real freight cars accumulate dirt, rust, scratches, and fading from constant exposure to the elements. By replicating these effects with powders, washes, and airbrushing, modellers can instantly elevate the credibility of their layouts. Adding figures interacting with rolling stock… such as workers loading cargo or resting in a doorway… further enhances the narrative and draws viewers into the scene.

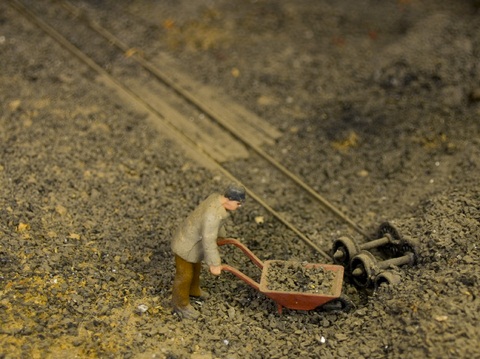
The second photo from the exhibition demonstrates another clever use for box cars and old rollingstock: repurposing them as scenic features. In this case, a disused rail car has been placed off the main line, partially hidden by overgrown vegetation. The surrounding weeds and shrubs suggest years of neglect. A nearby vehicle and industrial wagons reinforce the impression of a forgotten siding or storage area. This is a fantastic example of how retired rolling stock can add depth and realism to a layout.
Disused box cars and rolling stock can serve many purposes on a model railroad. They can become storage sheds, site offices, workshops, or even makeshift accommodation. On rural branch lines, old freight cars were sometimes left in place for decades, gradually blending into the landscape. Modelling such scenes provides opportunities to experiment with heavy weathering, broken boards, faded paint, and creeping vegetation.
Box cars can also be used to suggest economic changes in a town… perhaps a once-busy industry has declined, leaving rolling stock stranded. Alternatively, they can anchor an active freight yard scene, positioned at loading docks or warehouses to create operational interest.
Whether operational or abandoned, box cars are versatile tools for adding authenticity. As seen at the Derby Model Railway Exhibition, thoughtful placement, realistic weathering, and a touch of human activity can transform a simple freight car into a compelling focal point that truly brings a model railroad layout to life.
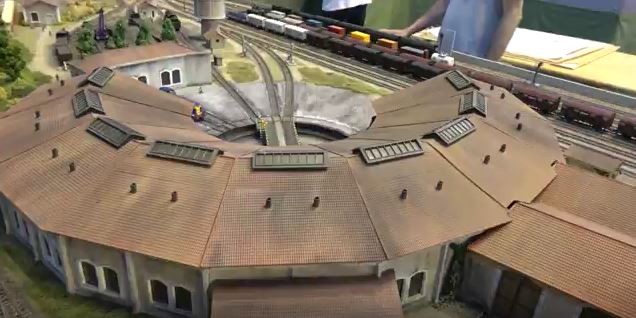
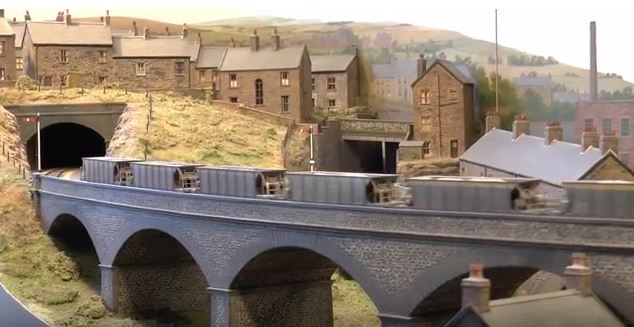
Large model railroad turntables are among the most impressive operating features you’ll see at any exhibition layout. The example pictured here, photographed at the Guilherand Granges Model Train Show in France, is a perfect demonstration of how a turntable can become the visual and operational heart of a locomotive depot.
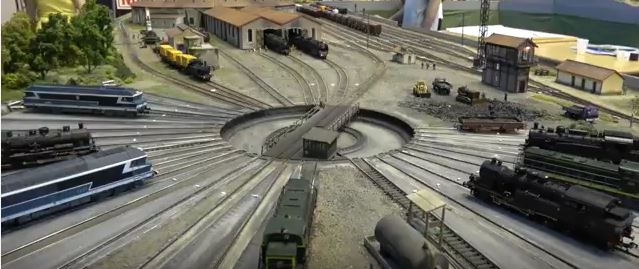
Guilherand Granges Model Train Show, France
A turntable’s primary purpose is simple: to rotate locomotives so they can be directed onto different radial tracks or turned to face the opposite direction. In the steam era especially, many locomotives were designed to run optimally forward, making turntables essential infrastructure in busy engine terminals. On a large-scale model railway, recreating this functionality adds both realism and operational flexibility.
What makes big model turntables so captivating is their combination of engineering and theater. The slow, precise rotation of the bridge, the alignment with multiple approach tracks, and the careful indexing to each stall track all mirror real railway practice. When paired with a semi-circular roundhouse, fuel points, ash pits, and detailed weathering, the entire scene becomes a working diorama of railway history.
From a modelling perspective, large turntables demand accurate track laying, flawless electrical continuity, and reliable motor control. Any misalignment can cause derailments or electrical dead spots. Yet when properly installed, they allow operators to shuffle locomotives between service bays, display prized engines, and create authentic depot movements that draw crowds.
At shows, a well-built turntable doesn’t just turn engines…it turns heads.
Want smoother running model trains and fewer frustrating derailments?
It all comes down to one thing: your trackwork.
In Part 3 of this derailment prevention series, we’re focusing on the final six track laying tips that can make or break your model railroad layout. If you’ve already worked through Tips 1–23 (covered in Parts 1 and 2), you’ll know that preventing model train derailments is mostly about careful planning, correct weighting, and solid maintenance.
Now it’s time to fine-tune your build.
Because once the baseboards are down and the track plan is decided, the real reliability comes from how well you actually lay that track.
Many model railroad derailments aren’t caused by faulty locomotives or bad rolling stock. They’re caused by:
The good news? Every one of these problems is preventable.
Let’s dive into the final six derailment prevention tips that will help keep your trains running smoothly for years.
Before you wire it.
Before you ballast it.
Before you glue anything permanently.
Run trains over it.
Push a few freight cars and a locomotive slowly through every section of new track. Watch closely:
Small bumps become big problems later. Fix them now while access is easy. It’s much simpler to adjust bare track than to rip up ballasted sections.
Inconsistent curves are a hidden cause of model train derailments.
If a train enters a gentle curve and suddenly tightens into a sharper radius, the stress shifts instantly. Longer cars and locomotives are especially vulnerable to this change.
For smoother model railroad operation:
Smooth, flowing curves not only reduce derailments — they also look far more realistic when a long train snakes through them.
Loose track equals unreliable operation.
Over time, temperature changes, humidity, and vibration can cause track to shift slightly. Even a millimetre of movement can create:
Secure your track properly using:
Pay extra attention to curves and turnouts, as these areas experience more lateral force from passing trains.
Stable track is dependable track.
S-curves (back-to-back opposing curves) are notorious derailment spots.
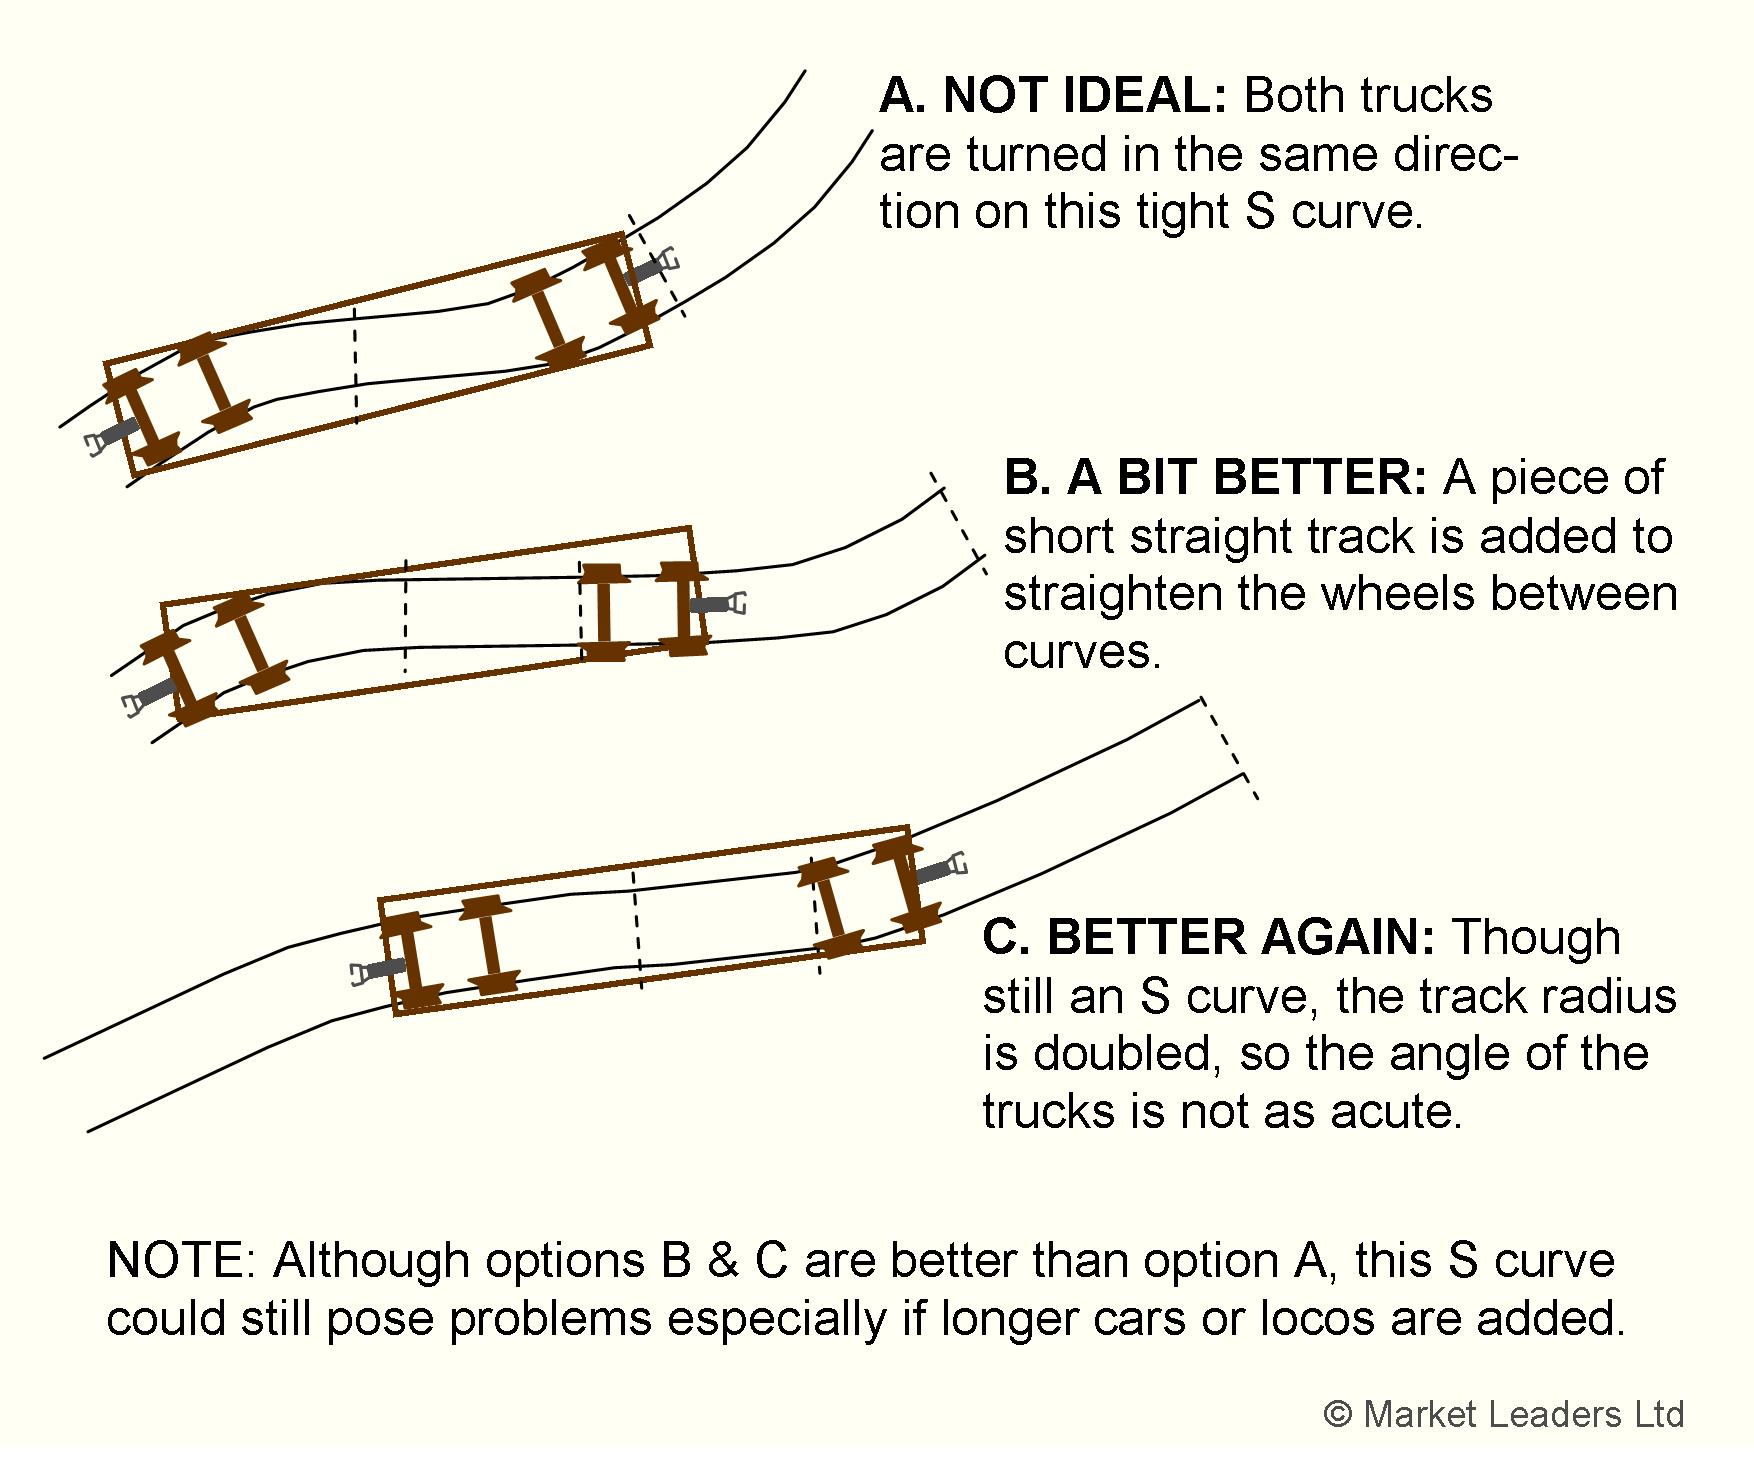
When cars are pulled in opposite directions without a straight section between curves, couplers are forced sideways. This creates tension that can easily lift wheels off the rails.
The fix is simple:
Always insert a short straight section between opposing curves.
Even a small straight buffer allows couplers and car bodies to realign naturally. That small adjustment dramatically improves reliability — especially for longer rolling stock.
Grades add visual interest and operational challenge. But steep grades are a major cause of:
As a general rule, aim for a maximum 2% grade (roughly 2 inches of rise over 100 inches of track).

If space is limited:
Gentle elevation changes keep trains stable and reduce stress on couplers and wheelsets.
Excitement is part of the hobby.
But rushing track laying almost always leads to:
And those small imperfections are exactly what cause derailments later.
Taking your time now saves hours of troubleshooting in the future.
Careful track laying isn’t the flashiest part of model railroading… but it’s the most important.
If you want fewer derailments on your model train layout, focus on your trackwork.
Every:
Matters more than you think.
Reliable operation isn’t about luck. It’s about preparation, precision, and patience.
When your track is laid carefully and tested properly, your locomotives glide smoothly, your rolling stock stays planted, and your operating sessions become far more enjoyable.
And that’s what this hobby is really about… watching your trains run flawlessly on a layout you built with care.
Trackwork, Weighting, and Setup Tips for Smooth, Reliable Model Railroad Operation
If derailments are still sneaking up on your model railroad, don’t worry… you’re not alone. Even well-built layouts can suffer from annoying tip-offs and wheel lifts if a few key details are overlooked. The good news is that most derailments are caused by small, fixable issues, especially around car weight, track alignment, and transitions.
In Part 1, we covered maintenance basics like wheel gauge, couplers, and cleanliness. In this second installment, we’ll focus on trackwork and rolling stock setup, which play a huge role in keeping your HO, OO, or N scale trains running smoothly.
Below are Tips 13–23 in the complete series of 29 derailment-prevention techniques. (The final tips continue in Part 3.)
Model trains are light by nature, which means they’re far less forgiving than the real thing. Slight bumps, uneven joins, or poorly balanced cars can easily push wheels off the rails. Getting the fundamentals right here will dramatically improve reliability across your entire layout.
Rolling stock that’s too light tends to wobble, bounce, or derail… especially through turnouts and curves. Use NMRA (or local equivalent) recommended weights as a guideline to keep cars stable and predictable.
If a car feels “floaty” or tips easily when handled, it probably needs more weight. Extra mass helps wheels stay planted on the rails and improves tracking through curves and minor imperfections.
Where you place the weight matters just as much as how much you add. Position it as low and central as possible to lower the center of gravity. This reduces rocking and side-to-side sway, especially on curves.
Uneven weight distribution can cause a car to lean, overload one wheelset, and increase derailment risk. Try to balance weight left-to-right and front-to-back so the car rides flat and true.
Sharp curves are a common trouble spot, particularly for long cars or lightweight rolling stock. If wheels lift or cars lean excessively, your curve radius may be too tight. Added weight can help, but redesigning the curve or using shorter cars may be the better solution.
Even a tiny misalignment at rail joins can grab a wheel flange. Run your fingertip across joints… if you can feel a bump, your trains will feel it too. Light sanding or filing can eliminate many hidden derailment causes.
Baseboards and benchwork aren’t always perfectly flat, and small dips or humps can throw cars off balance. Use a small spirit level and check trouble spots regularly, especially near joints and turnouts.
Oversized gaps between rails can cause wheels to drop, particularly in smaller scales like N. Keep gaps tight and uniform while still allowing for temperature expansion. Alignment is just as important as gap size.
Soldered rail joints are far less likely to shift over time. Unsoldered joins can slowly open up due to temperature changes or layout movement, leading to electrical issues and derailments. Soldering improves both mechanical strength and electrical reliability.
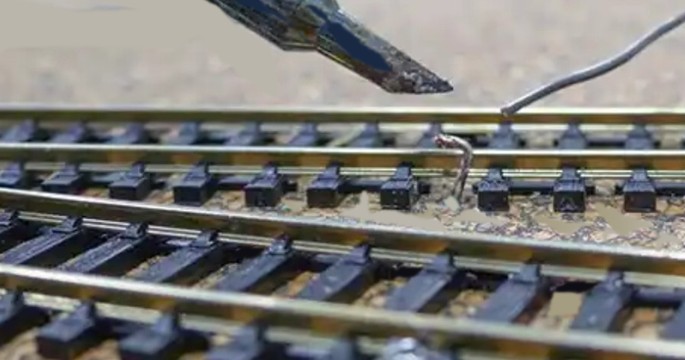
After soldering, inspect the rail carefully. Any bumps, blobs, or sharp edges can snag wheel flanges or coupler trip pins. A fine file can quickly smooth these areas… just be careful not to scratch the railhead.
Sudden changes in direction or height… such as from straight to curve or one baseboard to another… are derailment magnets. Transitions should be gradual and flowing. Always test with rolling stock before ballasting or final wiring.
One of the best habits you can develop is testing constantly. Roll cars by hand, push long trains slowly through problem areas, and watch closely for wobble or hesitation. It’s far easier to fix issues before scenery and ballast lock everything in place.
The final part of this series will cover advanced derailment prevention tips, including turnout tuning, grades, train length, and operational practices that keep trains running reliably during long sessions.
Smooth-running model trains don’t happen by accident. They’re the result of careful weighting, solid trackwork, and attention to small details that many hobbyists overlook. Dial these in, and you’ll spend far less time rerailing cars—and far more time enjoying realistic, frustration-free operation.
Your trains deserve it.
Essential Derailment Prevention Tips for HO, OO, and N Scale Model Railroads
Few things are more frustrating in model railroading than repeated train derailments. Your locomotive is running smoothly, everything looks fine… and then a car mysteriously jumps the rails. It breaks the illusion, disrupts operations, and quickly drains the fun from your layout.
The good news? Most model train derailments are not random. They usually come down to a handful of common issues: dirty track, poorly adjusted wheels, misaligned couplers, or skipped maintenance. Fix those, and derailments often disappear entirely.
Whether you’re building your first layout or fine-tuning a well-established railroad, these derailment prevention tips will help you achieve smoother, more reliable operation. This is Part 1 of a two-part series, covering the first 12 of 29 proven ways to prevent derailments on your model railroad.
Model trains derail for the same reasons real ones do: poor track conditions, mechanical issues, and inconsistent maintenance. Because everything is smaller and lighter, even tiny problems can cause big operational headaches. The key is eliminating those problems before they show up during a running session.
Dust, dirt, and residue on rails or wheels reduce traction and disrupt smooth movement. Regularly clean your track and rolling stock wheels to maintain consistent performance and minimize derailments.
Poor electrical contact can cause sudden stalls or surges that lead to derailments. Clean wheel pickups, locomotive contacts, and rail surfaces to ensure smooth power delivery.
A few minutes of routine inspection can prevent hours of frustration. Check cars and locomotives periodically instead of waiting for problems to appear during operation.
Proper lubrication helps wheels, axles, and couplers move smoothly… but only in tiny amounts. Use plastic-safe lubricants and apply them carefully.
Too much oil attracts dust and grime, which can actually increase derailments. Excess lubricant may also damage paint or soften plastic components over time.
Wheelsets that bind or resist movement cause cars to drag, especially on curves or grades. Ensure every axle rotates smoothly with minimal resistance.
Out-of-gauge wheelsets are one of the most common causes of derailments. Use an NMRA standards gauge (or equivalent) to verify that all wheels meet proper spacing for your scale.
Bent axles or warped wheels can bounce a car right off the rails. If a wheelset doesn’t run true, replacement is usually faster and more reliable than repair.
Cars that are too light or have stiff trucks can force wheel flanges hard against the rails. This increases the chance of climbing the rail, especially on curves or turnouts.
A single misaligned coupler can cause derailments across an entire train. Check for correct height, smooth movement, and proper centering.
New couplers sometimes have sharp edges or molding flash. Lightly filing these areas can prevent snagging and unwanted side forces during operation.
Uneven couplers cause binding on curves and grades, leading to derailments or accidental uncoupling. Consistent coupler height across your rolling stock is essential.
Reliable operation begins with careful planning and thoughtful construction. Clean track, properly gauged wheels, and well-maintained couplers form the foundation of derailment-free running. Fixing small issues early prevents larger problems later… and saves you from endless troubleshooting.
In Part 2, we’ll cover additional derailment prevention techniques, including track geometry, turnout tuning, car weighting, curve design, and layout maintenance tips that take reliability to the next level.
Model train derailments may be common, but they’re rarely unavoidable. Paying attention to details like wheel gauge, coupler alignment, lubrication, and cleanliness can dramatically improve how your trains perform. A smooth-running railroad doesn’t happen by accident… it’s the result of smart habits and regular care.
Take the time to apply these tips, and you’ll spend far less time rerailing cars… and far more time enjoying realistic, trouble-free operation.
Budget-Friendly Scenery Techniques for HO, OO, and N Scale Layouts
Model railroad scenery can easily become one of the most expensive parts of the hobby… but it doesn’t have to be. In fact, some of the most realistic scenery effects don’t come from hobby shop shelves at all. They come from everyday household items, garden finds, and workshop leftovers.
If you’re building a HO scale, OO scale, or N scale layout and want it to look convincing without draining your wallet, these low-cost scenery ideas will surprise you. They’re simple, effective, and perfect for adding texture, variety, and realism to your model railroad.
Nature is messy, uneven, and full of variation. Ironically, that’s why some commercial scenery products can look artificial… they’re too uniform. When you use natural or improvised materials, you automatically introduce randomness, which helps your layout feel more like the real world.
Let’s dive into nine clever, budget-friendly scenery techniques that work beautifully across all popular model train scales.
One of the easiest and cheapest ground textures may already be in your kitchen. Used tea leaves and coffee grounds make excellent soil, forest floor debris, and dried vegetation.
After brewing, spread them out to dry completely… either in the sun or in a low-temperature oven. This prevents mold and improves adhesion. Once dry, sprinkle them over white glue or scenic cement and mist lightly to lock everything in place.
Tea leaves work especially well for fine textures, while coffee grounds give you a darker, richer soil look. The result is subtle, realistic ground cover at virtually zero cost.
Fine-grade steel wool or plain kitchen scrubbing pads can be turned into convincing bushes and low shrubs. Pull them apart gently to create irregular shapes… avoid neat clumps.
Spray the material with dark green or brown paint, then sprinkle on turf or flocking while the surface is still tacky. Once dry, glue the bushes into place along fence lines, embankments, or trackside areas.
This method produces excellent texture and works especially well for HO and OO scale scenery.
Cotton wool balls are ideal for background scenery where you want shape without heavy detail. Pull the cotton apart into loose clumps and attach them to hillsides or backdrop edges.
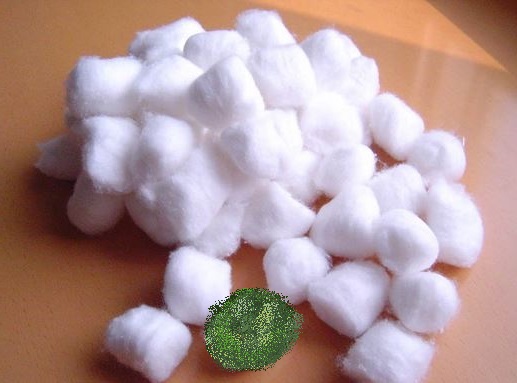
Lightly spray or brush them with muted greens and browns. When placed toward the rear of the layout, these soft shapes suggest distant trees and foliage without drawing attention to themselves… perfect for forced perspective.
If you have a damaged flyscreen or window screen, don’t toss it. Cut it into narrow strips and use it as instant chain-link fencing.
Glue the screen between posts made from toothpicks, matchsticks, or thin wire. Paint it a dull silver or light grey, then add a thin rust wash for realism. This technique is ideal for industrial areas, sports fields, scrap yards, or railway maintenance zones.
It’s a small detail that adds big realism for almost no money.
Workshop leftovers like pencil shavings and sawdust make excellent scenery materials when used correctly. Finely chopped pencil shavings can represent dry leaves, bark, or forest debris.
Sawdust works well for dirt roads, footpaths, yard areas, or lightly used sidings. Sift it to get a consistent texture for your scale, then color it with diluted acrylic paint or wood stain if needed. Apply over glue and seal with a light mist of scenic cement.
Crumpled aluminium foil can be transformed into convincing scrap metal. Roll small pieces into loose balls, compress them into irregular shapes, and glue them into piles.
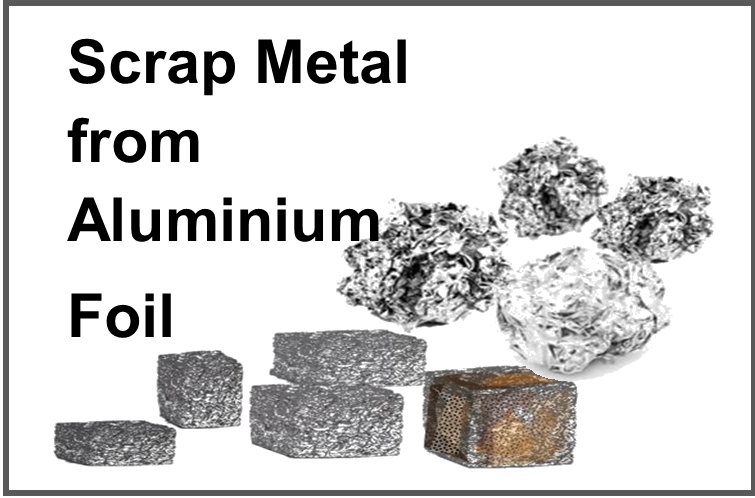
Paint them rusty brown, dark grey, or grimy black. Add these piles near workshops, yards, or industrial scenes. In smaller scales, this trick works especially well because the irregular shapes naturally hide the material’s origin.
Some of the best model trees come straight from nature. Dried weeds, twigs, and flower stems… especially those with fine branching… make outstanding tree armatures.
Plants like Queen Anne’s Lace, yarrow, or similar dried stems are ideal. Spray them brown or grey, then apply spray adhesive and sprinkle with fine turf or flocking.
Each tree ends up unique, with a far more natural silhouette than many plastic alternatives. Best of all, they’re free.
Dried parsley, oregano, thyme, or basil can double as instant ground cover. Crush them finely and use them for weeds, undergrowth, or grassy patches.

They work particularly well in smaller scales where fine texture matters. Just be sure the herbs are fully dry, then seal them with scenic cement to prevent deterioration over time.
Corrugated cardboard is a hidden gem for structure detailing. Peel away one flat layer to expose the ridged core, then cut it into panels.
Paint the panels silver, grey, or rusty brown to simulate corrugated metal roofing or siding. Add dry-brushed rust streaks or soot marks for extra realism. This technique works beautifully on sheds, warehouses, and industrial buildings, especially in HO and OO scale.
You don’t need expensive materials to build realistic model train scenery. With a bit of creativity and a willingness to experiment, everyday items can outperform many store-bought products.
By mixing textures, avoiding uniformity, and thinking like nature… not a manufacturer… you can create scenery that looks authentic, lived-in, and uniquely yours. Your layout will look better, feel more personal, and your budget will thank you for it.
Proven Illusion Techniques to Add Depth, Distance, and Realism to Any Model Railroad
No matter how much space you have for your model railroad, it never feels quite big enough. Whether you’re building a compact shelf layout, a spare-room empire, or something in between, space is always at a premium. The good news is that you don’t need more square meters to make your layout feel larger. With smart scenery design and a few proven visual tricks, you can make your HO scale, OO scale, or N scale model railroad appear far more expansive than it really is.
The secret lies in how the human eye interprets depth, distance, and perspective. Let’s explore the most effective scenery techniques used by experienced model railroaders to make small layouts look impressively large.
Forced perspective is one of the most powerful tools in model railroad scenery design. The idea is simple: objects closer to the viewer appear larger and more detailed, while distant objects look smaller and softer.
On an HO scale layout, for example, you can place slightly smaller trees, vehicles, or even N scale buildings toward the rear of the scene. As the scale subtly reduces, the eye is tricked into believing the landscape continues much farther than it actually does. This technique works particularly well along the back edge of a layout or near a backdrop.
To keep the illusion convincing, make the transition gradual. Avoid sudden changes in scale, and limit fine details in the background to maintain a sense of distance.
A high-quality backdrop instantly increases the perceived size of your model railroad. Painted skies, distant hills, mountains, or city skylines visually extend your scene beyond the physical edge of the benchwork.
Choose soft, muted colors for background scenery, as lighter tones naturally suggest distance. Make sure the horizon line aligns with the viewer’s eye level when standing or sitting at the layout. A mismatched horizon can break the illusion.
The most important step is blending. Match ground colors, textures, and vegetation at the base of the backdrop so there is no obvious “end” to the layout. When done correctly, the layout appears to flow seamlessly into the distance.
Flat layouts tend to look smaller than they really are. Adding elevation changes such as gentle hills, shallow cuts, embankments, and overpasses gives your scenery depth and dimension.
Even small variations in height can dramatically improve realism. Raised track sections, road overpasses, and rolling terrain suggest a much larger geographic area beyond what is visible.
Layering scenery elements enhances this effect. Instead of lining up trees, fences, or buildings in straight rows, stagger them at different depths. This layered arrangement creates visual complexity and makes the scene feel deeper and more expansive.
Straight lines reveal boundaries. Curved roads and tracks hide them.
When a track or road curves behind a hill, building, or tree line, the viewer assumes it continues beyond the visible scene. You don’t need to model what’s hidden… your brain fills in the rest. This technique works equally well with roads, paths, fences, and waterways.
Avoid running roads or tracks directly from one edge of the layout to the other. Let them disappear naturally into the scenery to create mystery and a sense of continuation.
As objects recede into the distance in real life, they appear smaller, less colorful, and less detailed. You can replicate this effect on your model railroad.
Use shorter trees, smaller vehicles, thinner poles, and simpler structures toward the back of the layout. Reduce weathering and surface texture as you move into the background. This mimics natural atmospheric perspective and reinforces the illusion of depth.
This technique works especially well when combined with forced perspective and a well-blended backdrop.
It may seem counterintuitive, but blocking parts of your layout can actually make it feel larger. Buildings, overpasses, tree lines, and ridges act as visual dividers, breaking the scene into smaller sections.
These view blocks encourage the viewer to explore what lies beyond, creating a sense of discovery and hidden space. Just be careful not to block everything… use these elements to frame scenes and guide the eye rather than overwhelm it.
Lighting plays a crucial role in how we perceive space. Soft shadows and highlights help define terrain and separate foreground from background.
Warm lighting in the foreground and cooler tones toward the rear subtly reinforce distance. Even consistent overhead lighting, when thoughtfully placed, can dramatically improve how large your layout feels.
Low-relief or flat building fronts are a powerful way to suggest urban density without consuming valuable space. These thin structures sit against the backdrop and appear to extend deep into the scene.
Photo-realistic building designs mounted on lightweight materials such as corflute or foam board can add incredible realism. Details like weathering, stains, and faded signage help sell the illusion of age and distance while keeping your layout uncluttered.
Making your model railroad look bigger isn’t about adding more track or structures… it’s about guiding the viewer’s eye. By using perspective, elevation, curves, lighting, and layered scenery, you can create a layout that feels open, expansive, and immersive, even in a limited space.
With these proven scenery tricks, your model train layout can deliver the big-railroad experience… no extra room required.
How to Create Realistic Model Railroad Scenery That Looks Like the Real World
A model railroad is more than just track and rolling stock. What truly brings a layout to life is the scenery surrounding the trains. Realistic model railroad scenery creates the illusion of distance, scale, and place, transforming a simple track plan into a believable miniature world. The good news is that you don’t need professional art skills or expensive tools to achieve great results. With proven scenery techniques, careful layering, and a bit of patience, you can make your model train layout look natural and convincing.
Below are practical, beginner-friendly techniques used by experienced model railroaders to create scenery that looks realistic in photos and in person.
Before adding grass, trees, or structures, focus on shaping the land. Hills, embankments, valleys, and gentle slopes are the foundation of natural-looking model railroad scenery. Real landscapes rarely feature sharp vertical walls unless you are modeling cliffs or quarries.
Lightweight materials such as foam board, extruded polystyrene foam, or crumpled newspaper covered with plaster cloth work extremely well. Foam is especially popular because it is easy to carve, clean to work with, and lightweight.
Carve smooth transitions between elevated and flat areas using a utility knife, rasp, or coarse sandpaper. Subtle variations in height make a layout feel larger and more realistic than perfectly flat terrain.
One of the most important scenery tips is also one of the simplest. Always paint your terrain before adding ground cover. A flat earth-tone color such as brown, tan, or gray works well depending on the region you are modeling.
This step ensures that if small gaps appear in the grass or dirt later, they still look natural. Painted terrain prevents white plaster or pink foam from breaking the illusion and instantly improves realism.
In the real world, dirt comes before grass, and the same logic applies to model railroad scenery. Start by applying a fine layer of real dirt (sifted and baked) or commercial scenic soil products.
Spread the dirt over diluted white glue or scenic cement, then lightly mist with water to help it settle. Once dry, this layer becomes a realistic foundation for everything above it.
When adding grass, static grass provides the most realistic results. It stands upright like real blades of grass and creates natural texture. Use multiple shades and lengths to avoid a uniform, artificial appearance.
Layering is the secret to making model train scenery look realistic. Avoid using just one material across large areas. Instead, combine fine turf, coarse turf, weeds, ground foam, and natural textures.
Add small twigs, dried herbs, or leaf litter to represent forest debris. These subtle details add depth and visual interest. Nature is messy and irregular, so embrace variation rather than neat, even coverage.
Trees and shrubs are major visual elements on any model railroad. Homemade trees often look more realistic than ready-made plastic ones and cost far less.
Wire armatures, seafoam, or dried plant stems make excellent tree bases. Cover them with adhesive and apply fine turf or flocking for foliage. Vary tree heights, colors, and shapes to avoid repetition.
Bushes and undergrowth can be made from lichen, clump foliage, or teased polyfiber sprinkled with scenic foam. Group vegetation in natural clusters rather than straight lines for better realism.
If your layout includes rocky terrain, plaster or hydrocal castings from rubber molds work very well. Paint rocks using thin washes of gray, black, tan, or brown, then dry-brush lighter shades to highlight texture.
Real stones can also be used, but scale is critical. A pebble that looks small in your hand may look enormous next to an N scale figure.
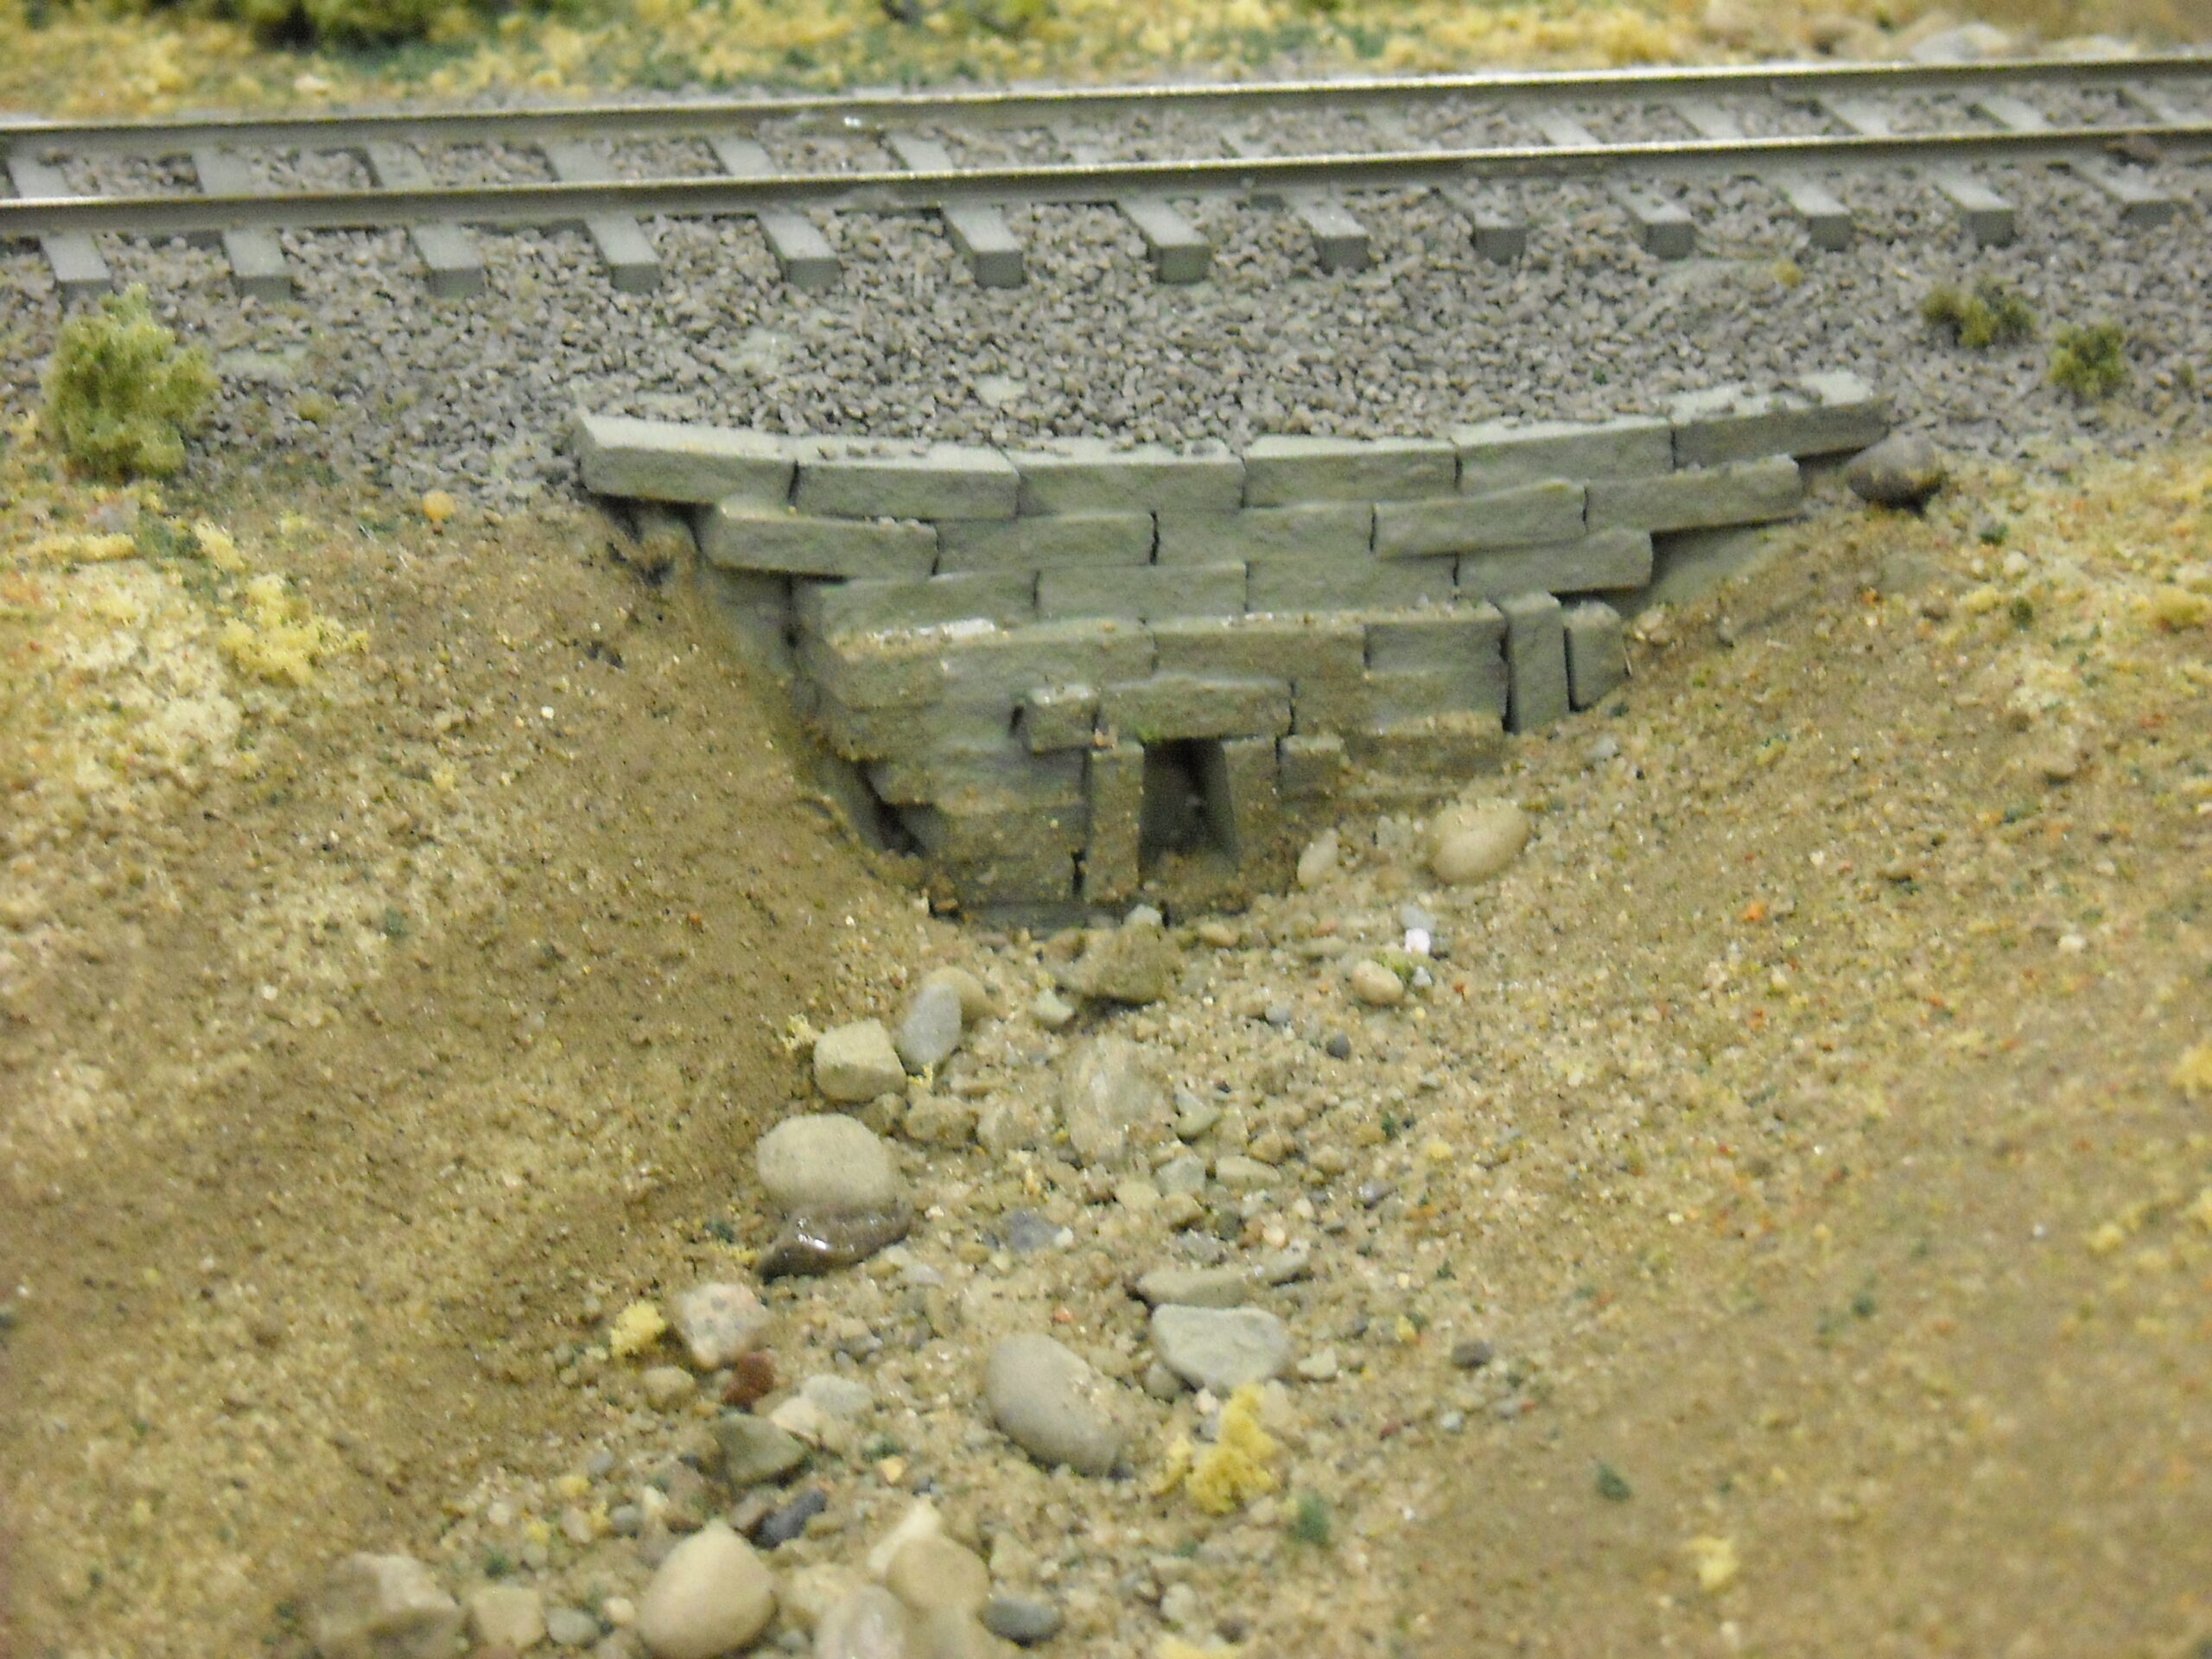
Roads can be modeled using painted foam board, sanded grout, or fine sandpaper. Add weathering with chalks or washes to simulate cracks, oil stains, and wear.
Tracksides are rarely tidy. Add cinders, weeds, spilled ballast, and discarded ties to create a lived-in appearance. Small details such as fences, signs, telegraph poles, junk piles, people, and animals bring scenes to life and help tell a story.
The final step is blending. Use weathering powders or chalks to soften edges and unify colors. A light mist of matte scenic cement locks everything in place.
Step back often and view your layout from different angles. Taking photos can reveal areas that need adjustment. With thoughtful blending, your model railroad scenery will feel natural, balanced, and realistic… just like the real world in miniature.
Patrick asks readers:
“I’m running an HO scale layout with DCC, but I keep running into this annoying issue: the train runs for a bit, then just stops, loses power, and starts up again… over and over. It’s making it hard to actually run anything. Any idea what might be causing this and how I can fix it?”
You can have your suggestions published by submitting your thought in the COMMENTS tab under this post.


