Scenery
Everything on model trains, model railroads, model railways, locomotives, model train layouts, scenery, wiring, DCC and more. Enjoy the world's best hobby... model railroading!

 If you are new to model trains, consider investing in diesel locomotives as some in hobby claim they run better than similarly priced steam engine counter parts. Others in the hobby might disagree. You have the option of cargo and passenger cars, with complete kits available.
The rails come in various options, but many prefer nickel silver as it ensures better conductivity.
Scenery can be a big investment if you don’t make most of it yourself… it’s fun making scenery!
Always invest in the best engine as you can, and then go on to build the required landscape. The idea here is to create a perfectly running model railroad, otherwise all your efforts on creating a classic model might go in vain.
There are several excellent resources available for beginners (and experienced) hobbyists, including the “Best Selling” Model Train Help Ebook. Model train enthusiasts can also benefit greatly from access the numerous resources inside the online Model Train Club.
 If you have a model railroad question you would like answered, then use the link on this blog to submit your question. If you word your question carefully and provide some useful details, then chances are someone reading this blog will offer a solution. Only the best question will be published. Please spell check your question before submitting it to the blog moderator for approval.
The link to submit your question is on this page.
 If you are into model railroading and have been for a while, you will be aware of the importance of using great sceneries as a part of your design plan. However, if you are a beginner, don’t worry, here are 3 tips that will help you in the process!
1. Choose A Theme – There are many ways to go about this. There are fans of American West that have set up their railroad map entirely based on the late 18th to the early 20th century.
2. Budget – Some themes are expensive compared to others (a rural landscape with several tunnels is a great example) while others are relatively cheap. Stick to a plan that can stay within your budget.
3. Select A Map – Building your railroad based on a map is an absolutely fantastic idea as it will bring perfection to your railroad design.
Lots more ideas in the Model Train Scenery and Layout Construction Ideas downloadable book.
John (a regular contributor) has kindly sent in this helpful article on making roads and sidewalks for a layout:

Despite the common misconception that roads are black, they are actually gray in color. Macadam appears black as its first put down or the road is resurfaced, but it quickly turns to gray and should be represented as such on a train layout. There are many products available in hobby shops for roadways, but they can also be made by hand, as long as size and scale are always crucial elements.
To make a roadway, first plan it out. Roads go somewhere, and there is an “in” and “out” off the layout, though they may be one and the same. Once your road is placed, paint it a medium-gray color and let it dry. Then it is time to add the white and/or yellow stripes if they are being used. A good place to get these stripes is in map stores that offer colored tape in various sizes.
Realism should be added to a road, which always sports some kind of spill. I model the late-1950’s on my small N-Scale layout, and while the classic vehicles for that time period are fantastic to say the least, some of them always seemed to leak something. To model gasoline, oil, and transmission spills and leaks, wait till the gray paint is dry and then brush on a wash of flat black paint in certain places. If you add too much or the road doesn’t look realistic, wipe the wash off completely while it is still wet and start over.
Sidewalks and curbs add much to a city or rural scene, and are available through a hobby shop or can be made with items around the house, heavy cardboard is one of them. The sidewalk is a concrete color, as is the curb, and should show usage. An excellent way of doing this is offered by Robert Anderson, owner of this website, who recommends dusting on baking soda while the concrete color paint is still wet, which makes the sidewalk look weathered. Another weathering technique when the paint is dry is to make small, very shallow cuts with a hobby knife to simulate cracks. Using the same wash as for the roads, brush it on and wipe it off, and the cracks in the sidewalk will show clearly. Curbs can be scuffed up by tires, or by pedestrians who have something “undesirable” on their shoe.
Doing these tasks can be time-consuming, but it is time well spent. Whether we model a prototype or specific time period, anything that approaches realism will enhance the areas in which our train(s) run, and increase the fun of model railroading.
Instead of buying a ready-made tunnel for your model railroad, consider making your own customized tunnel. To make a tunnel all you need to do is to bend chicken wire into the shape of a tunnel and wrap it all over with plastic sheet. Now, cut newspapers into 1 inch wide strips and dip it in colored plaster slurry. Cover the chicken wire frame completely with the help of this soaked plaster paper strips and with the help of a modeling plaster mold the shape of a mountain over this plaster. Once you have allowed this to dry completely, paint the mountain according to your railroad theme and add surrounding accessories like rocks, dirt, grass, stones etc.
Wayne has a question:
“Hi my name is Wayne I live in Sydney Australia. I was wanting to find out where I can get extruded styrene insulation, the type you see in most how to videos, in Sydney?”
Add your comments.
 If you are looking for the perfect model railroad, how about including a model train turntable. Turntables not only bring in the visual perfection to your railroad, but it also offers excellent functionality. Make sure that your model train turntable operates from DCC throttle and the gear drive is motorized to ensure smoother operation and the mounting table should be included with the package. Adding model train turntables to your railroad can give you unlimited route possibilities in many ways you never imaged!
 Adding a railway station can make a model train layout look very realistic. Use the steps below to build your own railway station from scratch.
Obviously, these are just the basics to get you started, and you can certainly add lots of interesting features and details to really bring your model railway station to life.
Ryan has put together this helpful tutorial for avoiding derailments on a model train layout. The video includes some excellent layout scenes. Feel free to pass it on to friends. Enjoy!
It is usually best to start waterfalls above eye as they will have a more realistic and dramatic effect, as well as providing the illusion of extra height.  When making your waterfall try not to make it too perfect as water never falls down in a perfectly straight line. In real life, water will flow naturally around the rocks and possibly split out into yet another waterfall. It’s best not to make the water appear too still or smooth, as it will usually look more natural if it has ripples or splashes.
Ramish has sent in this scenery ideas to share:
I am very proud of the Scrap Yard scene on my layout. Visitors always comment on the a pile of tires stacked up in the yard.

Unfortunately Ramish did not supply a photo of his trash yard scene, but this photo of another layout shows how the idea could look.
Here’s how I made it. A went to a local auto parts shop and bought a short length of the small diameter water hose (very cheap to buy). I cut it into thin slices based on my scale and painted them a dark greyish black and added some specks of mud color. When dry I stacked and glued them in place.
Add your suggestion or comment by clicking on the BLUE title above.
For signs that are put on buildings such as industries, stores, stations, freight houses, etc., use heavier full-sheet label paper. Print the sign you want, peel off the back, and place the sign with the adhesive on it directly on the structure. However you make it, the sign is completely original, and use the money you save to make your layout even better!
Thanks John, you are making a wonderful contribution to the hobby.
Christy is hoping for some advice from readers:
“I have seen a video of a model railroad where they used I think some sort of hobby motor to make a figure, and tow motor move, and other things move. Please tell me what and how to use add this element of motion to my G scale display. Please give ideas on where to order the parts for this also. Thanks for your help.”
Comment below
If anyone else wants to share some creative scenery ideas, please submit details using the Ask A Question link below. Approved ideas will be published in approx 7 - 10 days.
Shane who is a Level 11 member of the online Model Train Club sent in this idea to share with others.
“I find Seamoss trees great to use but I like to make them stronger, so I insert a length of thin piano wire up the hollow trunk.
If you are careful you can gently push the wire a long way up the trunk to make each tree much much stronger and stable. I leave about an inch of wire protruding out the base of the trunk as this is helpful when mounting the tree to the layout.
Just be careful when using piano wire (or locating trees with piano wire in them) as the wire is very sharp and could do some serious injury if someone accidentally poked themselves in the eye when viewing the trees up close.”
Joss an 11 month member of my online Model Train Club has posted this idea at the club.
I know you can buy ready-made ground cover, but I’m a bit old fashioned and like to make my own. I gather up dead leaves and crush them in a kitchen blender. I then gently bake the moisture out, or I thoroughly air dry the mixture (don’t start a fire in the oven!). I then use a sieve to sift the baked material to look like tiny fragments of dead leaves (which is what it really is). Apply some ground goop to your surface area and sift on the leaves to bond them to your forest floor. Leave it to dry. I haven’t had any problems with the leaves showing any signs of decay or mold, and I first used this method a few years ago.
Razza a keen member of my online Model Train Club posted this idea in the members area.
You can either buy telegraph poles from a hobby shop or you can make your own. The bought ones are usually molded in one color so you might need to paint them a bit so they look more real. The ceramic insulators on telegraph poles are not usually vivid white and on a real pole they are likely to be off white or greyish in color. So touching them up with some paint will take away the unreal starkness.
You can also add more details. For example (depending on where you live), the poles might have a band around them to stop possums climbing the poles and causing a power failure. Some poles will have a guard to stop mice and other rodents climbing or attacking the poles. The telegraph poles might have a styrene plastic sheet wrapped around towards the base of the pole to stop vermin climbing up. You can replicate this by wrapping on a small piece of heat shrink insulation and then lightly applying heat to help it grasp the pole. Have a look at some telegraph poles in your area, or search images on the net, to see what details you can include to add realism.
There are hundreds more helpful ideas in the members area at the online Model Train Club.
John has kindly sent in this article which he hopes will be helpful to others in the hobby.
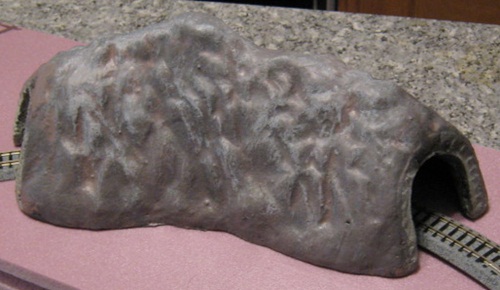
A tunnel is always an important part of our layouts, as it serves multiple purposes. On bigger layouts, a tunnel breaks up the train as it “disappears” inside the mountain for a short time, while on smaller oval or switching layouts a tunnel can serve as an area that leads to a place outside the layout itself. The only problem is that, if you don’t build the tunnel yourself, an inexpensive type of tunnel can look just like it is – a toy that has the basic shape but does not look realistic. However, there is a way to remedy this problem with a few cans of model paint, and the following is one type of example.
I used a very inexpensive small, curved N-Scale foam tunnel which was factory painted green, brown, and white, and all-white inside. First of all, tunnels are dark places where only trains and adventurous people dare to go, so the entire inside was painted black. It would be a good idea to also paint the roadbed a dark color, because when you look inside, the only things that should be seen are the locomotive headlight and the reflection on the rails.
The next step would be to paint the entire outside a gray color or even a combination of grays. When that dries completely, make a brown wash (to simulate earth) and spray or paint it on so it flows between the ridges in the rocks. Then paint the tunnel portals a concrete color to make them stand out somewhat from the rocks. After this, let the whole tunnel dry for a day or two, and to make sure you like the way it looks before going on.
When all the paint is dry, dry-brush all the rocks (especially the rocks on top of the tunnel) to simulate the effects of nature and sunlight. Dry-brushing, if you haven’t done it before, takes some practice. I have all the manual dexterity of your average water buffalo, yet learned how to dry-brush by trying it out on articles that won’t be used on a layout. The important part is not to use too much white paint, just enough to make the rocks stand out. If you do put too much on, immediately wipe it off and try again.
The final steps are to paint a bit of black in the center of the tunnel portals to simulate engine smoke, and to put on lichen, ground cover, trees, etc. The example in the accompanying photo was left lichen-less because the tunnel will be used on a holiday layout, and will be covered in snow. But the primary consideration is to have the tunnel look exactly like the surrounding environment. As railfans know, a tunnel is built so trains can go through it rather than go all the way around a mountain, and as modelers we should try to recreate this fact.
Thanks John for your excellent contribution. It would be fantastic if other experienced model railroaders did the same.


