
Everything on model trains, model railroads, model railways, locomotives, model train layouts, scenery, wiring, DCC and more. Enjoy the world's best hobby... model railroading!
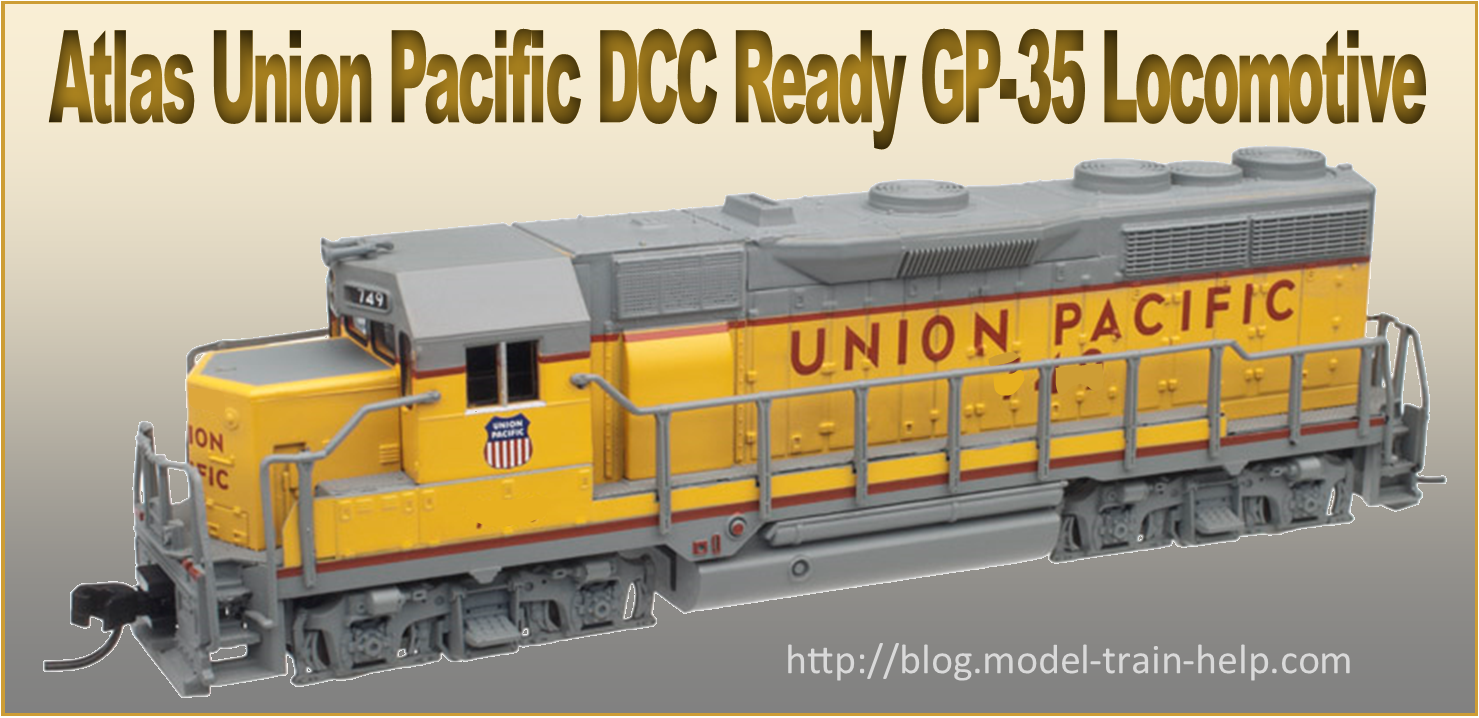
Reynold models N scale and asks:
“I wanted the DCC Ready Atlas GP35 loco in Union Pacific markings, but have just found out it wasn’t around until the 1960s. My layout… half-finished… will be set in the mid to late 50s, so I’m probably better with something a little older. I don’t need Union Pacific if that opens more options. Any ideas?”
Add your comments to this post – see COMMENTS below, or have your own question published – see ASK A QUESTION below.
 Bryan asks:
“What do people think about DCC sound? The obvious price difference is not the only reason I ask. From what I’ve seen and heard, the car/wheel track noise seems to negate the engine sound effects. Winding up the volume is an option, but that exaggerates the sounds to a less realistic level. Am I overthinking this? Thoughts.”
ASK A QUESTION or post your COMMENTS below.
Clint writes:
“Before attaching my track directly to ply should I lay down cork first? What should I use – track tacks/nails, or glue what type?”
Add your comments below. And, remember you can have your question published too. See the ASK A QUESTION link below.
Howard posted this:
“I am finally changing to DCC a big change, and want to buy a couple of new diesel sound mainline engines but not sure which manufacturer to go with. My layout is US 70s/80s and I’m open-minded on the livery. I was wondering who is the best manufacturer of these engines, and why you like them? I have done a quick search of these online but haven’t settled on anything yet – Proto2000, Atlas, Bachmann, Athern, Kato, and Mantua.”
ASK A QUESTION or post your COMMENTS below.
The Gainsborough Group Industrial Equipment Building is one of the new background structures available for immediate download. It can be built to HO scale, N scale, or OO scale.
Version 8.0 of the Model Buildings Catalog is available now for download https://www.modelbuildings.org/catalog
Dale posted:
“I am currently renovating an older Marx train set. I get a weaker response the farther I get from the transformer connection. The set has a Marx Model 709 Train Transformer. I am wondering if I need to replace this transformer? If so… should I replace it with a 709 transformer, or should I change to a different transformer for additional power? If I should replace it…. any recommendations?”
Brian asks:
“My HO layout is DCC running a Digitrax DCS52 Command Station and a Digitrax LNWI LocoNet WiFi Interface. What device connects a laptop PC running JMRI to your layout? “
Bruce asks:
“I have an HO Peco SL-E8361 turnout that I’m trying to connect to a Peco PL-11 side-mounted motor, but there’s no connecting rod to go between them. Does anyone have a solution for doing this? The hole in the turnout is quite a bit smaller than the hole in the motor. Thanks.”
Rick has O scale and writes:
“My transformer Lionel 1033 voltage is low when the load is applied it reads 6v. Without load, it reads 18v. I put a jumper from the b post to the circuit breaker but the voltage read only 8v. Any suggestions on how to get the voltage up to 18 or what to check?”
Poorna asks:
“I intend to buy some DC HO scale twin motor drive DCC not ready large locomotives and fix them with DCC decoders. My choices are Athearn Genesis DDA 40X Union Pacific centennials, EMD DD 35 B (Alco or Overland) with the objective of gaining the skill of fixing the locos with DCC decodes. As I’ve heard those double motor-driven locomotives need two DCC decodes. All I need to know is:
1. Is it true that such locomotives need two decoders instead of one?
2. If two decoders are fixed, how are the cables of them connected to the motors and circuitry of the locomotive?
3. Which one of those two decoders will be the primary?
and
4. How can I assign an address to such a locomotive after DCC decoders are fixed?”
Post (and view) answers below.
 Terry sent in this question:
“I am trying to figure out how to do reversing loops for a DC Atlas code 100 track and train that I got for Christmas in 1961. It has an Atlas code 100 brass track. The stamp on the underside of the engine says The Lionel Corporation New York NY and it is a Santa Fa 0594 blue and yellow engine.
I believe I need 4 reversing loops, number 5-8 on my diagram. The switches are labeled 1-4 on my diagram.
All I can find on the internet is products and information on DCC systems, I have a DC system. Any information on where to purchase, what I need, and how and where to do it would be greatly appreciated.
I should also add, the attached layout is what I would like to have. 1-4 would be switched and I assume 5-8 is where I need reverse loops?”
Add your comments below if you can assist Terry.
Dan asks:
“I use a Digitrax Zephyr DCS50 and was given a second-hand Spectrum 4-6-0 DCC sound-equipped loco. I tried to ascertain the decoder address by setting it up on my programming track, but it keeps showing a DND error message? Any ideas gratefully accepted.”
Roger kindly shared this tip for making barbed wire:
“I wanted a small section of barbed wire on a fence, so used some fishing line and tied knots in it. With a little trial and error, I cut the knots so that tiny bits stuck out to make the wire barbs. I test sprayed a length in silver and touched up some areas near the barbs with brown and rust-colored paint. There might be other ways to do it, but mine after weathering looks real and was cheap and easy to make.”
Gerrard posted this question:
“With the same idea as Wayne, I unpacked my train stuff from the cupboard. Great minds think alike HA! HA! A couple of tracks pieces are out of alignment and some of the brass (I think that’s what it is) gunk came off the ends. Similar question to Wayne’s, can I fix it, or should I toss the worst pieces in the garbage? Like to know thanks.”
Add your answer below.
Wayne sent in this question:
“I recently retired and I got out my trains after about 4 years boxed up. I notice a control box has some corrosion as do the track connectors. Can I safely clean them…how…or should I replace them”
Buzza writes:
“I am not a fan of plastic and thought about using real treated timber cross ties. Has anyone done this? Are there any issues? Where can I get them in HO? Would love some feedback.”
Add your comments below.
 Caleb who is new to the hobby posted this question:
“What brand manufacturer and type of turnout is best to stop shorting out when my train passes over? I have a Walthers code 83 turnout. Can I do something to the turnout or train to fix this?”
Add your comment below if you would like to assist Caleb.
This large background industry building is the latest in the series of 6 new downloadable color plans available on the website https://www.modelbuildings.org/background-buildings
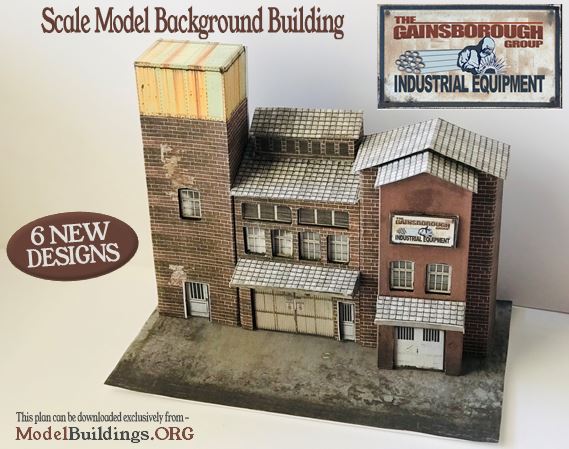
Feedback from customers who have already made some of the other 5 buildings in the series has been really positive. Thank you, and well done, to those who have sent in photos.


