Trackage
Everything on model trains, model railroads, model railways, locomotives, model train layouts, scenery, wiring, DCC and more. Enjoy the world's best hobby... model railroading!

Article contributed by Club Member Andrew Wilkinson
 Having a train that stutters and jerks is a common problem raised by model railroaders (especially beginners in the hobby). Believe me, there’s not a lot of fun in having to prod and push a train along the track. However, these problems are often easily rectified, but first the cause(s) needs to be diagnosed.
Obviously keeping the layout (track) and rolling stock (wheels) clean and free from dust and grime is essential, and is more often than not a factor in poor operation.
Humidity can affect track too. Using a dehumidifier can assist in keeping the room humidity to 50-55% range. A tarnished rough track can be problematic as it is likely to have a highly electrical resistant surface. Apart from reducing engine performance, tarnished track can cause wear on the pickup wheels if they become oxidized or dirty.
The same goes for rail joints, they need to operate efficiently. The connection between the each piece of track could provide enough electrical resistance to cause a train to slowdown or pause momentarily, especially on track that is at the other end of the layout. The solution in this case could include replacing worn (or loose) fish-plates and to electrically connect track pieces together using a track-power booster cable.
Any number of other faults can result in erratic operation. With consistent use, washers, insulating bushes, and other electrically devices could show signs of wear and no longer be properly insulating the locomotive chassis electrical parts. Damaged or loose drive gears need to be fixed and properly secured to their shafts. Also watch for any wheels that work loose on their axle shaft.
In a nutshell; model trains rely on the track rails for power. A train will slow down, or even stall, if that connection is inconsistent or broken.
Trains need enough consistent power throughout the course of the journey, whether they are close to the power source or on the other side of the layout. Erratic running could be an indication the trains are not receiving enough power, so you might need to improve the power flow. A drop in voltage can usually be fixed up by including more connections.
A drop in voltage is a likely cause if the train slows or stops just in a certain spot on the track. The distance from the power supply and the track section joints can weaken the power flow. Consider the solutions already mentioned to tighten any loose rail joiners and if needed, run another set of wiring from the power supply directly to the problem section of track. Obviously care needs to be taken to ensure each wire is connected to the correct rail.
With large model layouts, and also with most DCC systems, utilizing a bus wire (with feeders) to multiple track sections is the preferred option. The use of heavier wire (No 14 to No 10 gauge) depending on the scale and run length, is generally more productive than the rails. Smaller (No 20 to No 18) feeder wires can be joined as often as required between the rail and bus. These feeders are often connected at 6 to 12 foot intervals.
Rail joiners can also be soldered. This can definitely reduce the voltage drop, as well as helping to eliminate any rail kinks that could cause a derailment. Leaving a few joiners open will provide some room for expansion and contraction over the course of the year.
I would be interested in hearing other suggestions from readers.
If you would like to submit an article for publication please contact us here.
JD has a question for readers:
“I like the HO ez track by Bachmann, but I’m not sure what the difference is between steel track and nickel silver track. Any help would be appreciated.”
Warren asks readers:
Can someone please explain the difference between code 80 and code 55 tracks – I’m confused? And, can I combine both on my layout?
One of the biggest mistakes when planning a model railroad is to misjudge the required gradients (grades) for the layout. Even though the track plans might look good sketched on paper, the big question is; how practical will they be when converted from paper to track, wood, and foam on a model railroad?
The track may need to be longer than on the sketched plan if the locomotive is to pull several cars up and down an incline without mishap, or the wheels spinning through lack of traction. Having a locomotive cough, splutter, and eventually stall on a grade can be very disheartening, especially if it results in a derailment or burnt out motor.
Here is the link to the FREE TRACK GRADE CALCULATOR for you to easily work out the correct track grades, and avoid the problems mentioned above. You are welcome to share it on Facebook or by email with friends.
You can calculate in feet, inches, miles or in metrics.
 One of the key questions asked when it comes to track planning is whether to single track or double track the line. The answer to that dilemma will become apparent when you decide the answers to these 8 questions:
Running two or more trains on your own is more difficult than you might think, especially when operating a large layout. If you’re operating with DC, you’ll require two power packs, or a double power pack. DCC has made wiring and control much easier, but if you are not paying attention, the trains could derail on a curve, in a tunnel, or onto the floor.
I am not trying to discourage you from double tracking, far from it; but it is important to be aware of the ramifications in terms of cost, space, operation, and maintenance. Do you have the time, the energy, and the patience to ensure both mains are kept clean for your trains to run smoothly?
Double tracking could double (or at least substantially increase) your costs. Apart from the increased space requirements; you will need double the amount of track and roadbed, more ballast, more rail joiners… and the costs of those things can really add up.
 4. Do you have enough space to double track?
I touched on space requirements earlier, but the importance of having enough space to double track should not be overlooked. In particular, the curves need to be wide enough and spaced correctly, so that trains don’t side swipe each other and derail. As a guide, take a look at clearances from a prototypical viewpoint.
In the real world, single track railroads typically have a passing siding where a train can wait for another train to clear. If you’re only going to operate one train, and then maybe 10 to 15 minutes later operate the next one, then a single track is possibly all you require.
Sometimes it is, especially from an aesthetics point of view. A model railroad can be more visually interesting, and look a little more prototypical by double tracking, or by using a combination of single track and double track. One option is to double track most of the layout and then run a single track over a bridge, through a tunnel, on a tight curve, possibly through a town, or somewhere else where it might be much easier to just have single track. That approach is not uncommon on real railroads, because it can save the railroad money without adversely affecting operational efficiency.
If you opt to single track your layout and compensate by including passing sidings, then you’ll need to know the length of your longest train before committing. The length of the longest train will determine how long your passing siding needs to be. It should be at least the same length as your longest train.
On real railroads; sidings will generally have a slower speed limit than the main line. Trains on sidings might be restricted to 10 miles per hour. Also, it can be a good idea to position a siding close to a passenger station, rail yard or industry. An industry could operate off a siding without affecting the main line traffic operations.
Now, I could have posed this question earlier, because it is a key factor. However, I wanted to expand on the question so have left it until last.
This question is important because in days gone by, double track was often the norm. The same goes for specific railroads. As an example; railroads in Canada, United States and Mexico are classified based around their operating revenue.
In many instances a Class 1 railroad (the biggest) had as many as four mainline, with two in operation for passenger services, and two operating freight services. This minimized delays, because being on a different line the fast freights didn’t need to wait for the slower regular stopping passenger trains.
As a matter of interest, until January 1956 a railroad with revenues of $1 million was classified as a Class 1 railroad. Before 1956, railroads with annual revenues below $100,000 were classified as Class III railroads.
The annual revenue cutoff requirement for railroad classification has increased over the years. Class 1 railroads increased several times from $3 million to $5 million by 1965, to $10 million by 1976, to $50 million in 1978, and in 2011 to $433.2 million. The number of railroads meeting the Class 1 cutoff requirements reduced in number over the years.
Throughout the years there were also other requirements and changes that affected railroad classifications. In 1979 all terminal and switching railroads were re-designated to Class III.
Railroads with increasing revenues were often reluctant to be reclassified, because an upgrading usually meant a corresponding increase in legal and administrative costs. An example was in 1991 when the Wisconsin Central and Montana Rail Link Class II railroads requested the ICC (Interstate Commerce Commission) increase the required minimum revenue requirement from $93.5 million. This was to avoid being re-designated to Class I.
Also, the introduction of CTC (Centralized Traffic Control) changed railroad signal operations. Train crews and local signal operators were no longer responsible for routing decisions. Centralized offices for dispatcher’s were introduced to control train movements were trains moving in opposing directions on the same track use switches and sidings to pass each other.
The widespread use of automobiles, bus, air, and road freight also affected railroad operations. Many rail passenger services ceased to exist as railroads were forced to streamline or downsize operations with single track and passing sidings.
So, numerous changes have impacted rail operation over the decades. This is why, if you want to authentically replicate a real railroad, you will need to know how it operated at a particular point in time.
After giving some thought to how you answered each of the above 8 questions, the decision on whether to single or double track your layout will be an easy decision to make.
For more help with plans, diagrams, tutorials, videos etc on DCC, scenery, wiring, repairs, maintenance, overcoming problems etc watch this video…
Cliff is having derailment problems and needs advice from readers:
“My HO RR has a curve in the tunnel, but it is causing me no end of problems.
The trains run okay from one direction, but derail when running in the opposite direction. Small trains seem to operate ok but the bigger one’s are a real problem. Really annoying. The tunnel is a little hard to access but I have been able to alter the curve a little but the problem is still there. I desperately need help from someone please.”
Lee has a question for readers:
“I live on the coast of NC. My O scale layout goes from the game room through the wall into the garage.
The ‘Salty’ air is rusting the track. I use steel wool, sand paper, and everything else I can think of. Is there ANY treatment that can be done to help?”
If you would like to post a question, please follow the guidelines in the right hand column.
Warren sent in this question:
“I am in the process of constructing my rural country/mountain layout in HO scale 12ft x 4ft. I’m working on two tunnels right now and am about to lay the track where the tunnels will go. However, I have already had quite a few problems with my cars derailing at the switches so I don’t want to proceed until I can solve the derailments. I have replaced a few wheels on the cars, but the problem still exists. I would really appreciate it if one of your readers could give me some advice. Thanks in anticipation.”
Tim used the form on this page to submit this question to readers.
“I saw an earlier question about road widths and thought I would ask my question on track widths. What spacing should I use between N track where my two tracks run side by side? What spacing should I use for my curves? The NMRA standards is gobbledygook to me.”
Model trains will usually operate faster on long straight flat stretches of track, but that can be boring after a while, not to mention the amount of space required to run a long mainline. There’s nothing wrong with having flat level areas of track, but changing the elevations by including gradients (slope of railroad track) can add considerable interest to a layout. Adding grades to a model railroad can increase the option of including tunnels, bridges etc as the trains meander through the countryside or mountain ranges.
However, railroad grades need careful consideration if you are to avoid operational problems such as derailments or stalling locomotives. It’s not just the loco that will need to safely navigate up or down the raised track, it is also the fully laden cars carrying coal, timber, metal, refrigerated foods, fuels, vehicles, livestock, or even people (well, plastic models of people). A long train can be very heavy and this needs to be taken into consideration when going up or down a gradient of a real railroad, or on a scaled down model railroad.
Let’s look at a real life example: A loaded train might have 135 coal wagons, with each one weighing 22 tons (empty) or 143 tons (loaded with coal). 135 cars x 143 tons equates to 19305 tons with the 3 locomotives moving the train (approx. 630 tons). Add that up and the weight could be up to 20,000 tons (40 million pounds).
Those are staggering figures, and the same rules of physics apply on a model layout.
A model train locomotive will need enough power to safely pull its cars up (or down) a grade without slowing to a stop or a derailment happening. A “gutless” engine won’t haul many cars up a steep grade, so if you want steep grades, you’ll require strong locomotives.
In general, more weight means greater wheel traction. A heavier loco might be able to climb a steep grade, whereas the wheels on a lighter weight loco might slip. Following this logic; a larger scale loco might cope better on steeper grades than would a smaller scale loco.
These days it’s often more cost efficient for a railroad to operate longer trains with multiple locomotives. With more pulling (or pushing) power a train can climb a steeper grade and/or have more cars attached. It is not uncommon to see multiple locos on smaller N scale layouts. They are typically at the front of the train, but sometimes there’s a loco positioned in the middle to add more pulling/pushing power.
Using extra locomotives is nothing new. In the days of steam engines the railroads often had “helper” engines standing by to help haul trains up the steeper gradients.
Another method is to use a ‘ghost car’ (sometimes called a cheater car) on your model railroad. This is basically a motorized boxcar or freight car that can be positioned somewhere towards the center of a long train. If the model train is really long, then more than one ‘ghost car’ can be used. They just need to be evenly spaced along the train.
A track gradient is measured as a percentage of rise over the length of the track. So if the model train track stretches for 100 inches, and over that distance the train climbs by one inch, then the gradient would be 1%. That’s a comfortable gradient for most model trains to navigate. Compare that to a short 25 inches of model train track with the same 1 inch rise – that would be really steep and equate to a 4% rise. A steep 4 percent rise could be problematic and likely cause a lot of frustration.
Track grades on real railroads fall into there categories; light grade is 0.8% – 1%, heavy grade 1% – 1.8%, and above 1.8% is classified as mountain grade. Real railroads need to make money, so having trains stall or derail can prove costly.
Broken down trains can block the line (upsetting schedules), derailed trains can be expensive to get back on the tracks, damaged goods (or passengers) is bad for business, and damaged trains or track can run into big money to replace or repair. That’s why real railroads choose to minimize operating costs and minimize risks, by avoiding overly steep gradients. They avoid anything that could have an adverse effect on operations.
The same goes for model railroads; keeping track gradients 2% or below is a good rule of thumb. It can also look more realistic (as long as you have the space) than a really steep grade. As I mentioned earlier, a 1 percent grade poses few problems on most layouts.
As with life-size railroads, the grades on a model railroad will be determined by the weight and length of trains. Other factors will be the number (and type) of locos being operated and the track speed limit. That’s not to say model trains can’t or don’t operate on grades of 4%, 5%, or even 6% – they do. But the steeper grades are more likely to operate short trains, geared locos, and at slow speeds. A good example might be a train hauling logs or coal from a mountain region. So, grades of 4% or higher are manageable on some layouts.
Helper locos are often used when trains need to haul heavy loads especially above grades of 1.5%. Mainline grades are generally below 2%.
The thing to remember is that on real railroads the trains gain considerable momentum on long straight level sections of track. If the track runs level for several miles and then has a small ½ mile run of steeper 2 percent grade, then the power of the train will take it up the grade without too much effort. So, from a railroad management view point, the 2% grade is unlikely to disrupt schedules or add greatly to the running costs. The same can’t be said for a 1.5% to 2% grade that stretches several miles. A lot more pulling power would be required to haul the same train.
More info on model train grades, realistic scale speeds
Curves and bends also influence operations on level ground as well as on gradients. An easement for a curve needs to be gradual, as does the transition into a gradient. A sudden change to track slope or angle is a recipe for disaster, posing a higher risk of unplanned uncoupling or even derailments. Special care needs to be taken when constructing curves within a gradient. This is because curves increase the wheel and rail friction making it more difficult to haul a train up a curving gradient, and less troublesome taking it down.
However, a including curves on grades can give a longer run where space is limited on a model railroad. This can reduce the grade percentage needed. Gradients can add considerable interest to a scale railroad, especially where one track passes over another on trestles or bridges. However height is needed for an over/under configuration, so there needs to be sufficient space for the train to climb and turn.
Including grades is good; including curves is good; but the mix of curves and grades needs to right. Too many, or overly tight, curves can cause problems. The same goes for ‘S’ curves – care needs to be taken when planning the configuration. As long as there are no track or wheel faults, a train will generally run along a straight section of track without difficulties. Add a tight curve, an ‘S’ bend, or steep gradient, and train speed and operation changes.
To achieve continuous running, a layout will need 180 degree curves so the train can turn around without stopping. Due to space limitations, this is not possible on every layout, especially on narrow railroads. The minimum radius of curves will also vary depending on the scale.
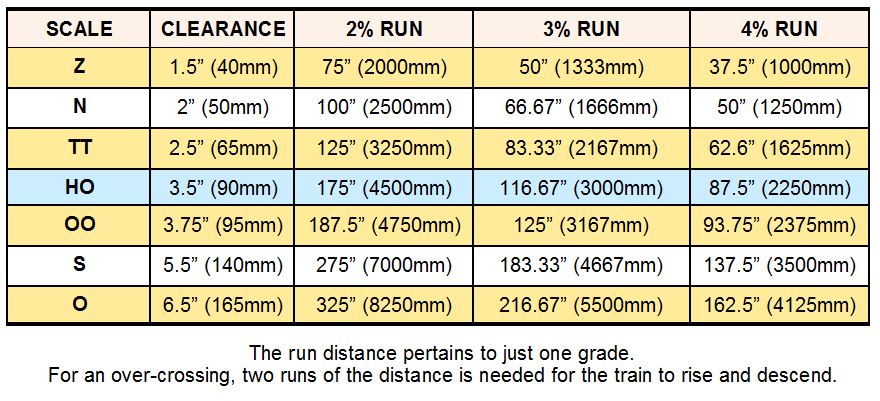
The above chart shows various scale clearances needed when planning tunnels and bridges. Remember that when a track rises it generally needs to come back down again, so the length of the grade will need to be doubled to allow for both the rise and descent.
When constructing a layout it is always best to try and avoid potential problems, rather than try to fix problems after they have happened. Simply things can save a lot of frustration, like testing the trains on your layout BEFORE gluing down the track and grade foam. The trains need to comfortably navigate the track without mishaps. They need to be able to take the curves without derailing and climb the grades without coming to a standstill. Obviously you will need to decide how many cars each train is likely to have to conclude whether the track configuration is adequate for your needs. There’s no point in having a fancy layout that isn’t practical to operate.
John asks readers for advice:
“Does mixing track from Bachmann and other manufacturers work. I like the Bachmann ez track but find really good deals on other brands . Would someone let me know through the blog, thanks.”
It doesn’t matter how carefully you’ve constructed your model railroad, there will be limits to what your model trains can realistically do. One of the most common ways beginners learn this is through experiencing derailments.
 It takes a while to appreciate that most track curve sections on a model layout are typically more exaggerated than the curves that actual real-size trains run on. The basic laws of physics take over when long trains, or high speeds are combined with tight track curves. Something has to give, and more often than not, the train derails. It happens to all of us at times, even those who have been in the hobby for years.
Whilst it may not be possible to completely eliminate derailments, there are preventative measures that can keep derailments to a minimum.
Driver Error
Most road accidents are caused by driver error and sometimes vehicle defects. The same applies to operating a model railroad. To prevent derailments the operator needs to operate the trains with care and attention. The track needs to be in good order as do the trains.
Model trains need to operate at realistic speeds especially around curves or S bends. Operating a train at full speed can be risky, and speed changes need to be gradual. Model trains need to completely stop before they change direction. The operator will need to examine the routing of switches before the train crosses them. This is a sure-fire way of reducing derailments and saving the trains from expensive damage.
Before operating a layout it is well worthwhile watching real trains in action, and try to replicate the scale speeds. A real-size train will typically take a mile or more to come to a complete stop. In a rail yard the train will generally move at under 4mph when coupling cars together. So those kinds of observations should be taken into consideration when operating a model railroad.
Even though it can be somewhat entertaining to watch a model train derail, especially when it is not your own prized possession, it can cause considerable damage. Kids especially like watching train crashes, so staging a train crash can be a way of involving and educating children with the hobby. Derailments can be a way of explaining the physics of train operation and the need for safety. You might be surprised with how the message sinks in when an actual derailment happens.
Mechanical Faults
Even with the best of care derailments can still occasionally happen. Often the cause of the derailment can be difficult to locate. That’s why it is better to avoid derailments in the first place. Correct and careful laying of track can prevent future problems. The clearances and curves need to be accurate. If multiple cars derail at the same spot, then it is probably due to a track problem. If the same car derails in more than just one spot, then it’s likely the car has a fault. There may be exceptions, but that’s generally a good guide. If just one car is derailing in the same place, then a check of both the track and car would be warranted.
So to summarize:
 If the problem occurs at a particular spot, then in all likelihood the track will need a closer inspection. It may take just a small tweaking to remedy the problem.
If the same loco or car derails regularly, then some adjustments may be required to the car or loco. A simple wheel adjustment might fix the problem. Otherwise it could be a coupler problem, or the weight of the car causing the derailment.
Other factors to consider are everyday wear-and-tear on the trains and track. That’s where regular maintenance comes into play as a preventative measure. Tracks and wheels get dirty, so regular inspections of trains and track is generally well worthwhile. Also, be aware of changes in humidity and temperature as these can affect smooth running.
More help with track work and fixing problems.
Locating Problems
Often the best way to locate a problem is to backtrack what happened by repeating the process. Run the train over the same section of track at about the same speed. Get down close to the track so you can spot any problems. You might need to do this several times until you locate the cause. You might need to slow the loco or car down to spot the problem.
The problems that are most difficult to locate and fix are often those that can’t be repeated. Obviously everything needs to be in gauge as you keep a close watch as the train passes the spot.
Although you might be somewhat of a perfectionist, no matter how careful you are, derailments can still happen. That’s why you shouldn’t get too stressed with derailments, but instead, aim to reduce the likelihood of similar problems occurring in the future.
When most steam and some diesel locomotives reach the end of their run, they need to be turned around to head back in the other direction. If that station doesn’t have a turntable or a reversing loop track, they need a wye reversing track, commonly just called a wye.
Because of its size, a wye is usually located near the end of the yard, or track. Looking down on a wye is often like looking down on an equilateral triangle, with three equal sides, with one end connected to the yard track. At each corner is located a turnout or switch, often a wye switch, with the diverging tracks of equal angle, and beyond each turnout a short track to hold the locomotive and still clear the points of the turnout.
Operating a Wye
We can call the corner turnouts #1, #2, and #3, or 1, 3, 2, it makes no difference as the wye works just as well in either direction. For this example we will go #1, #2, #3. Turnouts #1 & #2 are aligned together and the locomotive proceeds forward through both turnouts and stops on the short track beyond #2. Now turnouts #2 & #3 are aligned and the locomotive proceeds backwards to the short track beyond #3. Finally turnouts #3 & #1 are aligned and the locomotive proceeds forward to the original track, except in the opposite direction.
On a model railroad each turnout must be powered, and isolated from the others with gaps. A wye is just a complicated reversing loop, but in a more compact space.
Add your comment.
If you are ready to lay track you must have some idea of what your layout will look like, and it also is a good time to ask some questions. Do you plan to use sectional or flexible track, or hand lay ties and spike the rails? Do you plan to use cork or other roadbed? If you are reading this I would guess you are not going to hand lay your track at this time.
Before you begin laying track you will have to have the track center-lines on the layout, whether it be a 4’x8′ plywood board, open grid, or even foam. Both roadbed and track may be attach in several ways. Nails are handy and we all know how to use them. Some roadbed is self adhesive, like peel and stick tape. Adhesive bathtub sealing caulk is used a lot now, while white glue, diluted with two or three parts water to one part glue is very common. Everything except nails will have to be weighted down until the adhesive sets, from a couple hours to overnight. Use soup cans, bags of rice or beans, even plastic bags with sand. Use the proper size rail joiner for the code size of track you are using.
Add your comment
Club member Larry sent in this tip:
Laying the track is one of the most important aspects of building a railroad model. Design the entire track on paper first. Once done, loosely place the sectional and curved pieces to get the whole idea of the layout. Do not join any pieces at this point. For curved tracks, choose a radius that is bigger than the size of the train.
You can now proceed with joining the track. Start at one end and work on small sections at a time. Fasten the track down. Soldering is a good option to finish off the track because it prevents derailments.
Add your comments
Supplied by club member Warren:
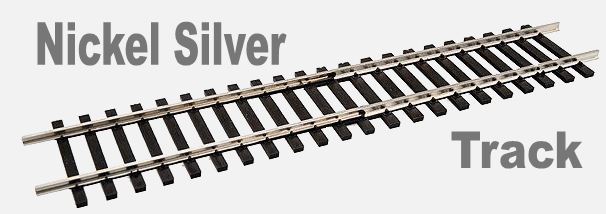
Nickel – Silver is a composition of copper and nickel, with copper being the dominant metal. It is similar to brass but has added advantages. When brass oxidizes, a layer called rust is formed. Rust does not allow electrical conductivity. Consequently, if brass tracks are used, trains may not run smoothly. Regular cleaning and removing of rust is essential.
Nickel-Silver tracks also oxidize after a time. The difference is that nickel silver track has a higher current flow resistance than does brass track. This can necessitate more wiring to adequately feed the track.
Add your comment.
Derailments are frequent and very annoying when you are trying to build a perfect railroad track. Here are a few tips to avoid them.
–> The joints must be well aligned and the gap between them must be kept to a minimum. The track should be smooth when you rub a finger over it.
–> Solder your sectional pieces in the end so that they remain fixed at one position.
–> The track gauge should neither be tight nor wide. If the track gauge is too tight the wheels could ride up and cause a derailment. If it is too wide the wheel flanges won’t span the track correctly, potentially causing a derailment. Heating the rail with a soldering iron can allow for the rail to be adjusted into position.
–> Make sure the switch points don’t grab the wheels. This sometimes happens with new switch points. A file can be used to carefully smooth the points (moveable parts) to achieve a smooth transition. Inspect the rail gauge when in each position.
–> The wheels must move freely and contact the rails evenly.
–> Ensure couplers don’t snag and are properly centered.
–> Check the length of your longest car if you are making an S-shaped track. It needs to be able to enter and exit the S curve without derailing.
–> Add additional weight to cars if they are too light. Aim for a low center of gravity with the weight in the towards the centre of the cars.
–> Lubricate frequently. If wheel sets are incorrectly aligned, out of gauge, or not rotating freely, they could cause a derailment. However, use oil sparingly as it does attract dust.
Add your suggestions and comments.
Ken asks readers:
“What radius would I use if I had 3 tracks next to each other ( 10-12-14 inch ) and hopefully a 4-8-4 would work on at least 2 of the 3 tracks? I model N scale. Thank you.”
Add your comment.


