
Everything on model trains, model railroads, model railways, locomotives, model train layouts, scenery, wiring, DCC and more. Enjoy the world's best hobby... model railroading!
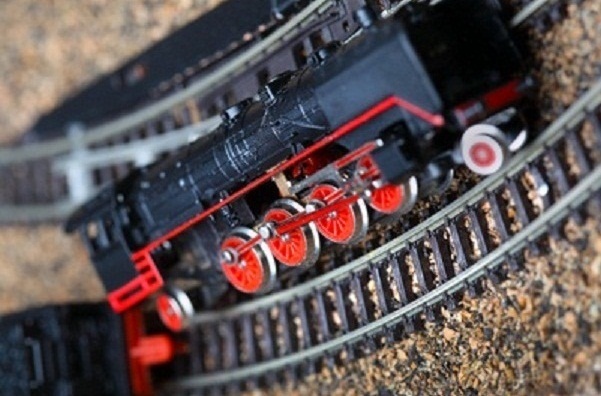
It doesn’t matter how carefully you’ve constructed your model railroad, there will be limits to what your model trains can realistically do. One of the most common ways beginners learn this is through experiencing derailments.
 It takes a while to appreciate that most track curve sections on a model layout are typically more exaggerated than the curves that actual real-size trains run on. The basic laws of physics take over when long trains, or high speeds are combined with tight track curves. Something has to give, and more often than not, the train derails. It happens to all of us at times, even those who have been in the hobby for years.
Whilst it may not be possible to completely eliminate derailments, there are preventative measures that can keep derailments to a minimum.
Driver Error
Most road accidents are caused by driver error and sometimes vehicle defects. The same applies to operating a model railroad. To prevent derailments the operator needs to operate the trains with care and attention. The track needs to be in good order as do the trains.
Model trains need to operate at realistic speeds especially around curves or S bends. Operating a train at full speed can be risky, and speed changes need to be gradual. Model trains need to completely stop before they change direction. The operator will need to examine the routing of switches before the train crosses them. This is a sure-fire way of reducing derailments and saving the trains from expensive damage.
Before operating a layout it is well worthwhile watching real trains in action, and try to replicate the scale speeds. A real-size train will typically take a mile or more to come to a complete stop. In a rail yard the train will generally move at under 4mph when coupling cars together. So those kinds of observations should be taken into consideration when operating a model railroad.
Even though it can be somewhat entertaining to watch a model train derail, especially when it is not your own prized possession, it can cause considerable damage. Kids especially like watching train crashes, so staging a train crash can be a way of involving and educating children with the hobby. Derailments can be a way of explaining the physics of train operation and the need for safety. You might be surprised with how the message sinks in when an actual derailment happens.
Mechanical Faults
Even with the best of care derailments can still occasionally happen. Often the cause of the derailment can be difficult to locate. That’s why it is better to avoid derailments in the first place. Correct and careful laying of track can prevent future problems. The clearances and curves need to be accurate. If multiple cars derail at the same spot, then it is probably due to a track problem. If the same car derails in more than just one spot, then it’s likely the car has a fault. There may be exceptions, but that’s generally a good guide. If just one car is derailing in the same place, then a check of both the track and car would be warranted.
So to summarize:
 If the problem occurs at a particular spot, then in all likelihood the track will need a closer inspection. It may take just a small tweaking to remedy the problem.
If the same loco or car derails regularly, then some adjustments may be required to the car or loco. A simple wheel adjustment might fix the problem. Otherwise it could be a coupler problem, or the weight of the car causing the derailment.
Other factors to consider are everyday wear-and-tear on the trains and track. That’s where regular maintenance comes into play as a preventative measure. Tracks and wheels get dirty, so regular inspections of trains and track is generally well worthwhile. Also, be aware of changes in humidity and temperature as these can affect smooth running.
More help with track work and fixing problems.
Locating Problems
Often the best way to locate a problem is to backtrack what happened by repeating the process. Run the train over the same section of track at about the same speed. Get down close to the track so you can spot any problems. You might need to do this several times until you locate the cause. You might need to slow the loco or car down to spot the problem.
The problems that are most difficult to locate and fix are often those that can’t be repeated. Obviously everything needs to be in gauge as you keep a close watch as the train passes the spot.
Although you might be somewhat of a perfectionist, no matter how careful you are, derailments can still happen. That’s why you shouldn’t get too stressed with derailments, but instead, aim to reduce the likelihood of similar problems occurring in the future.
Ray asks readers: “I am wanting to know the best method for building roads that’s not too difficult for a beginner like me. I am progressing well with my 4ft x 8ft HO scale layout and have more space to expand it in the future. Also, how do I go about building crossings where the tracks meet the roads?. Also how wide should I make the roads for single lane and two lane roads? Thanks in anticipation.”
I your model railroad is become somewhat of an obsession, then you’re not alone. This short Joe McDoakes film from 1955 shows how things can really get out of hand. Enjoy!
Russell has a question for readers and asks:
“I want to apply an application of mortar between structure bricks and am not sure of the correct process. I am hoping someone can advise me of the correct way to do it. Is there a way to add color to the bricks before I apply any mortar”
Callum has a related question, “Can somebody tell me the best way to scratch build a brick wall?”
Add your comment.

Most of us will h ave seen pantographs in action above trams or trains and perhaps not fully understood how they work. If you haven’t heard the term before, it basically refers to equipment mounted on top of the roof of an electric tram or train that collects power by direct contact with the overhead wire (called the Catenary). Usually there will be a single wire and the return current flows through the rail. The modern day pantograph is like an updated version of the Trolley Poles used on the older style Trolley Buses. Although reasonably reliable, the Trolley Poles on the older style electric buses where prone to come off the wires at times, and potentially cause traffic chaos on a busy road.
This interesting video clip show how a pantograph and catenary operate.
This video show trams in action in Leeds (UK) in the late 1950’s.
Add your comment.
Digital Command Control can still be wired to the track with two wires, just like the older DC system, but there is a better way.
Direct Command Control, DCC, requires more power (amps) to operate, not only more locomotives, but also the many options DCC provides. The old system worked well with two wires because it only powered one locomotive, or a mated pair.
The optimal wiring for DCC uses two heavy 10 to 14 gauge solid copper wires, one Plus (+) and one Minus (-). They should be of different colors so you can correctly connect track drop wires. These buss wires are suspended below the layout, and follow track where ever it goes. In this way your DCC signals are available to all points of the layout with power to spare.
Whether you use DCC or the older DC system, track feeders are required, one to each rail. Track feeders are of a lighter 20 or 22 gauge stranded copper wire because they are short, and therefore cause very little voltage drop. Being thin and stranded, they are more flexible and solders more easily to the rail. You can buy track feeders already soldered to the bottom of rail joiners or simply solder your own directly to the rail.
Add your comment.
If your layout is small, or only needs one or two power packs to operate, a fixed operating location is fine. Many hobbyist now desire several operators who wish to move around the layout with their train.
The solution for them is a Walkaround Throttle. A workaround throttle is a handheld unit and available for DC or DCC. They have all the same controls as a fixed throttle. These throttles come in two types, wired or wireless. A wired unit has a lead, similar to a telephone cord, and attaches to the layout a one or more points. A wireless unit uses radio control and needs no lead. While two or three operators may use a wired unit, the more operators wired units in use can cause a tangle of wires. Therefore most people prefer to use the wireless type.
Add your comment.
DCC locomotives have an electronic detector located inside the body. This detector is able to perform many functions in addition to speed and direction.
Depending on the model, it may turn the lights and bell on and off, blow the whistle or horn, and even change the sound of them. Most are able to reproduce the sounds a locomotive makes, including steam hiss, air brakes, wheel squeal, and many others. While some detectors are generic, and useful for various model locomotives, most are specific to a type of locomotive and even the prototype railroad.
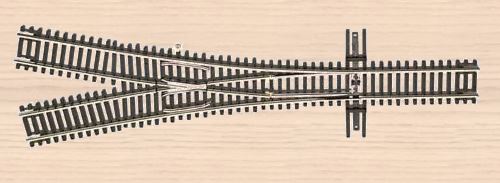
When most steam and some diesel locomotives reach the end of their run, they need to be turned around to head back in the other direction. If that station doesn’t have a turntable or a reversing loop track, they need a wye reversing track, commonly just called a wye.
Because of its size, a wye is usually located near the end of the yard, or track. Looking down on a wye is often like looking down on an equilateral triangle, with three equal sides, with one end connected to the yard track. At each corner is located a turnout or switch, often a wye switch, with the diverging tracks of equal angle, and beyond each turnout a short track to hold the locomotive and still clear the points of the turnout.
Operating a Wye
We can call the corner turnouts #1, #2, and #3, or 1, 3, 2, it makes no difference as the wye works just as well in either direction. For this example we will go #1, #2, #3. Turnouts #1 & #2 are aligned together and the locomotive proceeds forward through both turnouts and stops on the short track beyond #2. Now turnouts #2 & #3 are aligned and the locomotive proceeds backwards to the short track beyond #3. Finally turnouts #3 & #1 are aligned and the locomotive proceeds forward to the original track, except in the opposite direction.
On a model railroad each turnout must be powered, and isolated from the others with gaps. A wye is just a complicated reversing loop, but in a more compact space.
Add your comment.
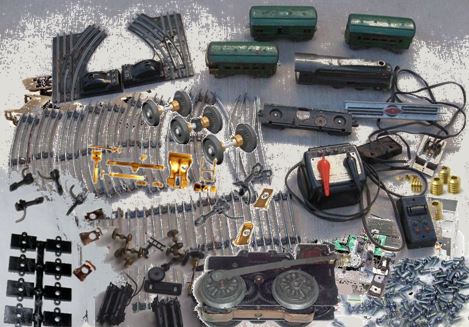 When building a model railroad layout it is well worth putting in place systems to safely store the model trains and any spare gear you might need in the future. It is also a good idea to have systems in place to organize your parts and tools so that you can easily find and access anything when needed. Being tidy and organized will remove the frustration if you can’t find the parts and accessories when needed. It could also save you hours of time when everything is well organized and at your fingertips.
Tips For Looking After Your Valuable Trains
When trains and track are not on display they need to be kept safe to avoid dust or damage. This will help keep them in good condition and help retain their value.
1. Try to keep trains stored in the original boxes if you still have them
Keep them away from direct sunlight or fluorescent lights in a dry area. Those little silica gel sachets can be stored inside the boxing to help keep out moisture and humidity. The metal parts are less likely to rust and the boxes shouldn’t become musty. Store them so the trains don’t roll around inside rub against something.
2. Wrapping trains safely
Be careful when wrapping trains in newspaper as the ink could smudge over time. Bubble wrap gives good protection, but if wrapped too tightly, the bubbles can leave circular markings. Also, be aware that plastic and tape can tear off decals when too tightly up against tinplate or plastic items.
I know this sounds fussy, but also be careful if wrapping valuable trains in old clothing. Even though the clothing may be clean, it could have residual detergents, chemicals, or clothes dye, which could “over time” remove color or detailing. You might need to put the clothing through 2 or 3 hot wash cycles using your washing machine to remove all the residual chemicals.
Alkaline (acid-free) tissue paper is usually suitable for wrapping metal and plastic items. Use 2 or 3 sheets wrapping the item first in one sheet, then in a second, and possibly again in a third sheet. It is a good idea to stick a little label on the outside so that you know what you wrapped. The silica gel sachets will help control the humidity. Also make sure all items are dry before storing. Remember too, that polyethylene bags can trap in moisture. A dehumidifier can be money well spent.
3. Wrap items according to the need.
For example, I would wrap flatcar loads separately. Rubber tires can get out of shape if squashed for a long time in storage. The rubber can also react with the chemicals in plastic over time. If you do separate the loads from the cars, keep the separate wrapped packages stored together so that each load goes with the right car.
Avoid using rubber bands as they break down and stick to surfaces over time. If feasible, store car loads upside down as this will remove weight from the tires. Mounting other loads using blocks of dry wood is an option if it keeps the load off the car surface. You can also use this method when displaying trains on a shelf.
4. Beware of sharp edges.
When storing expensive trains be careful to avoid potential scratches from exposed staples, nails, screws, or anything else they could come in contact with.
5. Try to keep the humidity to around 50 – 60 percent.
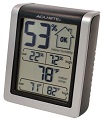 If you have an Indoor Humidity Monitor
 you can measure the daily humidity of where your trains get stored. You won’t want the humidity too high or too low (paint and decals can crack, plastic can warp). A temperate of between 55F (13C) to 72 (22C) is the best range.
Safe Organized Storage
There are numerous options for parts storage ranging from compartmentalized cupboards, drawers and boxes either plastic or wooden. Have divisions in the containers or drawers makes it easier to find things and keeps everything neatly separated.
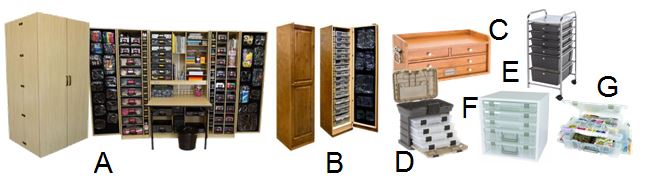
Here are a some storage options from the most expensive to cheapest.
A. Storage Cabinet System B. Storage Tower
C. Oak Chest with Dividers
D. Tool Box with dividers
E. Storage Cart with 6 Drawers
F. Storage Case Rack
G. Compartment Divided Box
Not everyone wants to build their model railroad layout from scratch. In fact some prefer to buy something that requires less work and can be operational in a quicker time. The Woodland Scenics HO Scale Grand Valley Layout Kit 4ft x 8ft layout is an example of just such a layout. It comes with all of the sub-terrain, as well as the terrain and landscaping features needed to construct the layout.
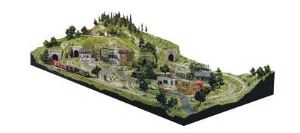 You can use some risers and some inclines to make the mountains, hills and the lower-lying sections of the layout. Foam sheets are used to create flat and elevated areas for the towns and structures. You cover it using plaster cloth to make the hard terrain cover. The next thing is to create and install the rocks and then add the tunnel portals and the culverts. You can then landscape using a wide range of trees, ground cover, details and other scenic products to complete a great layout.
As I said this type of construction is not for everyone, and many serious modelers would consider it cheating, but not everyone has the time or interest in creating everything from scratch. The concept is particularly good for someone starting off as it is a way of learning some of the required skills, which can then be used on their next layout… which they’ll probably want to make from scratch.
Woodland Scenics also do an N Scale Scenic Ridge Layout Kit
Add your comment.
The most common wiring mistake on a model railroad is doing too much without testing, such as, wiring ten turnouts and all the track, only to find it doesn’t work. Where do you start to fix such a problem? I would say, start over.
If you are new to the hobby, start small, such as an oval. With the power pack turned off and unplugged, connect two wires, one to each rail and to the terminals marked “Variable Track 0 To 12 Volts DC.” If in doubt read the instructions. Now plug in the power pack. if no smoke or sparks, turn the power pack on. Still nothing advance the throttle speed control. Still nothing, GOOD, turn the speed control off and place a locomotive on the tracks, making sure ALL the wheels are properly on the track. Advance the throttle and the locomotive should move. If not it may need a SLIGHT nudge. If it moves, stop it, move the “Direction” button, and try it in reverse. If the locomotive runs in both directions add some cars and play trains. Yes, I said play, because model railroading is to be FUN.
Now you have an operating model railroad that you can add to, one item at a time and test. As you gain experience you will have more confidence and become braver.
Add your comment.
If you are ready to lay track you must have some idea of what your layout will look like, and it also is a good time to ask some questions. Do you plan to use sectional or flexible track, or hand lay ties and spike the rails? Do you plan to use cork or other roadbed? If you are reading this I would guess you are not going to hand lay your track at this time.
Before you begin laying track you will have to have the track center-lines on the layout, whether it be a 4’x8′ plywood board, open grid, or even foam. Both roadbed and track may be attach in several ways. Nails are handy and we all know how to use them. Some roadbed is self adhesive, like peel and stick tape. Adhesive bathtub sealing caulk is used a lot now, while white glue, diluted with two or three parts water to one part glue is very common. Everything except nails will have to be weighted down until the adhesive sets, from a couple hours to overnight. Use soup cans, bags of rice or beans, even plastic bags with sand. Use the proper size rail joiner for the code size of track you are using.
Add your comment
Model steam locomotives are often equipped with smoke units to simulate the real thing. Smoke units are usually a simple cup under the smokestack, with a heating wire inside to heat the ‘smoke fluid.’ thus producing smoke. Each little plastic bottle will usually provide about 30 minutes of smoke. There are various brands including Marklin, Piko, Seuthe, and Faller.
Faller Smoke Generator Kit Details
The following video has some great scenes of a double header model steam engine belching out smoke. In real life the color of the smoke can vary depending on the quantity of coal being used. Too much coal in the firebox would emit black smoke. If the smoke was gray it usually was burning about the right amount of coal to keep the fire hot.
The guys at modelbuildings.org are still offering this FREE sample if you haven’t yet grabbed it.
The detailing is especially true to real life as they use “photo-realistic” images of actual buildings to replicate the weathering effects found in everyday life. This FREE sample even includes a choice of four signs for over the store frontage. You don’t need to sign up for anything to get the free sample (that’s unusual these days!), but I’m sure they would appreciate it if you purchased something from their website, or at least told your friends about their great site.
Download your FREE sample building here
Share this post with your friends.
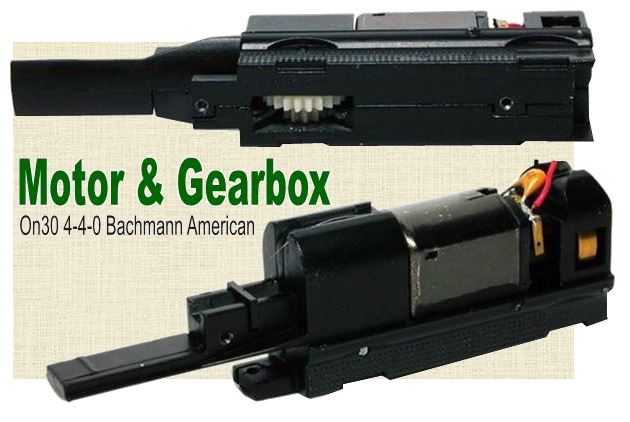
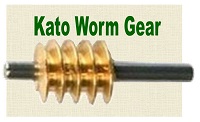
Electric motors need gears to reduce the speed of the motor and align it to gears mounted on the axles of the locomotive. To reduce the speed of the motor a small gear is mounted to the motor shaft and a large gear to the drive wheels. Because of wear, the smaller gear is usually brass, and the larger gear, plastic.
The drivers of a steam locomotive are usually large enough to allow a plastic gear large enough to make the speed reduction with a single set of gears. The gear is only on a single axle because, like the real locomotives, the side rods transmit the power to the other drivers.
 A model diesel locomotive has smaller wheels mounted in trucks at opposite ends of the unit. Therefore diesel models usually have motor with shafts out each end, leading to a set of several gears mounted in a tower above each truck.
Dirt, lint, and cat hair are bad for any gear set. Too much oil or grease on the gears attracts those contaminants to the axles, as well as the gear sets. Be sure any cleaning solution or lube is intended for use on plastic gears.
Add your comment.
Until the recent development of can motors, the electric motors in our locomotives had an open frame. In an open frame motor, all the internal parts are visible, the magnets, armature, and brushes.
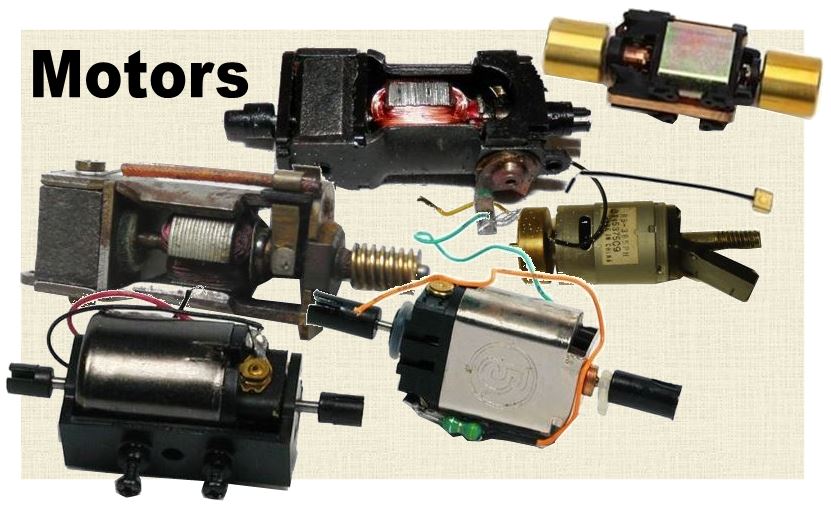
Bushes come in pairs one plus +, and one minus -, depending on the chosen polarity, and rub on the commutator to transmit current to the armature, making the motor turn. Brushes are made of a carbon substance, quite small, usually round, and held in place by a light spring wire or leaf. As they wear the face of the brush takes the shape of the commutator. This wear sometimes causes the carbon to eventually fill the tiny grooves on the commutator, and require cleaning.
Add your comment


