
Everything on model trains, model railroads, model railways, locomotives, model train layouts, scenery, wiring, DCC and more. Enjoy the world's best hobby... model railroading!
Roger asks readers:
“Greetings from the Adelaide Hills. South Australia. My club uses the NCE control units. Is it possible for someone to give us a round down on the different DCC Decoders. I know you get what you pay for, however we live in a real world and that means budget restrains.”

Aurélio asks readers for suggestions:
“I’m trying to refurbish a last 60’s Marklin train, a legacy from an uncle and that at its time, made my cousin’s and my youth quite happy. The layout suffered several “attacks” during all this years, as you can see from the attached photo. I will try to use the base and improve the layout and the details; let’s see if I’m able to do it. Suggestions appreciated.”
Steve asks:
“I can’t find any info on converting Red Ball locos. I have 2 C-Liners that need to be changed. Any suggestions please?”
David asks readers:
“I been trying to fine the kit to change HO Athearn engines from DC to DCC. Does any one knows will to fine the kits I need?”
Bill models OO gauge (similar to HO) and asks readers:
“I have a new system put up which runs very well, however now for some reason it’s starting to derail. Different types of locomotives run well for a certain amount of time, then they start derailing for no apparent reason. I am not a novice modeller, but I’m getting fed up with the continual derailment. Sometimes I can find a small problem which I put right, sometimes I find nothing, and I’m STILL getting problems. I have checked the back to back on all the locos and found that some were out and some were ok, which I soon put right with the back to back gauge. I’m thinking of giving the whole thing the heave-ho so if someone could come up with some suggestions, I would be much obliged. Thanks in advance.”
Simon asks readers:
“I have mountain and I’m trying to make a realistic fall theme. I have grand central jims pine trees and orange birch trees, but I don’t know how to make it a realistic fall scene with some bare spots at the top.”
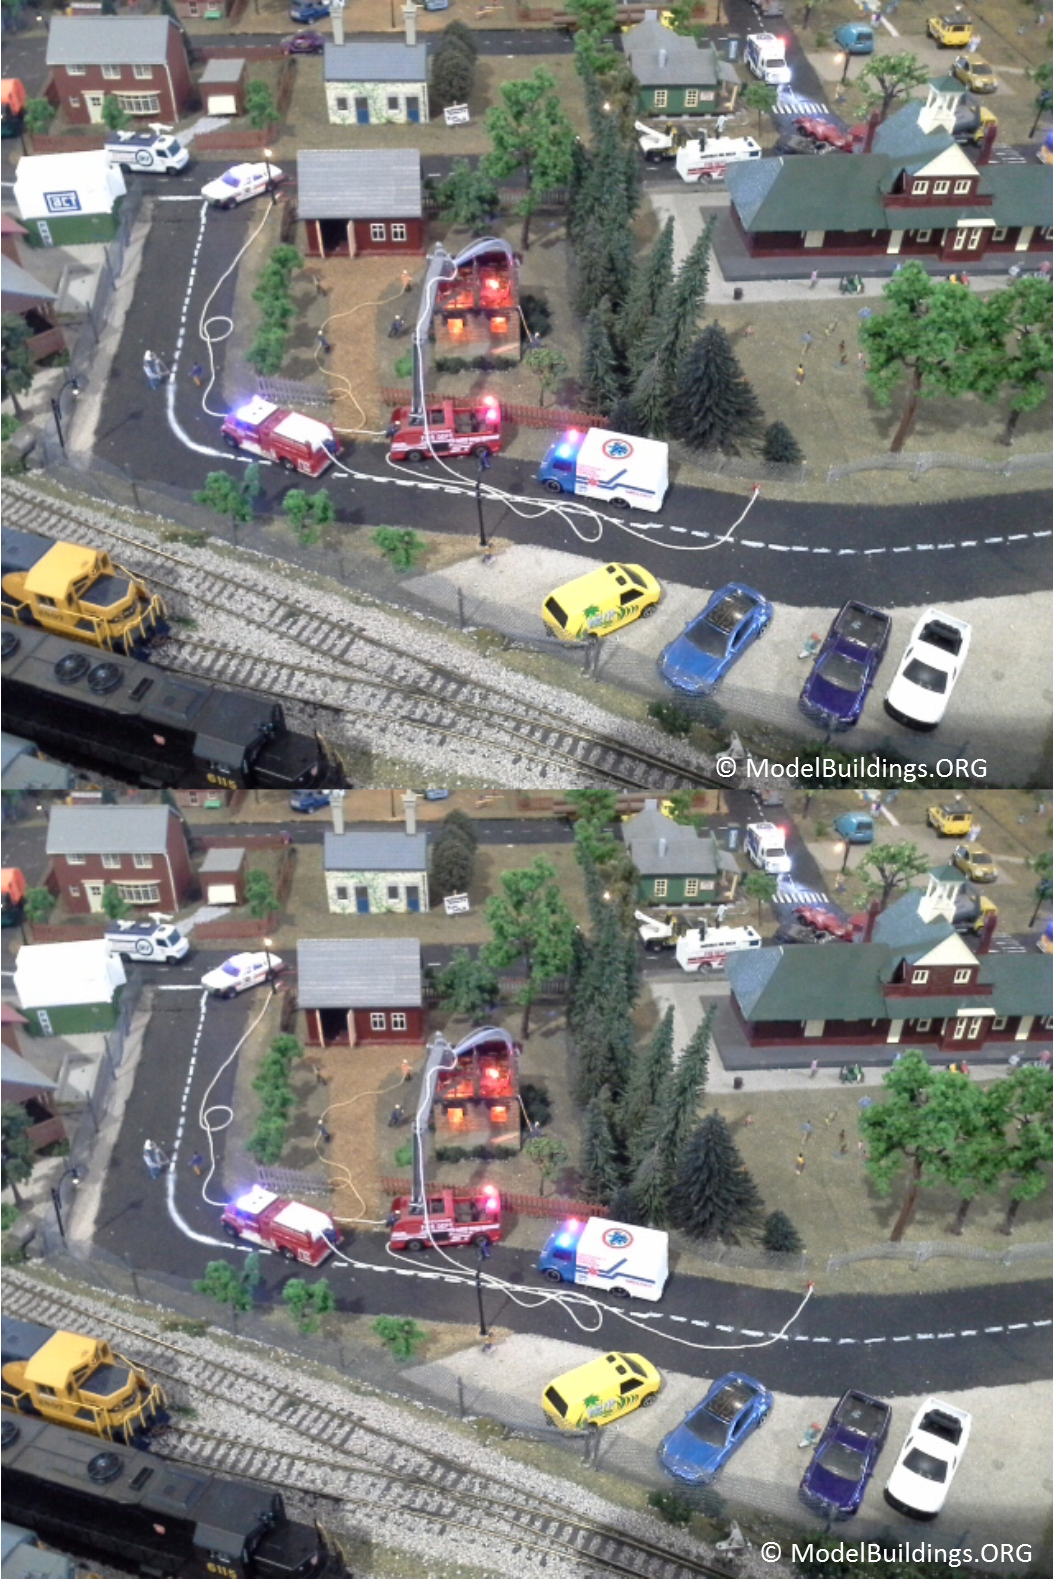
The response to our first SPOT THE DIFFERENCE photo a couple of weeks ago was amazing. In the reader poll a whopping 84% said they would like to see more spot the difference photos on the blog. So, here is a second photo which has 7 differences. Can you spot them? Click the COMMENTS link to list your solutions.
Alister from New Zealand asks:
“What are the pros and cons in using Automatic Transmission fluid for cleaning track?”
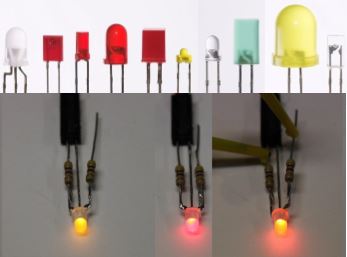
LEDs have numerous applications in model railroading including:
• Locomotive headlights and internal passenger car lighting
• Warning lights for the rear end of trains (cabooses, passenger cars etc)
• Structure illumination
• Signage illumination
• Railroad signals
• Panel indicators
LEDs also have many advantages over traditional incandescent lights including:
• The cost: It is hard to put an exact figure on it, but LEDs typically are around 20 to 40% of the cost of traditional incandescent light bulbs (depending on the project).
• Long life: Again depending on the usage, LEDs will typically last tens of thousands of hours. They will well and truly outlast traditional incandescent bulbs which almost eliminates the need to replace bulbs.
• Heat: LED bulbs give off virtually no heat so are a lot safer inside plastic structures or enclosures.
• Current: LEDs will typically draw just 10-30 milliamperes (0.010 – 0.030 amperes), which is much less than an incandescent bulb, so on larger projects you might get by with a smaller power supply.
• Color and consistency: You might have noticed how the color of incandescent bulbs becomes whiter when the brilliance increases. This is because they predominantly glow at red wavelengths. When the brightness increases so does their heat output. This also reduces the life expectancy of incandescent bulbs. By comparison Red, blue, yellow and green LEDs are monochrome so their color remains constant regardless of their brilliance.
Oscar asks readers:
“I have a Loco Bachmann H0 GP30 Diesel DCC with a Digitrax DCS 50 Zephir. My question is – the lights, forward and reverse, are in a low intensity, how can I do to put both in high intensity ? Thanks.”
Joseph is into O scale and asks:
“I’m just starting out. I bought a proto 3 diesel and a tiu so everything I’ve read in the tiu manual says proto 2. Is this generic for proto 2 and proto3?”
Alex asks readers:
“We just moved into a smaller house and I did a lot of damage to my old HO layout deconstructing and moving it. It was harder than I thought it would be. Anyway, I decided to sell off the stuff to friend and start again in N scale because I don’t have as much space. This time I’ll build it in modules, but I’m unsure what’s the best way to join them for smooth rail joins, good connections, and easy dismantling if I do another house move?”
Kevin seeks advice from readers:
“Does anyone have any tips or suggestions for soldering wires on to my rails as power feeds? I am a bit heavy nanded with solder and never seem to get it perfect.”
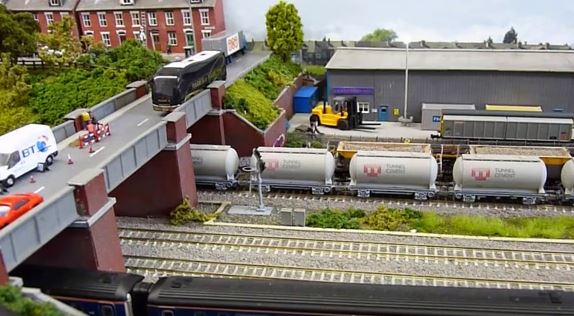
Damien from the UK sent in this photo he took at the Sileby Model Railway Exhibition. It looks like British Telecom (BT) are do some work on the phone lines – great detail.
Ed asks readers for advice:
“I recently read – Bring your layout to life by adding people and animals. Put the people in period dress. I agree whole heartedly, but I’ve encountered a problem. I’m currently putting together a short point to point N scale 4’x8” depiction of the area outside Yankee Stadium in the early 30’s. I’ll be running a trolley and have already got the buses and cars and trucks for the scene, but trying to locate 40-50 “period dressed” people has been a challenge. Men wore suit sand hats and ladies wore dresses and hats to a ball game in the period and I’ve yet to locate anything similar. Any ideas?”
Daniel wonders if readers can solve his mystery:
“I have a mystery (for me). Have about 17 feet of what appears to be 027. Three rail in stainless. However, the pins have one end that fits the 027 and the other end fits O Gauge. Doesn’t appear to be handmade. What do I have? Thanks.”
Ethan asks readers for advice:
“Hey guys. I have been thinking about starting up my own model railroad in either HO or N scale and including a switching yard and a few sidings. I got to looking into the wiring for switch machines and decided that I want to use toggle switches with indicating lights. However, I noticed that most toggle switches will constantly power the switch to whichever line it is switched to. Will this not burn up the motor by constantly feeding it power trying to get it to move even after it has switched the turn out?”


